p
AM
aerial
AUX In
RIGHT LEFT
RL
speaker
(right)
speaker
(left)
A
B
C
AC power cord
FM wire antenna
AM loop antenna
3
FM
aerial
75
VOLTA GE
SELECTOR
110V-
127V
220V-
240V
VO LTAGE
SELECTOR
220V-
240V
VIDEO OUT
D
VIDEO
IN
Television
L
R
AUDIO
OUT
E
110V-
127V
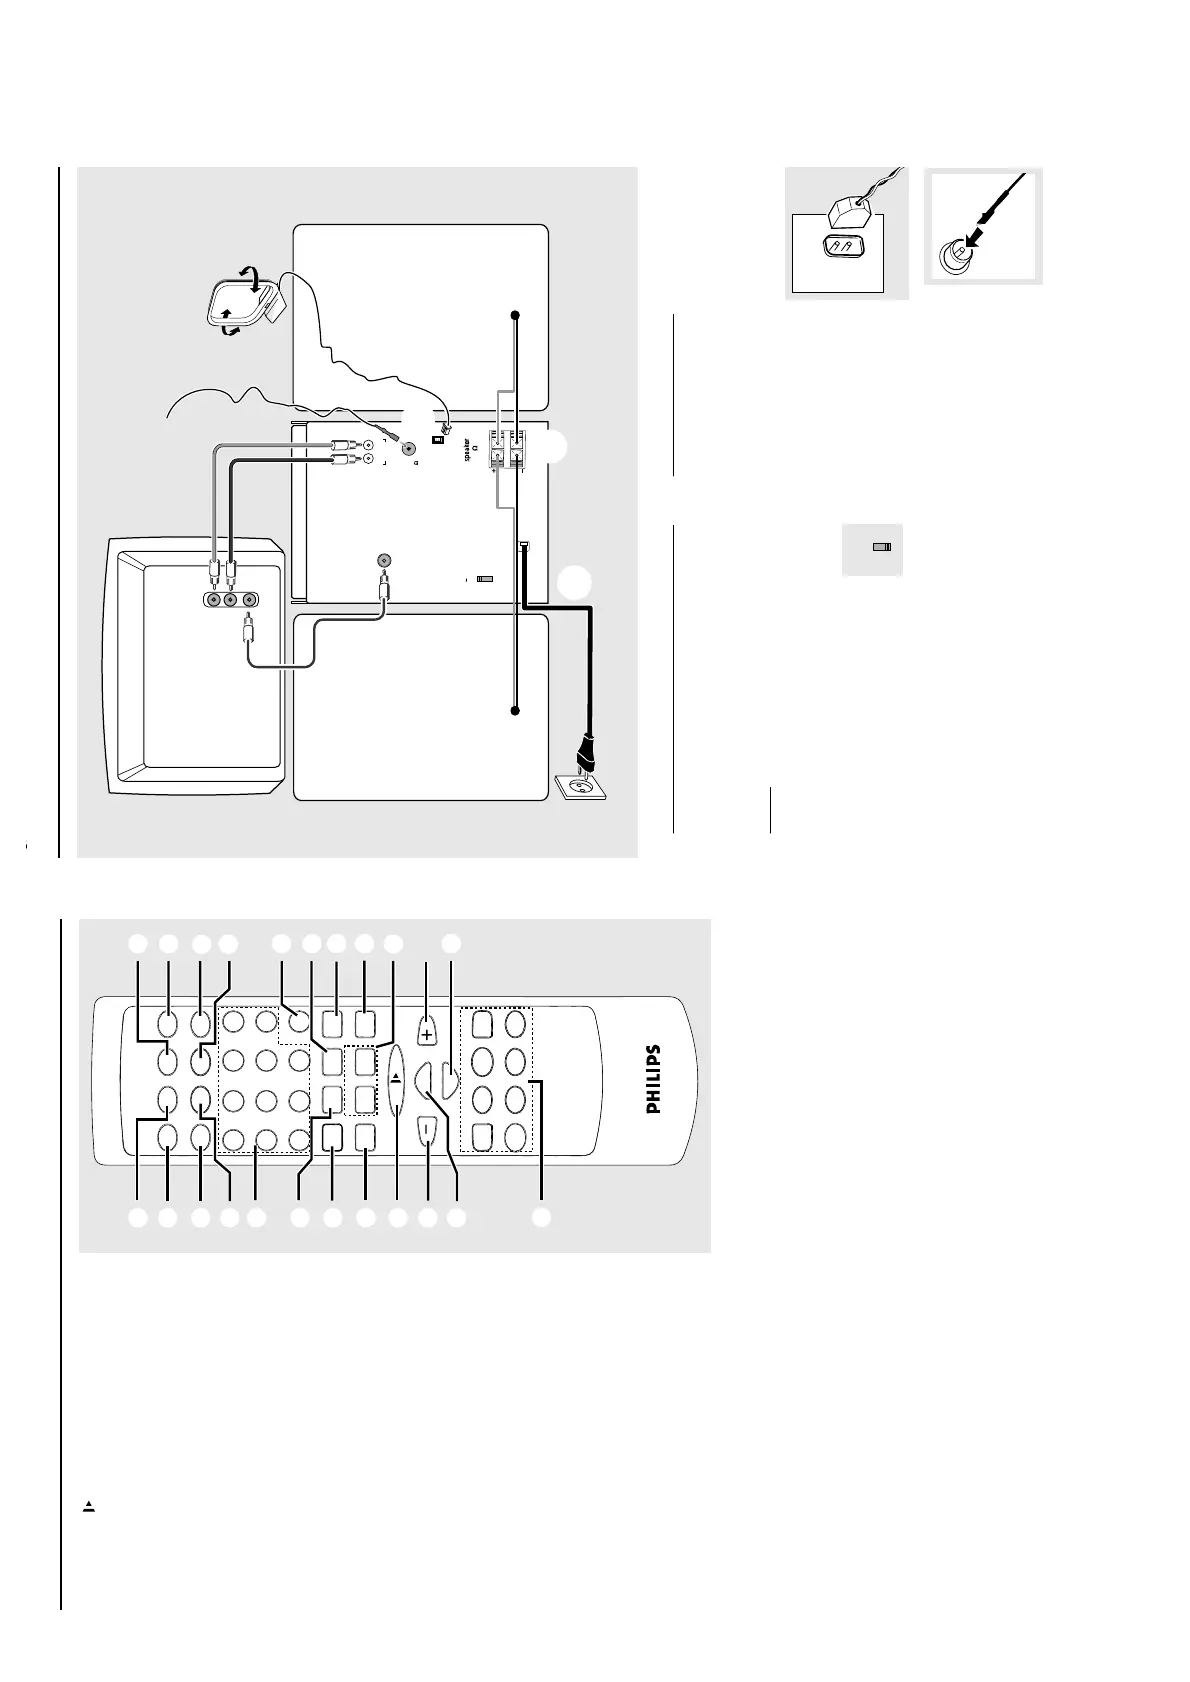
Rear connections
The type plate is located at the rear of the
system.
A Power
Bef ore connecting the AC power cord to the
wall outlet, ensure that the following are done;
– If your system is equipped with a
Voltage Selector, set the VOLTAGE
SELECTOR to the local power line
voltage.
– All other connections have been made.
WARNING!
– For optimal performance, use only the
original power cable.
– Never make or change connections with
the power switched on.
B Antennas Connection
Connect the supplied AM loop antenna and FM
antenna to the respective terminals. Adjust the
position of the antenna for optimal reception.
AMAntenna
● Position the antenna as far
as possible from a TV, VCR
or other radiation source .
FM Antenna
● For better FM stereo
reception, connect an
outdoor FM antenna to the
FM AERIAL terminal.
VO LTAGE
SELECTOR
110V-
127V
220V-
240V
AM
aerial
3 - 2
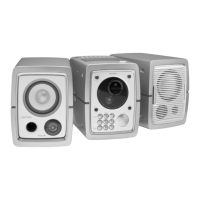
CS xx xxx
CONNECTION AND CONTROLS
1
2
3
4
5
6
7
8
9
0
+10
STANDBY NTSC/PAL
OSD
SOURCE
SLEEP BAND TIMER MUTE
REPEAT SHUFFLE DBB DSC
REW PREV NEXT FWD
PBC
RETURN A-B SLOW
VOCAL
ECHO
KEY VIEW
GO TO
RESUME
PLAY/PAUSE
STOP
VOL
VOL
£
™
≤
∞
4
#
*
1
(
)
¡
º
⁄
2
ª
•
!
0
≤
3
≥
#
§
ÅÉ
áà
Ç
ëí
2
∞ RESUME
– to continue playback again from where you have
stopped (for VCD with PBC switched off).
§ VCD operations (on remote control only)
PBC
– to switch on or off the playback control mode
(for VCD version 2.0 only).
RETURN
– to retur n to the previous menu level during
playback (for VCD with PBC switched on).
A - B
– to playback a certain scene or passage of a
CD/VCD repeatedly.
SLOW
– to watch the VCD at a slower speed.
VIEW
– to scan through a VCD or a specific tr ack (for
VCD with PBC switched off)
KEY
– to display and set the key tone level
.
ECHO
– to adjust the echo level for karaoke after
inserted the microphone.
VOCAL
– to fade out the original vocal from a Karaoke
VCD or to switch between mono or stereo
mode during audio disc playback.
≥ PREV í /ë NEXT
for CD/VCD/MP3-CD…to select a desired
track.
for Tuner ............. to select a preset radio station.
for Clock ............ to set the hour s and minutes.
• GOTO
– to playback at any chosen time on the CD/VCD.
ª TIMER
– to activate the timer/clock function.
º MUTE
– to enable or disable the sound output.
⁄ OSD
– to switch on or off the On Screen Display on
the TV.
Controls
Notes for remote control:
– While the system is in active mode ,
select the source you wish to control by
pressing SOURCE key on the remote
control.
–
Then select the desired function (for
example
É
,
í
,
ë
).
Preparations
AM
aerial
AUX In
RIGHT LEFT
RL
speaker
(right)
speaker
(left)
A
B
C
AC power cord
FM wire antenna
AM loop antenna
3
FM
aerial
75
VOLTA GE
SELECTOR
110V-
127V
220V-
240V
VO LTAGE
SELECTOR
220V-
240V
VIDEO OUT
D
VIDEO
IN
Television
L
R
AUDIO
OUT
E
110V-
127V
Rear connections
The type plate is located at the rear of the
system.
A Power
Bef ore connecting the AC power cord to the
wall outlet, ensure that the following are done;
– If your system is equipped with a
Voltage Selector, set the VOLTAGE
SELECTOR to the local power line
voltage.
– All other connections have been made.
WARNING!
– For optimal performance, use only the
original power cable.
– Never make or change connections with
the power switched on.
B Antennas Connection
Connect the supplied AM loop antenna and FM
antenna to the respective terminals. Adjust the
position of the antenna for optimal reception.
AMAntenna
● Position the antenna as far
as possible from a TV, VCR
or other radiation source .
FM Antenna
● For better FM stereo
reception, connect an
outdoor FM antenna to the
FM AERIAL terminal.
VO LTAGE
SELECTOR
110V-
127V
220V-
240V
AM
aerial