Do you have a question about the Philips S7310 and is the answer not in the manual?
Register your product and find support at www.philips.com/welcome.
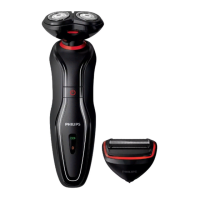
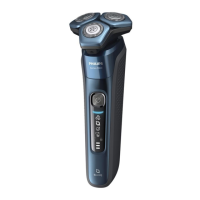
Part 1: The attachment for trimming sideburns and moustache.
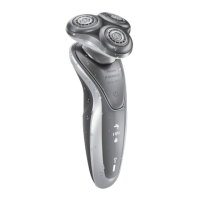
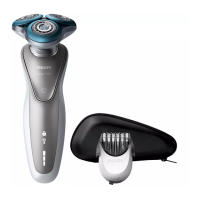
Part 2: The main shaver head assembly.
Part 3: The ergonomic body of the shaver.
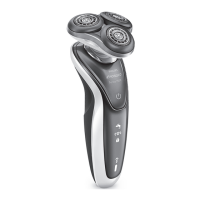
Part 4: Connection point for the charging plug.
Part 5: LED indicating the current battery charge level.
Part 6: Symbol indicating the need to unplug for operation.
Part 7: Icon indicating the travel lock feature is engaged.
Part 8: Indicator for shaving head replacement.
Part 9: Indicator signaling the need for cleaning.
Part 10: The power adapter for charging the shaver.
Part 11: The plug that connects the adapter to the shaver.
Part 12: The accessory pouch for storing the shaver.
Critical safety warning to prevent electrical hazards.
Do not modify the adapter plug due to the internal transformer.
Safety guidelines for use by children or persons with reduced capabilities.
Warnings regarding water temperature, damaged parts, and cleaning agents.
Do not use water above 80°C for rinsing the shaver.
Avoid using damaged appliance parts; replace with original ones.
Prohibits use of compressed air, scouring pads, or harsh chemicals.
Water may leak from the socket; this is normal and safe.
Shaver is waterproof and meets safety regulations for wet use.
Shaver is waterproof and meets safety regulations for wet use.
Adheres to standards for electromagnetic field exposure.
Adapter handles voltages from 100 to 240 volts.
Explains charging process, quick charge, and indicator lights.
A full charge takes approximately 1 hour.
Fast and slow flashing indicates charge level during quick charge.
The indicator flashes white slowly while charging.
Details display behavior when the battery is full.
Display turns off after 30 minutes when the battery is fully charged.
The symbol flashes white to prompt disconnection from the mains.
The battery charge indicator lights up white continuously when fully charged.
The battery charge indicator flashes orange when the battery is nearly empty.
The cleaning reminder flashes when the shaver is switched off.
Press and hold the on/off button for 3 seconds to activate the travel lock.
The travel lock symbol lights up white continuously when activated.
Press the on/off button for 3 seconds to deactivate the travel lock.
Replace shaving heads every two years for optimal performance.
The indicator lights up to signal when shaving heads need replacement.
Hold the on/off button for 7 seconds to reset the shaver after replacement.
The 'unplug for use' symbol flashes white to remind disconnection from mains.
A full charge takes 1 hour, providing up to 50 minutes of shaving.
Charge the shaver before first use and when the battery is low.
Ensure the shaver is switched off before connecting the charger.
Insert the small plug into the shaver and the adapter into the wall socket.
Basic instructions for operating the shaver.
Skin and beard may need time to adjust to the new shaving system.
Shave regularly (3 times/week) for 3 weeks to help skin adapt.
Press the on/off button once to start the shaver.
Move the shaver heads in circular motions over the skin.
Press the on/off button to stop; the display shows battery status.
How to use the shaver with water, foam, or gel.
Apply water, then shaving foam or gel to the face.
Rinse the shaving unit under the tap to ensure smooth movement.
Switch on the shaver and use circular movements on the skin.
Rinse the shaver under the tap periodically to maintain smooth gliding.
Dry your face and clean the shaver thoroughly after use.
Steps to detach the shaving unit and attach the trimmer.
Pull the shaving unit straight off the handle; do not twist.
Insert the trimmer lug and press down to click it into place.
Instructions for operating the trimmer.
Press the on/off button to activate the trimmer.
Begin trimming sideburns and moustache.
Press the on/off button to turn the trimmer off.
Pull the trimmer attachment straight off the shaver.
Insert the shaving unit into the top slot and press down to attach.
Step-by-step guide for rinsing the shaver under running water.
Clean the shaver after every shave for optimal performance.
Be careful with hot water; check temperature to prevent burns.
Do not dry shaving unit with towels; this can damage shaving heads.
Switch off the shaver and rinse the shaving unit under a warm tap.
Detach the shaving head holder from the bottom of the shaving unit.
Rinse the shaving head holder under a warm tap for 30 seconds.
Shake off excess water and allow the shaving head holder to dry.
Reattach the shaving head holder to the bottom part of the shaving unit.
Detailed instructions for a deep clean of the shaver heads.
Pull the shaving head holder off the bottom part of the shaving unit.
Turn the retaining rings anticlockwise and remove them.
Detach shaving heads (cutter and guard) from the holder.
Do not mix cutters and guards; they are matched sets.
Clean the cutters and guards under the tap.
After cleaning, place the cutter back into its guard.
Place shaving heads back into the holder, aligning notches.
Place retaining rings back and turn clockwise to secure.
Hold the holder while reinserting heads/rings to prevent damage.
Reattach the shaving head holder to the bottom part of the shaving unit.
How to clean the trimmer attachment.
Steps to clean the trimmer attachment.
Lubricate trimmer teeth with oil every six months for best performance.
Store the shaver in the supplied pouch.
Allow the shaver to dry before placing it in the pouch.
Guidance on how to replace the shaving heads.
Replace shaving heads every two years for optimal shaving.
Shaving unit symbol illuminates when replacement is needed.
The symbol lights up continuously when the shaver is turned off.
Pull the shaving head holder from the bottom of the shaving unit.
Turn retaining rings anticlockwise and remove them.
Remove and discard the old shaving heads from the holder.
Place new shaving heads into the holder, ensuring correct alignment.
Place retaining rings back and turn clockwise to secure.
Hold the holder while reinserting heads and rings to prevent damage.
Reattach the shaving head holder to the bottom part of the shaving unit.
Press and hold the on/off button for approximately 7 seconds to reset.
Purchase parts from www.shop.philips.com/service or your local dealer.
Includes adapter, shaving heads, and cleaning spray.
Replace shaving heads every two years using original SH70 Philips heads.
Dispose of the appliance at an official collection point, not in household waste.
Remove battery only when discarding; ensure it's fully discharged. Battery strips are sharp.
Remove the back panel using a screwdriver after removing the screw.
Bend hooks aside to remove the power unit.
Break snap hooks to remove the front panel of the power unit.
Take out the battery holder and cut the battery tags with pliers.
Visit www.philips.com/support or the guarantee leaflet for help.
Shaving heads are subject to wear and tear and are not covered by the international guarantee.
Problem: Shaver not shaving well. Cause: Damaged or worn shaving heads.
Replace the shaving heads as per the replacement guide.
Clean the shaving heads using the thorough cleaning method.
Problem: Shaver does not work when the button is pressed.
Shaver cannot operate if connected to mains; must be used cordlessly.
Disconnect the shaver and press the on/off button.
The rechargeable battery is depleted.
Recharge the battery as described in the charging section.
Problem: Shaver not working. Cause: Travel lock is activated.
Press the on/off button for 3 seconds to deactivate the travel lock.
Problem: Shaver not working. Cause: Shaving unit soiled or damaged.
Clean or replace shaving heads as per cleaning and replacement guides.
Problem: Water leaking from the bottom.
Leakage is normal during cleaning; electronics are sealed.
Problem: Reminder active after replacing heads.
Reset the shaver by pressing the on/off button for approx. 7 seconds.
Problem: Shaving head symbol suddenly appears.
The symbol is a replacement reminder; replace shaving heads.
| Brand | Philips |
|---|---|
| Model | S7310 |
| Number of Shaving Heads | 3 |
| Shaver system | Rotary |
| SkinComfort | Yes |
| Wet & Dry Use | Yes |
| Cleaning | Yes |
| Display | Yes |
| Battery level indicator | Yes |
| Cleaning indicator | Yes |
| Replace shaving heads indicator | Yes |
| Travel lock indicator | Yes |
| Travel Lock | Yes |
| Charging Time | 1 hour |
| Quick charge | Yes |
| Battery Type | Lithium-ion |
| Automatic voltage | 100-240 V |
| Type | Electric Shaver |
| Shaver Series | Shaver Series 7000 |
| Contouring | Contour detect technology |
| Run time | 50 minutes |
| Usage Time | 50 minutes |
| Battery Life | 50 min |