Service Modes, Error Codes, and Fault Finding
EN 16 TPM9.1L LA5.
2012-Mar-30
back to
div. table
How to Exit the Factory mode
Use one of the following methods:
• Select EXIT_FACTORY from the menu and press the “OK”
button.
Note: When the TV is switched “off” by a power interrupt, or
normal switch to “stand-by” while in the factory mode, the TV
will show up in “normal operation mode” as soon as the power
is supplied again. The error buffer will not be cleared.
5.2.5 Customer Service Mode (CSM)
Purpose
The Customer Service Mode shows error codes and
information on the TV’s operation settings.The call centre can
instruct the customer (by telephone) to enter CSM in order to
identify the status of the set.This helps the call centre to
diagnose problems and failures in the TV set before making a
service call.
The CSM is a read-only mode; therefore, modifications are not
possible in this mode.
Specifications
• Ignore “Service unfriendly modes”.
• Line number for every
line (to make CSM language independent).
• Set the screen mode to full
screen (all contents on screen is visible).
• After leaving the Customer Service Mode, the original
settings are restored.
• Possibility to use “CH+” or “CH-” for channel surfing, or
enter the specific channel number on the RC.
How to Activate CSM
To activate CSM, press the following key sequence on a
standard remote control transmitter: “123654” (do not allow the
display to time out between entries while keying the sequence).
After entering the Customer Service Mode, the following items
are displayed.
Note: Activation of the CSM is only possible if there is no (user)
menu on the screen!
Contents of CSM
• 1.1 Set Type This information is very helpful for a
helpdesk/workshop as reference for further diagnosis. In
this way, it is not necessary for the customer to look at the
rear of the TV-set. Note that if an NVM is replaced or is
initialized after corruption, this set type has to be re-written
to NVM.
• 1.2 Production code Displays the production
code (the serial number) of the TV. Note that if an NVM is
replaced or is initialized after corruption, this production
code has to be re-written to NVM.
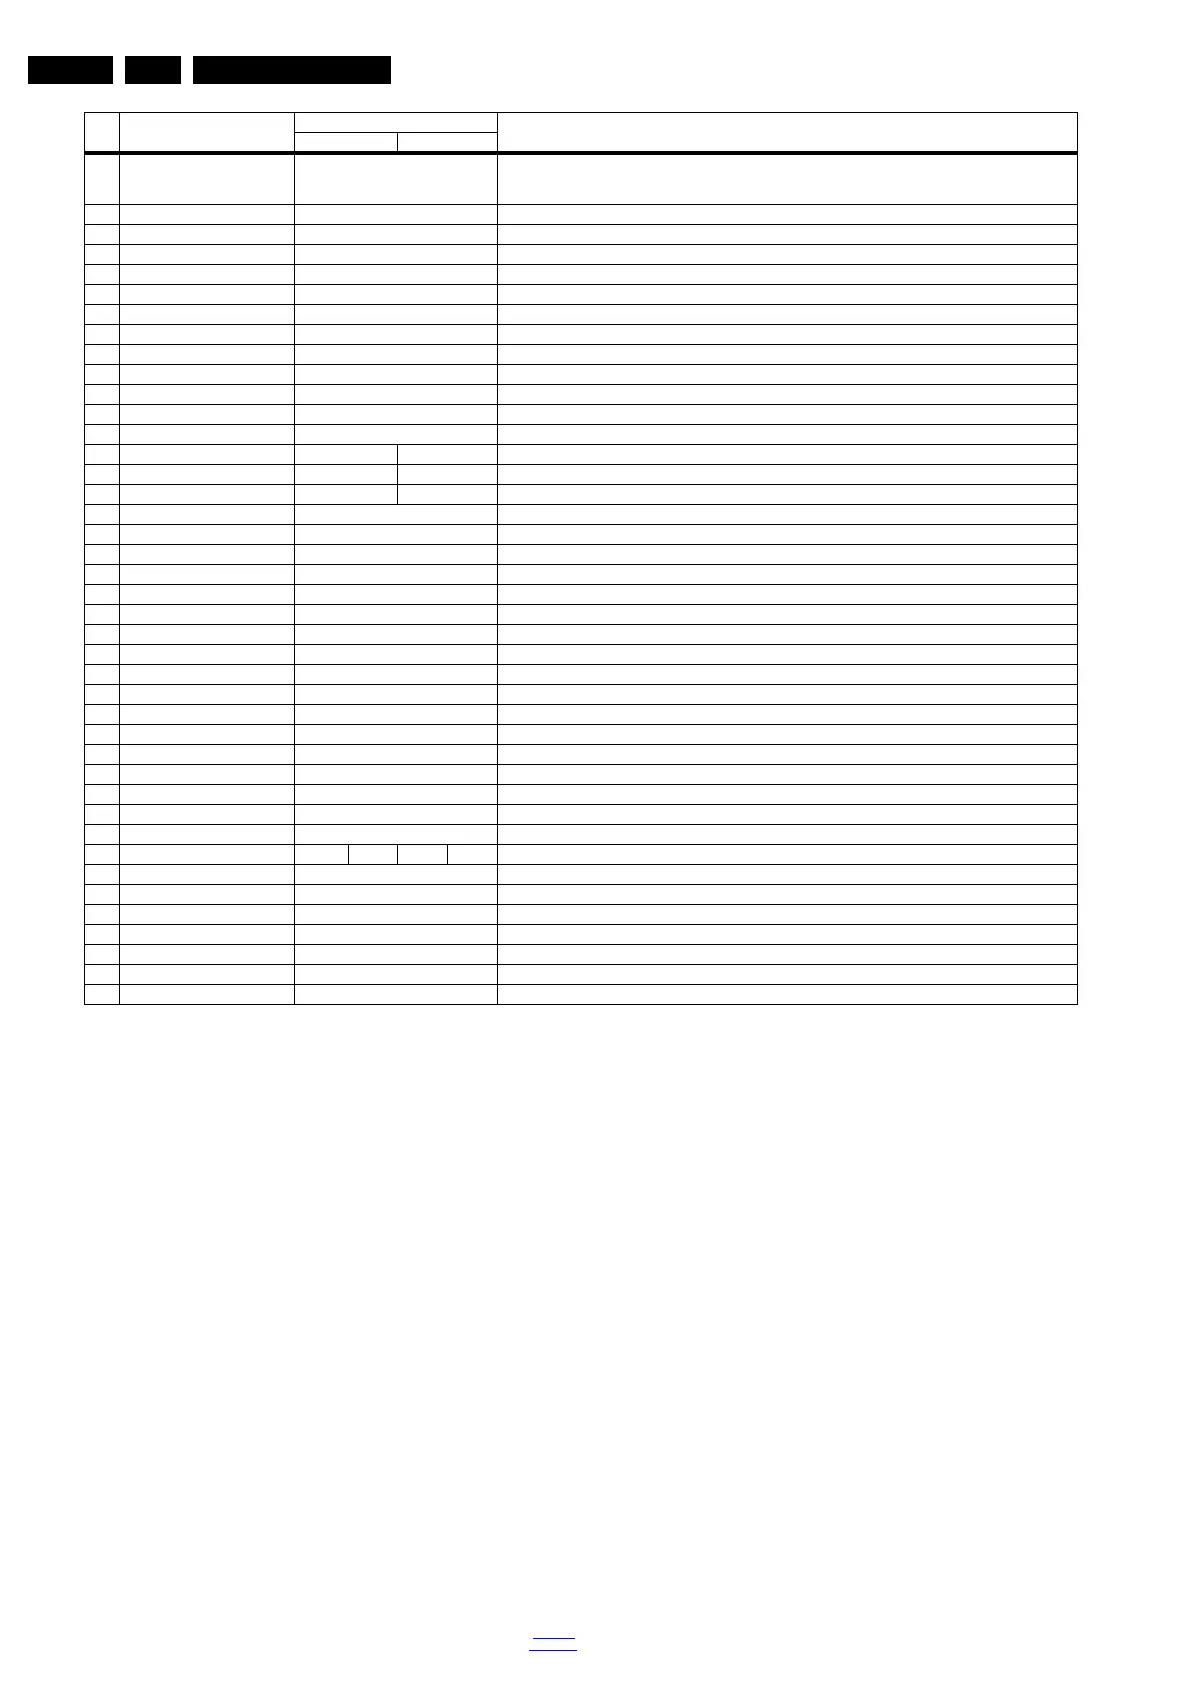
9 NVM COPY USB to TV Press OK Use this to store the NVM data from the USB memory stick to the TV. The TV will save the two files which
were created in item 8 to the NVM of the set. Use these options when replacing a SSB. When “USB to TV
Success” is displayed remove the power and restart the TV
10 RESET_PBS_PWD Press OK Use this to reset the Child Lock
11 DIM_LIB_RESET Press OK Reset the Dimming
12 SRC_METER RESET Press OK Reset the Source meter
13 CIPLUS_QUERY Press OK Shows the Validity of the CI+ key and the supplier information
14 CIPLUS UPDATE Press OK Used to enter a new CI+ code into the NVM. This can only be used when no CI+ code exists in the NVM
15 EDID UPDATE Press OK Used to enter a new EDID codes into the NVM
16 Test Pattern Press OK With the “left” and “right” keys of the remote control various test patterns can be chosen
17 VIRGIN_MODE Off/On Use this to return the set to virgin mode. Depends whether the set has been used already.
18 E-Fuse On E-fuse mode
18 ORT_MODE Off ORT mode
20 VGA_UART_SWITCH Off When switched “on” the VGA port can be used for UART logging.
21 AGEING MODE Off Use this for ageing a new LCD panel
22 CLR_TEMP_R 128 Red colour temperature setting
23 CLR_TEMP_G 128 Green colour temperature setting
24 CLR_TEMP_B 128 Red colour temperature setting
25 AUTO_COLOR Press OK PC: any pattern that has black and white, YPbPr: SMPTE bar (colour bar), any timing.
26 ADC_GAIN_R 164 Red ADC gain
27 ADC_GAIN_G 164 Green ADC gain
28 ADC_GAIN_B 164 Blue ADC gain
29 ADC_OFFSET_R 164 Red ADC offset
30 ADC_OFFSET_G 164 Green ADC offset
31 ADC_OFFSET_B 164 Blue ADC offset
32 YPBPR_PHASE InValid Not available for this chassis
33 AUD_LIMITER_MODE 2 Three modes, 0: off, 1: adaptive mode, 2: fixed mode
34 AUD_THRESHOLD_BYTE1 32 Limit threshold
35 AUD_THRESHOLD_BYTE2 32 Limit threshold
36 AUD_THRESHOLD_BYTE3 5 Limit threshold
37 AUD_GAIN_LINEIN 3 Line-in audio gain
38 AUD_GAIN_HDMI 2 HDMI audio gain
39 AUD_GAIN_ATV 3 Analogue TV audio gain
40 AUD_GAIN_DTV 2 Digital TV audio gain
41 AUD_GAIN_USB 2 USB audio gain
42 AQ_INDEX 0 1 2 3 Audio Quality index
43 Audio Test Mode Off Used for audio testing during production
44 Audio Channel Type 2.0 Defines the installed speaker system
45 DUMP PQ FROM TV Press OK Saves the picture quality data to a file “pq.bin” to the root of a FAT formatted USB memory stick
46 LOAD PQ to TV Press OK Loads the picture quality data from a file “pq.bin” in to the TV
47 DUMP AQ FROM TV Press OK Saves the audio quality data to a file “AQ.bin” to the root of a FAT formatted USB memory stick
48 LOAD AQ to TV Press OK Loads the audio quality data from a file “AQ.bin” in to the TV
49 EXIT_FACTORY Press OK Exits the Factory mode
Item Item value
Default value
Description32" 42"