Do you have a question about the Pioneer PL-470 and is the answer not in the manual?
Includes thank you note, reading instructions, and plug/outlet variations.
Critical warnings about moisture, shock hazards, and setting the line voltage selector.
Guidelines for operation, location, ventilation, heat, power, cord protection, polarization, and cleaning.
Precautions regarding power lines, outdoor antenna grounding, and electrical shock.
Details on auto-return, DC servo motor, S/N ratio, flutter, and cartridge replacement ease.
Advice on installation location, temperature, humidity, and proximity to other equipment.
Recommendations for record cleaning and avoiding static electricity.
Instructions for replacing the stylus and cartridge, emphasizing genuine parts.
Instruction to confirm all supplied accessories are present before operating the turntable.
Step-by-step guide for removing clampers, installing platter and mat, and securing the tone arm/stylus.
Detailed instructions for connecting the ground lead, output cords, and power cord to an amplifier.
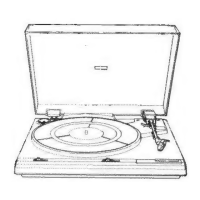
Identification and brief use of parts like EP adaptor, dust cover, platter, and tone arm.
Explanation of the SPEED Selector, STOP switch, and ARM ELEVATION switch functions.
Step-by-step guide to playing a record, including setting speed and tone arm placement.
How to stop playback, including automatic tone arm return after the last track.
Instructions for temporarily lifting and lowering the tone arm to pause and resume playback.
Procedures for cleaning the stylus with a brush or cleaner, and replacing the stylus holder.
Solutions for platter not rotating, no sound, noise, scratch sounds, and distorted audio.
Remedies for sound jumps, distortion due to warped records, and dirty styluses.
Troubleshooting hum noise from speakers and abnormal sound tempo issues like speed variations.
Details on motor type, drive system, platter, tone arm, supplied cartridge, output, and stylus pressure.
Specifications for power supply, consumption, external dimensions, net weight, and supplied accessories.
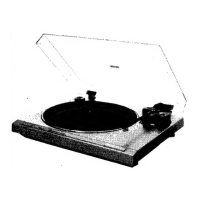
The Pioneer PL-470 is a stereo turntable designed for playing records. It features an auto-return mechanism, providing convenience and protecting your records and stylus. The turntable is equipped with a high-performance DC servo motor and an SH rotor, contributing to its excellent audio specifications.
The PL-470 is a belt-drive turntable that supports two speeds: 33-1/3 rpm and 45 rpm, allowing it to play both LPs and singles. It comes with an integrated straight pipe tone arm and a PC-295T MM type cartridge. The turntable offers auto-return and auto-cut functions, meaning the tone arm will automatically return to its rest position and the platter will stop rotating after the last track has been played. It also includes an arm elevation feature for manual play, temporarily stopping playback, or changing tracks.