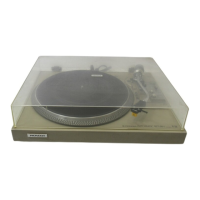
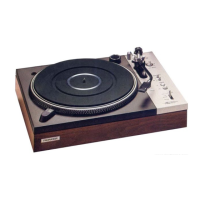
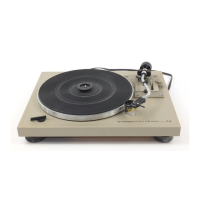
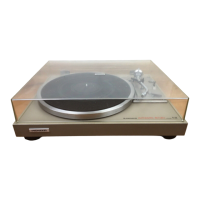
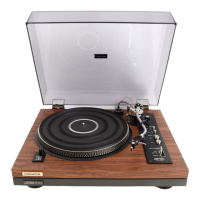
The Pioneer PL-518 is a direct-drive turntable designed for playing vinyl records. It features a static-balance, S-shaped pipe tonearm and an auto-return mechanism, which automatically returns the tonearm to its rest and turns off the turntable's power after a record has finished playing. The turntable is equipped with an anti-skating force control and a cueing device for precise tonearm operation. A detachable dust cover helps protect the unit, while insulator feet minimize vibrations. A strobe light is integrated for accurate speed adjustment, and the unit is housed in a 40mm-thick particle board cabinet.
Function Description
The primary function of the PL-518 is to reproduce audio from vinyl records. It operates at two speeds: 33-1/3 rpm and 45 rpm, selectable via a speed select switch. Fine adjustment of the platter speed is possible using a dedicated knob, which works in conjunction with the strobe light and calibration dots on the platter edge to ensure accurate playback speed.
The tonearm is designed to hold a cartridge weighing between 4g and 10g. Cartridge attachment involves carefully connecting lead wires to the cartridge's terminal pins, ensuring correct polarity, and then securing the cartridge to the headshell with screws, nuts, and washers. The headshell is then inserted onto the tonearm and locked into place.
Before playing a record, the tonearm requires several adjustments to ensure optimal performance and prevent damage to the stylus and record. These include:
- Level Balance Adjustment: The counterweight at the rear of the tonearm is adjusted to achieve a level balance, ensuring the tonearm is parallel to the record surface and does not tilt. This is crucial for proper tracking.
- Tracking Force Adjustment: After balancing, the counterweight is used to set the correct tracking force, which is indicated by a scale ring on the counterweight shaft. This force ensures the stylus maintains proper contact with the record grooves.
- Anti-Skating Adjustment: The anti-skating knob is adjusted to counteract the inward force that pulls the tonearm towards the center of the record, ensuring even pressure on both groove walls and preventing premature stylus wear or distorted sound.
The turntable incorporates an ARM-ELEVATION lever, which controls the ascent and descent of the tonearm, allowing for gentle placement and lifting of the stylus from the record. An arm clamp secures the tonearm to its rest when not in use, protecting the stylus.
Usage Features
Using the PL-518 involves a sequence of steps:
- Record Placement: Place a record on the platter.
- Speed Selection: Set the SPEED select switch to match the record's speed (33-1/3 or 45 rpm).
- Tonearm Preparation: Set the ARM-ELEVATION lever to the UP position, remove the stylus cover, and release the arm clamp.
- Stylus Positioning: Hold the headshell by the finger lift and carefully move the stylus over the desired track on the record. The platter will begin to rotate automatically.
- Speed Adjustment: Observe the strobe calibration dots on the platter edge. If they appear to move, use the SPEED ADJ. knob to finely adjust the platter speed until the dots appear stationary.
- Playback Initiation: Set the ARM-ELEVATION lever to the DOWN position. The stylus will descend slowly onto the record, and playback will begin.
- Audio Adjustment: Adjust the volume and tone controls on the amplifier to desired levels.
- Auto-Return: After the record finishes playing, the auto-return mechanism will activate, returning the tonearm to its rest, stopping the platter, and turning off the turntable's power.
- Securing the Tonearm: Secure the tonearm with the clamp and reattach the stylus cover for protection.
Installation Precautions:
To ensure optimal performance and longevity, the PL-518 should be installed in a suitable environment, avoiding:
- Direct sunlight, high temperatures, or high humidity, which can cause rust or interfere with insulation.
- Unstable surfaces, as this can interfere with normal operation and cause the stylus to jump.
- Dirty or dusty locations, which can lead to scratches.
- Heavy vibrations, such as those from speakers, which can cause howling.
- Proximity to the amplifier's power transformer, which can cause hum.
- Locations where alcohol, insecticides, or flammable substances are frequently used, as these can corrode the dust cover or cabinet.
Maintenance Features
The PL-518 is designed for relatively low maintenance:
- Cabinet Cleaning: The dust cover and cabinet can be cleaned with a polishing cloth or soft cloth. Avoid using furniture wax, benzine, insecticides, or other flammable materials, as these can corrode the turntable's exterior.
- Stylus Cleaning: The stylus tip should be cleaned with a soft brush to remove dust or dirt.
- Record Cleaning: Records should be cleaned with a good quality cleaner to prevent sound distortion.
- Lubrication: The PL-518 does not require lubrication as it uses oil-less bearings in its rotating parts.
- Motor Operation: The motor is designed to operate properly only when the platter is mounted. Running the motor without the platter may cause it to malfunction.
- Temperature Acclimation: If the turntable is moved from a cold to a warm environment, or if the room temperature changes suddenly, moisture may form on internal components. In such cases, allow the turntable to acclimate to the new environment for about an hour or gradually increase the room temperature before operation to ensure full performance.
General Precautions During Operation:
- Avoid making the turntable vibrate while a record is playing to prevent damage to the stylus and record.
- Place only one record at a time on the platter to ensure proper stylus contact and sound quality.
- Do not disconnect the power cord while the stylus is in a record groove, as this can damage the stylus and record.
- Never obstruct the turntable with your hand while it is rotating, as this can cause damage.
- Do not force the tonearm closer than 40mm to the center shaft or away from the arm rest, as this can damage internal mechanisms and render automatic operation ineffective.