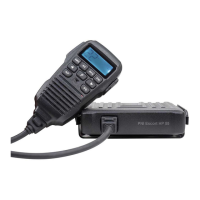
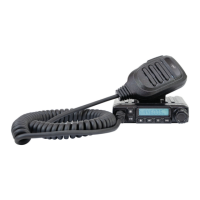
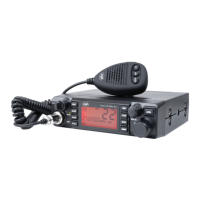
This document describes the Nanfone CB Radio, a compact and user-friendly vehicle CB radio, specifically the PNI Escort HP 6500 model. It offers good performance and a range of features for effective communication.
Introduction and Features:
The Nanfone CB Radio is designed for ease of use in vehicles. Its primary function is two-way radio communication. Key features include:
- Microphone with Up/Down Keys: For convenient channel selection.
- Scan Channel Function: Allows the radio to automatically scan through available channels.
- LCD Display: Provides clear visual feedback on the radio's status and settings.
- Auto ASQ/SQ Adjustable: Automatic Squelch (ASQ) and Squelch (SQ) functions are adjustable, helping to reduce background noise.
- RF GAIN Control: Allows adjustment of the radio frequency gain for optimal signal reception.
- External Speaker Support: For enhanced audio output.
Installation Instructions:
Before installation, it's crucial to check all materials. The radio requires a 12V to 13.8V power supply. The car charger should be connected to the car's 12V power supply socket, with the radio's positive and negative electrodes connected to the car charger's corresponding terminals. It is essential to verify all wiring is in good condition and free from short circuits before powering on the device to ensure normal operation.
Control Panel Functions (Front View):
The front panel of the radio features several controls:
- Microphone Socket (1): For connecting the microphone.
- A/F Button (2): Short press switches between AM/FM modes; long press activates the Scan Function.
- LCD Display (3): Shows channel information, settings, and other operational data.
- Power On/Off & Volume Knob (4): Turns the radio on/off and adjusts the volume.
- Channel Up/Down Select (5, 6): Used for navigating channels.
- EMG (Emergency Channel) Button (7): Short press switches between 9/19 emergency channels.
- RFG (RF GAIN) Button (8): Enters RF GAIN Model.
- SQ/ASQ (Squelch/Automatic Squelch) Function Switch (9): Short press enters SQ (ASQ) Level Switch; long press switches to ASQ Mode.
Operation:
Power On/Off the Radio:
- Power On: Turn the VOL switch clockwise. The LCD will display a full-screen spectrum model for 1 second, then enter the channel state.
- Power Off: Turn the VOL knob counterclockwise until it clicks.
Volume Control:
- Increase Volume: Turn the VOL knob clockwise.
- Decrease Volume: Turn the VOL knob counterclockwise.
Channel Selection:
- Normal Selection: Briefly press the "UP" or "DOWN" keys on the microphone to change the working channel.
- Fast Selection: Hold the "UP" or "DOWN" keys on the microphone to rapidly change channels.
Squelch Level Control (SQ):
The squelch function helps eliminate background noise when no signal is being received.
- Enter SQ Mode: Briefly press the "SQ" button until the LCD displays "SQ" followed by "X.X" (e.g., "0.F" for SQ off, "0.1" for lowest SQ, "2.8" for highest SQ).
- Adjust SQ Level: Briefly press the "UP" or "DOWN" keys on the microphone.
- Fast SQ Adjustment: Hold the "UP" or "DOWN" keys on the microphone.
- Store and Exit: Hold the "SQ" button or wait for 3 seconds.
ASQ Control (9 Levels):
Automatic Squelch (ASQ) automatically adjusts the squelch level.
- Activate ASQ: Hold the "SQ" key until the LCD displays "AQ". The ASQ function is now on, and the LCD will show "A.X" (e.g., "A.1" for lowest ASQ, "A.9" for highest ASQ).
- Adjust ASQ Level: Briefly press the "UP" or "DOWN" keys on the microphone.
- Fast ASQ Adjustment: Hold the "UP" or "DOWN" keys on the microphone.
- Store and Exit: Hold the "SQ" button or wait for 3 seconds.
Modulation Type:
- Switch Mode: Briefly press the "A/F" key to toggle between AM (Amplitude Modulation) and FM (Frequency Modulation) modes. The LCD will display the selected mode.
RF GAIN Control:
RF GAIN adjusts the sensitivity of the receiver.
- Enter RF GAIN Mode: Briefly press the "RFG" key. The LCD will display "R", and the current RF GAIN level will flash.
- Adjust RF GAIN Level: Briefly press the "UP" or "DOWN" keys on the microphone.
- Exit RF GAIN Control: Briefly press the "RFG" key again.
Emergency Channel:
- CH9: Briefly press the "EMG" key to select Channel 9. The channel number will flash.
- CH19: Briefly press the "EMG" key again to select Channel 19. The channel number will flash.
- Return to Normal: Briefly press the "EMG" key a third time to return to the last normal channel.
Key Lock:
- Lock Keys: Hold the "EMG" key for over 2 seconds. The LCD will display "LC".
- Unlock Keys: Hold the "EMG" key for over 2 seconds again. The LCD will display "OF".
Scan Function:
- Start Scan: Hold the "A/F" key. The LCD will display "SC".
- Scan Direction: Press the "UP" or "DOWN" keys on the microphone to choose scanning clockwise or counterclockwise.
- Exit Scan: Press the "A/F" or "PTT" key.
Changing the CB-Standard:
The radio supports different CB standards (norms) for various regions.
- Enter Standard Selection: Hold the "A/F" key while powering on the radio until the LCD displays the norms.
- Select Norm: Press the "UP" or "DOWN" keys on the microphone to choose the desired norm.
- Apply Norm: Power off the radio, then power it on again.
Available CB Standards:
| Standard |
Channels |
Frequency Range |
| EU |
40FM/40AM |
26.965-27.405MHZ |
| CE |
40 FM |
26.965-27.405MHZ |
| UK |
40 FM |
27.60125-27.99125MHZ |
| PL |
40FM/40AM |
26.960-27.400MHZ |
| I2 |
34FM/34AM |
26.965-26.865MHZ |
| DE |
40FM/40AM |
26.965-27.405MHZ |
|
80FM |
26.565-26.955MHZ |
| IN |
27FM/27AM |
26.965-27.275MHZ |
Restore Factory Default:
- Initiate Reset: Hold the "SQ" key while powering on the radio until the LCD displays "rt".
- Completion: All channel and function settings will revert to factory defaults after this operation.
FCC Statement:
This device complies with Part 15 of the FCC Rules. Operation is subject to two conditions: (1) it must not cause harmful interference, and (2) it must accept any interference received, including that which may cause undesired operation. The equipment has been tested and found to comply with Class B digital device limits, providing reasonable protection against harmful interference in a residential installation. It generates, uses, and can radiate radio frequency energy. If not installed and used according to instructions, it may cause harmful interference to radio communications. There is no guarantee that interference will not occur in a particular installation. If interference occurs (determined by turning the equipment off and on), users are encouraged to try correcting it by:
- Reorienting or relocating the receiving antenna.
- Increasing the separation between the equipment and receiver.
- Connecting the equipment to an outlet on a different circuit from the receiver.
- Consulting the dealer or an experienced radio/TV technician.
This equipment complies with FCC radiation exposure limits for an uncontrolled environment. It should be installed and operated with a minimum distance of 50cm between the radiator and the user's body.