This document describes the PORTOS DC5T, a 5-channel radio drive controlling system for roller shutters.
Function Description
The PORTOS DC5T is a remote control system designed to operate roller shutters. It allows users to program specific channels, change the direction of rotation, delete channel settings, add additional channels/transmitters, and set operating modes and scheduled lifting/lowering times.
Programming the Radio Drive on a Specific Channel:
There are two methods for programming the drive:
Programming an External Radio Receiver:
If using an external radio receiver (e.g., XT-R, PPKR-313, PPKR-400), refer to its specific user manual for programming instructions.
Changing the Direction of Rotation:
There are two methods to change the motor's running direction:
Channel Deletion (Deleting All Channel Settings):
Deleting a channel's settings will also delete drives assigned to that channel from other channels.
-
Method One (Remote Control):
- Select a previously programmed channel on the display.
- Press P2; the motor will beep once and move briefly up and down.
- Press STOP; the motor will beep once.
- Press P2 again; the motor will beep four times and the roller shutter will move briefly up and down.
-
Method Two (Microswitch):
- Press and hold the microswitch on the drive's lead for at least 15 seconds.
- After 1 second, the motor will beep briefly and move up and down.
- After another 5 seconds, the motor will beep three times, and the roller shutter will move UP and DOWN twice.
- After 15 seconds, the motor will beep three times, and the roller shutter will move UP and DOWN once.
-
Method Three (Reprogramming):
Reprogramming the radio drive on a given channel (as described in "Programming the Radio Drive on a Specific Channel") automatically deletes previous settings for that channel.
Adding Another Channel (Transmitter) to the Motor:
To add another channel or device, start with the initially programmed transmitter. Do not disconnect the motor from the power supply during this process. Transmitters must be within the receiver's range.
- Select a previously programmed channel on the active transmitter's display.
- Press P2; the motor will beep once and move briefly up and down.
- Press P2 again; the motor will beep once more.
- Press P2 on the device you wish to program; the motor will beep five times and move briefly UP and DOWN.
Device Operating Mode:
The PORTOS-RM radio drive can operate in two modes:
- Support Mode: Pressing and releasing the UP or DOWN button activates a programmed motor function (opening or closing). The motor operates until the roller shutter is fully opened or closed.
- Non-Support Mode: The motor operates only while the button is pressed. Releasing the button stops the motor. If the button is pressed for more than 2 seconds, the motor will switch to support mode (operating until fully opened or closed).
Changing the Operating Mode:
- Select a previously programmed channel.
- Press P2; the motor will beep once and move briefly UP and DOWN.
- Press UP; the motor will beep once.
- Press P2; the motor will beep three times and move briefly UP and DOWN.
This change affects all channels and remotes assigned later.
Deactivation of Selected Channels:
Channel deactivation works only in AUTO mode.
- Use the CHANNEL + and CHANNEL – buttons to select the channel to deactivate.
- Hold the CHANNEL + button for 3 seconds (the channel digit will flash).
Repeating this procedure reactivates the channel.
Device Functions (Transmitter Modes):
The transmitter can operate in three modes, changed by pressing the "M" button:
- MAN (Manual Mode): Only manual lifting is available.
- AUTO (Automatic Mode): Activates both timer functions and manual operation.
- RANDOMLY (Random Mode): Manual operation is available, and automatic functions are offset by +/- 15 minutes.
Setting the Time and Day of the Week:
- Briefly press the M button to switch to MANUAL mode.
- Press the CLOCK button for at least 3 seconds.
- Press the CHANNEL + button to select the option for changing hours, minutes, or days of the week.
- Use the UP and DOWN buttons to set the desired value.
- Confirm changes by holding the CLOCK button for 3 seconds (the time set will start flashing).
- Briefly hold the CLOCK button to activate the clock.
Programming the Lifting and Lowering Times:
- Select the desired channel on the remote control. Press the MODE button and set the mode to AUTO.
- Press and hold the TIME CHANGE button for 3 seconds. The screen displays the time of day and day of the week. Use UP and DOWN buttons to select the day of the week and check existing lift/lower times.
- Briefly press the TIME CHANGE button; the time of day starts flashing. Subsequent presses change the day of the week.
- Use UP and DOWN buttons to set the lifting time.
- Press the CHANNEL+ button to move to the minutes setting; the minutes of lifting start flashing.
- Use UP and DOWN buttons to set the minutes of lifting.
- Use the OPERATION MODE button to set the lowering time; the lowering time starts flashing.
- Use UP and DOWN buttons to set the lowering time.
- Press the CHANNEL+ button to move to the minutes setting; the minutes of lowering start flashing.
- Use UP and DOWN buttons to set the lowering minutes.
- Press the CHANGE TIME button to change settings for the next day. Repeat steps 4-11 for subsequent days.
- After setting all lifting and lowering times, confirm changes by holding the TIME CHANGE button for 3 seconds. The hour will blink three times, saving the settings.
Important Technical Specifications
- Power: 3V battery (CR 2430)
- Operating Frequency: 433 MHz
- Transmission Power: 10 mW
- Operating Temperature: -10 °C to +50 °C
- Operating Range: Determined by architectural and regulatory factors.
- Channels: 5 channels (DC5)
Usage Features
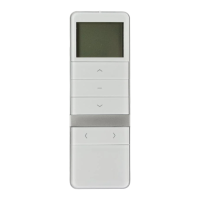
- Display: Features a clear display showing day of the week, operating mode (MAN, AUTO), channel number, lifting/lowering symbols, and time.
- Buttons: Dedicated buttons for UP, DOWN, STOP, P2, CHANNEL +/-, MODE, and CLOCK for intuitive control and programming.
- Battery Slot: Easily accessible battery slot for CR 2430 battery.
- Acoustic Feedback: The motor provides audible beeps to confirm actions during programming and operation.
- Motor Movement Feedback: Brief UP/DOWN movements of the roller shutter confirm successful programming steps and direction changes.
- Automatic Mode: Allows for scheduled lifting and lowering times.
- Random Mode: Adds a +/- 15-minute offset to automatic functions for enhanced security (simulating presence).
Maintenance Features
- Battery Replacement: Uses a standard CR 2430 battery, easily replaceable via the battery slot.
- Microswitch Access: A microswitch located on the drive's lead provides an alternative method for programming and changing settings, useful for troubleshooting or when remote control methods are not feasible.
- Clear Error/Confirmation Signals: Beeps and motor movements provide clear feedback, aiding in troubleshooting and ensuring correct operation.
- Modular System: The ability to add multiple channels/transmitters suggests a flexible system that can be expanded or reconfigured as needed.