4 - ENG
OPERATING INSTRUCTIONS
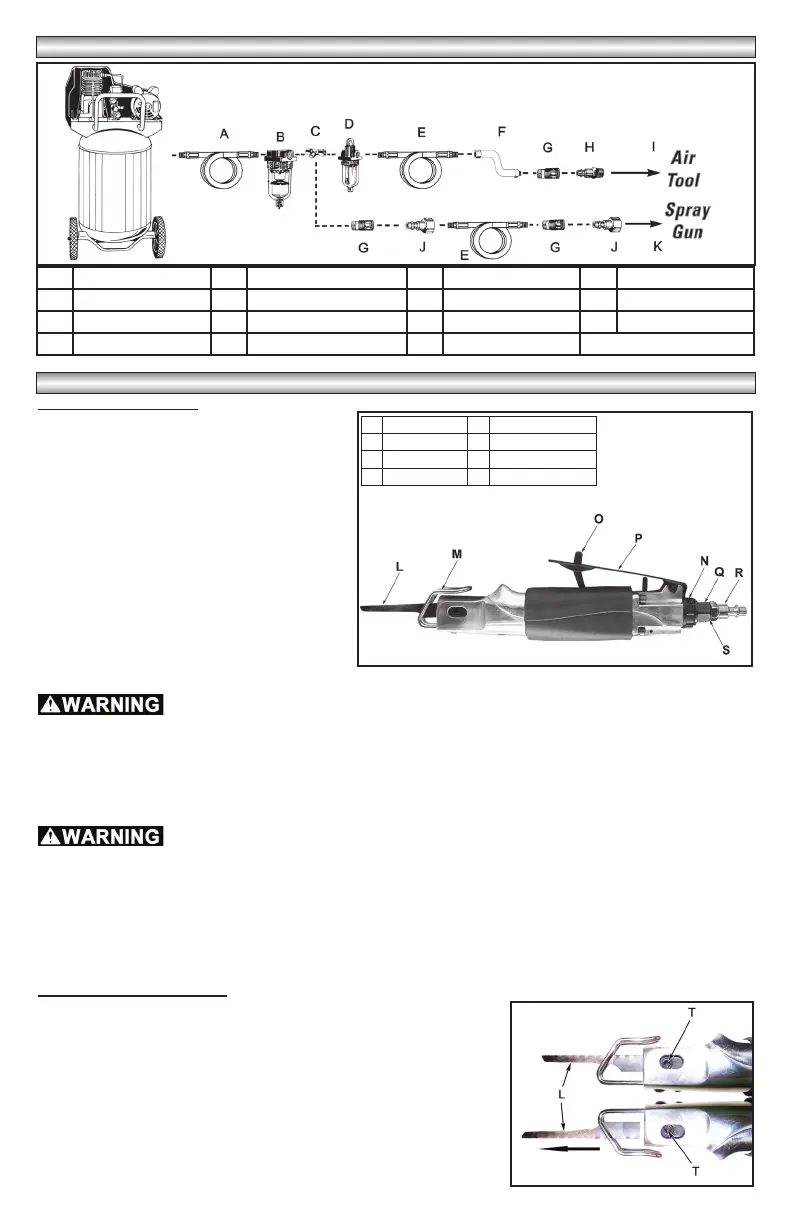
TYPICAL INSTALLATION
To begin using the tool:
1. As a standard practice, drain water from the
L Blade P Throttle
M Blade guard Q Air inlet port
N Exhaust port R Teflon tape
O Safety lever S Male connector
air compressor tank and air lines prior to use
each day (reference your compressor
operators manual for detailed instructions).
2. Install a 1/4” NPT male connector (R) (not
included) into the air inlet port on the tool
(see Figure 2). Note: Use Teflon® Tape on
all threaded connections.
3. Turn on the air compressor and allow it to
build up pressure.
4. Adjust the air compressor’s regulator or the
supply line regulator to 90 PSI.
5. Make sure the blade (L) and blade guard
(M) are secure before each use (reference
“Replacing blades”).
Never use a cracked or dull blade. Never use the tool with the blade guard or cover
removed.
6. Connect the tool to the air hose quick coupler. NOTE: It is recommended that a whip hose with a swivel
(not included) be used to prevent twisting, kinking and excessive wear to the air hose (ref. item “F”
in figure 1 for recommended connections).
7. Hold the saw with the front of the blade guard on the cutting surface to minimize chatter and allow for
smoother cutting action.
RISK OF EYE INJURY. Always wear ANSI Z87.1 approved safety goggles when using
an air tool. Air powered equipment and power tools are capable of propelling materials such as metal
chips, sawdust, and other debris at high speed which could result in serious eye injury.
8. Push the safety lever (O) forward to release the throttle (P). Press down on the throttle and move the blade
slowly along the work surface. Do not force the saw, let it do the work. Release the throttle to stop the tool.
Note: Avoid covering the exhause port vent holes (N) during operation.
9. When finished, turn off the air supply and hold the saw a safe distance from yourself and others. Squeeze
the throttle to bleed off the remaining air. Disconnect the air hose.
Replacing blades (Figure 3):
1. Disconnect the air tool from the air supply.
Figure 3
2. Remove the blade (L) by loosening the 2 set screws (T) on both
sides of the tool using the allen wrench provided. Pull the blade out
of the tool.
3. Insert the new blade and tighten the 2 set screws (T). Do not
overtighten. NOTE: The teeth of the blade should be facing upwards
when the saw is upside down.
Key Description Key Description Key Description Key Description
A Air hose D In-line Oiler G Quick Coupler J Female Connector
B In-line Filter E Air Hose H Male Connector K Spray Gun
C Tee Fitting F Whip Hose I Air Tool
Figure 1
Figure 2