EasyManua.ls Logo

Powerplus POWX07568TX - User Manual

Powerplus POWX07568TX
12 pages
Print Icon
To Next Page IconTo Next Page
Loading...
POWX07568TX EN
Copyright © 2016 VARO P a g e | 1 www.varo.com
1 APPLICATION .................................................................................. 3
2 DESCRIPTION (FIG. A & B) ............................................................ 3
3 PACKAGE CONTENT LIST ............................................................. 3
4 SYMBOLS ........................................................................................ 4
5 GENERAL POWER TOOL SAFETY WARNINGS .......................... 4
5.1 Working area ........................................................................................................... 4
5.2 Electrical safety ....................................................................................................... 4
5.3 Personal safety ....................................................................................................... 4
5.4 Power tools use and care ....................................................................................... 5
5.5 Service ..................................................................................................................... 5
6 ADDITIONAL SAFETY INSTRUCTIONS ........................................ 5
7 ADDITIONAL SAFETY INSTRUCTIONS FOR LASERS ................ 7
8 ASSEMBLY ...................................................................................... 7
8.1 Assembling the extension hoops .......................................................................... 7
8.2 Assembling the clamp ............................................................................................ 7
9 OPERATING INSTRUCTIONS ........................................................ 7
9.1 Transporting the mitre saw .................................................................................... 7
9.2 Dust and chip extraction ........................................................................................ 7
9.3 Clamping the work piece ........................................................................................ 8
9.4 Horizontal mitre angle............................................................................................. 8
9.5 Adjusting of the cutting angle (Fig. 1) ................................................................... 8
9.6 Vertical bevel angle ................................................................................................. 8
9.7 Slide lock adjustment ............................................................................................. 8
9.8 Switching ON / OFF ................................................................................................. 8
9.9 Laser (13) ................................................................................................................. 8
9.10 Dust bag .................................................................................................................. 9
9.11 Sawing ..................................................................................................................... 9
9.12 Sawing special work pieces ................................................................................... 9
9.13 Replacing the saw blade (Fig. 2) ............................................................................ 9
10 CLEANING AND MAINTENANCE ................................................. 10
10.1 Cleaning................................................................................................................. 10
Question and Answer IconNeed help?

Do you have a question about the Powerplus POWX07568TX and is the answer not in the manual?

Summary

Description

Symbols

General Power Tool Safety Warnings

Electrical Safety Precautions

Instructions to ensure safe use of electricity and prevent electric shock.

Personal Safety Measures

Advice on staying alert, using common sense, and avoiding fatigue during operation.

Power Tool Use and Care

Additional Safety Instructions

Additional Safety Instructions for Lasers

Assembly

Operating Instructions

Clamping the Workpiece

Proper techniques for securing the workpiece to prevent movement during cutting.

Switching ON; OFF

Safe procedure for turning the power tool on and off, using both hands.

Sawing Operation

Detailed steps for performing standard sawing operations safely and effectively.

Replacing the Saw Blade (Fig. 2)

Step-by-step guide for safely replacing the saw blade.

Cleaning and Maintenance

Cutting Capacity

Trouble Shooting

Warranty Information

Overview

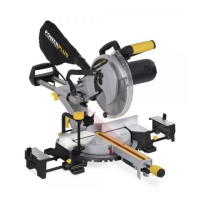
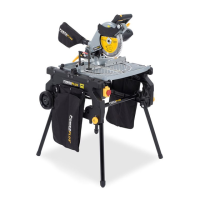
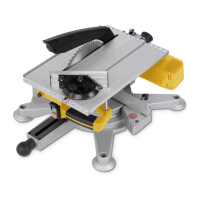
The POWERPLUS POWX07568TX is a 2000W sliding mitre saw designed for making straight and cross cuts in both hard and soft wood, as well as chip and fibre boards. This stationary machine is intended for adult use only.

Important Safety Information:

Before operating, users must read the manual and general safety instructions carefully. The power tool should always be given to other users along with these instructions. Key safety symbols include warnings for personal injury or tool damage, mandatory eye protection, reading the manual, and wearing gloves. The device is Class II double insulated, meaning earthing wire is not necessary.

General Power Tool Safety Warnings:

Users are advised to keep the working area clean, well-lit, and free from flammable liquids, gases, or dust. Children and bystanders should be kept at a safe distance. Electrical safety requires matching power tool plugs to outlets, avoiding modifications, and not exposing tools to rain or wet conditions. The power cord must be protected from heat, oil, sharp edges, and moving parts. For outdoor use, an appropriate extension cable should be used. Personal safety emphasizes staying alert, avoiding operation while tired or under the influence, and dressing properly (no loose clothing or jewellery). Safety equipment, including eye protection, dust masks, non-skid safety shoes, and hearing protection, should be used.

Power Tool Use and Care:

The tool should be used for its intended purpose. If the switch is faulty, the tool must be repaired. Disconnect the plug before making adjustments, changing accessories, or storing the tool. Store power tools out of reach of children and untrained users. Maintain tools by checking for misalignment, jammed parts, or breakages. Cutting tools should be kept sharp and clean. Use only recommended accessories and saw blades that meet the EN847-1 standard.

Additional Safety Instructions:

Always wear eye protectors. Never use the equipment with flammable liquids or gases, or with a cutting disc instead of a saw disc. Inspect the saw blade for cracks or damage before each use. Only use manufacturer-recommended saw blades. Ensure the blade is sharp and clean to reduce noise. Only use correctly sharpened saw blades and do not exceed the maximum indicated speed. Clean the axle, flanges, and hexagonal nut before installing the saw blade to prevent vibrations. Remove nails, screws, and other foreign materials from the workpiece. Remove spanners and other items from the saw table before turning on the switch. Never wear gloves while working, except when replacing cutting tools. Keep hands clear of the cutting line and never stand in the cutting line. Allow the saw to run briefly before inserting a workpiece to check for vibrations. The equipment is not for making grooves or recesses. Replace the table insert when worn. Do not make adjustments while the machine is turning; always remove the plug. Use a push block for smaller workpieces. Pay attention to kickback prevention by keeping the saw blade sharp, the rip fence parallel, and the saw guard in good condition. Do not perform free-hand operations. Never bend over or reach for the workpiece before the saw blade has stopped. Avoid sudden or quick infeed of workpieces, especially hard materials. If the saw blade jams, turn off the equipment immediately and remove the plug. Do not remove sawed-off chips or touch the saw guard while the blade is turning. Remove loose knots from the workpiece before sawing. Do not maltreat the cable or expose it to heat, oil, water, or sharp edges. Be aware that some dust generated during sawing may contain chemicals that can cause cancer or other genetic damages (e.g., lead from paints, arsenic, chrome from treated wood). Work in well-ventilated areas and use certified dust masks. Connect the equipment to a dust exhaust system for sawing operations. Ensure the saw guard is lowered and flat against the sawing table before connecting to the mains supply.

Laser Safety:

The laser beam can cause eye damage; do not look or stare into it. Do not point the laser beam at people, directly or indirectly through reflecting surfaces. This laser complies with Class 2 standards and has no servicing components. Do not open the housing. If damaged, have it repaired by an authorized agent. Laser viewing glasses are not protective against laser radiation.

Assembly:

Always disconnect the power plug before any adjustments or maintenance. The mitre saw must be fully assembled and prepared for use according to the manual.

  • Assembling the extension hoops: Loosen the side extension hoop screws (24), place the extension hoops (3) in both side holes, then tighten the screws to secure the hoops.
  • Assembling the clamp: The clamp (12) can be installed on either the left or right side of the guide fence. Insert the vise rod into the hole and fasten with the locking screw.

Operating Instructions:

  • Transporting the mitre saw: Use the retaining pin (19) to lock the saw in the lowered position for secure transport.
  • Dust and chip extraction: Attach the dust bag (20) to the sawdust outlet for integrated extraction, or use a vacuum cleaner hose for external extraction. The dust bag provides only partial dust removal.
  • Clamping the work piece: Press the workpiece against the fence (4) and between the clamp (12), then tighten the clamp clockwise to secure it.
  • Horizontal mitre angle: The horizontal mitre angle can be set from -45° to 45°. Pull up the turn table lock release lever (11), loosen the locking knob (6), push the lever, rotate the saw table (5) to the desired angle (read from scale flute (8)), tighten the locking knob, and release the turn table lock release lever.
  • Adjusting the cutting angle (Fig. 1): Position the saw in the lower position and block it. Hold a try square (90°) against the guide rail and saw blade. If necessary, adjust the angle by loosening the counter nut and adjusting bolts until the angle between the blade and turn table is 90°. Use the provided key for loosening screws and re-tighten afterwards.
  • Vertical bevel angle: The vertical bevel angle can be set from 0° to 45°. Loosen the locking lever (22), swing the tool arm to the required angle, and tighten the locking lever.
  • Slide lock adjustment: Turn the slide bar lock knob (23) counterclockwise to unlock and clockwise to lock the slide bar (14).
  • Switching ON / OFF: Use both hands. Connect to power supply. Pull the on/off switch (16) towards the handle to start. Release to turn off.
  • Laser (13): The machine is equipped with a laser. For long workpieces, use the slide; loosen the locking knob for this purpose. Saw through the workpiece, switch off, and wait for the blade to stop before removing the workpiece.
  • Sawing: Clamp the workpiece firmly. Set the desired horizontal mitre or vertical bevel angle. Switch on the power tool (push safety switch (17)). Move the handle (15) slowly downwards. For long workpieces, use the slide and loosen the locking knob. Saw through the workpiece, switch off, and wait for the blade to stop before removing the workpiece. Ensure the saw blade doesn't block, as this can damage the motor.
  • Sawing special work pieces: Secure curved or round workpieces against slipping. Ensure no gap between the workpiece and the fence (4) or saw table (5).
  • Replacing the saw blade (Fig. 2): Disconnect from power outlet. Wait for the blade to cool down. The teeth are sharp. Pull the mitre saw downwards and lock it. Remove the front mounting screw from the protective hood. Turn the centre cover and raise the blade guard. Press the spindle lock. Remove the screw, outer flange, and blade. Replace the saw blade (teeth pointing in the direction of the arrow on the cover). Reassemble all parts in reverse order. Turn the plastic cover back and mount the front mounting screw. When replacing the saw blade, the slide bar can be tightened with the locking knob (23).

Technical Specifications:

  • Nominal Voltage: 230-240V ~ 50 Hz
  • Power rating: 2000 W
  • No load speed: 2500 min-1
  • Protection class: II
  • Blade size: 254 mm x 30 mm x 2.2mm

Cutting Capacity (Height x Width):

  • Worktable tilting angle 90°, Head tilting angle 90°: 75 x 305 mm
  • Worktable tilting angle 45°, Head tilting angle 90°: 75 x 210 mm
  • Worktable tilting angle 90°, Head tilting angle 45°: 45 x 305 mm
  • Worktable tilting angle 45°, Head tilting angle 45°: 45 x 210 mm

Noise Emission Values (K=3):

  • Acoustic pressure level LpA: 89 dB(A)
  • Acoustic power level LwA: 102 dB(A)
  • Vibration (aw): 1.1 m/s² (K = 1.5 m/s²)
  • ATTENTION! Wear hearing protection when sound pressure is over 85 dB(A).

Cleaning and Maintenance:

Always pull the power plug before maintenance.

  • Cleaning: Regularly clean the machine housing with a soft cloth, preferably after each use. For stubborn dirt, use a soft cloth moistened with soapy water. Never use solvents like petrol, alcohol, or ammonia water, as these can damage plastic parts. Ensure no water enters the power tool.
  • Connecting cable: If the connecting cable or mains plug is damaged, it must be replaced by a qualified specialist.

Storage:

Thoroughly clean the machine and accessories. Store it out of reach of children, in a stable, secure, cool, and dry place, avoiding extreme temperatures. Protect from direct sunlight and keep it in the dark if possible. Do not store in plastic bags to prevent humidity build-up.

Powerplus POWX07568TX Specifications

General IconGeneral
BrandPowerplus
ModelPOWX07568TX
CategorySaw
LanguageEnglish

Related product manuals