EasyManua.ls Logo

Powerplus POW8130 - User Manual

Powerplus POW8130
12 pages
Print Icon
To Next Page IconTo Next Page
Loading...
POW8130 EN
Copyright © 2015 VARO P a g e | 1 www.varo.com
1 APPLICATION .................................................................................. 3
2 DESCRIPTION ................................................................................. 3
3 PACKAGE CONTENT LIST ............................................................. 3
4 SYMBOLS ........................................................................................ 4
5 CORRECT USE OF YOUR POW8130............................................. 4
6 GENERAL POWER TOOL SAFETY WARNINGS .......................... 5
6.1 Working area ........................................................................................................... 5
6.2 Electrical safety ....................................................................................................... 5
6.3 Personal safety ....................................................................................................... 5
6.4 Power tool use and care ......................................................................................... 6
6.5 Service ..................................................................................................................... 6
7 ADDITIONAL SAFETY INSTRUCTIONS FOR LASERS ................ 6
8 ADDITIONAL SAFETY INSTRUCTIONS FOR BATTERIES .......... 7
9 ASSEMBLY ...................................................................................... 7
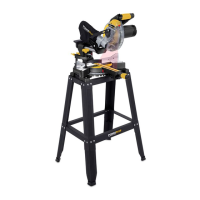
9.1 Setting up the saw (Fig. 1 / 3/12) ............................................................................ 7
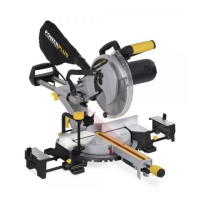
9.2 Adjusting the saw (Fig. 1/2) .................................................................................... 7
9.3 90° cross-cuts and 0° rotary table (Fig. 1) ............................................................. 7
9.4 Precision adjustment of the stop for 90° cross-cuts (Fig. 4/5) ............................. 7
9.5 90° cross-cuts and 0°-45° rotary table (Fig.6) ........................................................ 8
9.6 Mitre cuts 0°-45° and rotary table 0° (Fig. 4/7) ....................................................... 8
9.7 Precision adjustment of the stop for 45° mitre cuts (Fig. 8/9) .............................. 8
9.8 Mitre cuts 0-45° and rotary table 0-45° (Fig. 10) .................................................... 8
10 DUST BAG (FIG. 2) .......................................................................... 8
11 REPLACING THE SAW BLADE (FIG. 5/11) ................................... 8
12 LASER FUNCTION (FIG. 12) ........................................................... 9
13 CLEANING AND MAINTENANCE ................................................... 9
13.1 Maintenance ............................................................................................................ 9
14 SERVICE DEPARTMENT ................................................................ 9
15 TECHNICAL DATA ........................................................................ 10
Question and Answer IconNeed help?

Do you have a question about the Powerplus POW8130 and is the answer not in the manual?

Overview

The POW8130 is a 1500W mitre saw designed for crosscutting wood and plastic. It is not intended for cutting firewood or commercial use.

Function Description

The laser crosscut saw is designed to make precise crosscuts in wood and plastic materials. It features a laser function (35) that projects a beam onto the workpiece, enabling extremely precise cuts. The machine head (4) can be tilted for mitre cuts, and the rotary table (8) allows for angled cuts. A dust bag (14) is included to collect sawdust and chips, helping to maintain a cleaner working area.

Important Technical Specifications

  • Rated voltage: 220-240 V
  • Rated frequency: 50 Hz
  • Rated power: 1500W
  • Rotation speed: 5000 min⁻¹
  • Blade size: 210 x 30 mm
  • Max. cutting depth: Not specified, but maximum cutting capacities are provided for various angles.
  • Protection class: Class II
  • Cable length: Not specified.
  • Tilting range: -45° / 0° / +45°
  • Mitre cuts: 0° to 45° to the left
  • Maximum cutting capacity 90°: Not specified.
  • Maximum cutting capacity 90°-90°: 60 x 120 mm
  • Maximum cutting capacity 45°: Not specified.
  • Maximum cutting capacity 45°-90°: 35 x 120 mm
  • Maximum cutting capacity 90°-45°: 60 x 80 mm
  • Maximum cutting capacity 45°-45°: 35 x 80 mm
  • Table size: Not specified.
  • Number of teeth: 24 teeth
  • Weight: 9 kg
  • Laser class: 2
  • Laser wave length: 650 nm
  • Laser output: ≤ 1 mW
  • Laser module power supply: 2 x 1.5 V Micro (AAA)
  • Acoustic pressure level LpA: 100 dB(A)
  • Acoustic power level LwA: 113 dB(A)
  • Vibration (aw): 4.5 m/s² (K = 1.5 m/s²)

Usage Features

The POW8130 offers several features for versatile and precise cutting:

  • Workpiece Support Clips (12): Two clips can be inserted into mounts (21) and fastened with thumb screws (22) to support the workpiece.
  • Clamping Device (19): This device can be inserted into one of the two mounts (20) on the stop rail and fastened with a thumb screw (33) to secure the material during cutting, preventing movement.
  • Additional Stability Bar (32): Screws to the back of the machine for enhanced stability.
  • Rotary Table (8): Features latching positions at 0°, 15°, 22.5°, 30°, and 45°. The angle can be adjusted by moving the black handle to the left or right. The rotary table can be released by slackening the locking handle (10) and pressing the latch (11).
  • Machine Head (4) Tilt: The machine head can be angled to the left up to 45° by loosening the lock screw (12).
  • 90° Cross-Cuts and 0° Rotary Table: For straight cross-cuts, the material should be placed flat on the machine surface and secured with the clamping device. The saw blade (5) should reach maximum speed before cutting. The release lever (1) is pressed sideways, and the handle (2) is used to apply steady downward pressure to move the machine head through the workpiece. A return spring automatically raises the machine head after the cut.
  • Precision Adjustment for 90° Cross-Cuts: The machine head (4) can be lowered and fixed with the lock pin (16). A stop angle (A) is placed between the saw blade (5) and the rotary table (8). The counter nut (23) is slackened, and the setting screw (24) is adjusted until the angle between the saw blade and rotary table is 90°. The counter nut is then re-tightened.
  • 90° Cross-Cuts and 0°-45° Rotary Table: The saw can make angled cuts of 0°-45° relative to the stop rail on both left and right sides. The angle is adjusted by moving the rotary table (8) with the black handle until the mark (a) on the rotary table aligns with the desired angle dimension (17) on the base plate (9).
  • Mitre Cuts 0°-45° and Rotary Table 0°: For mitre cuts relative to the machine bed on the left side, the machine head (4) is lifted to its top position, and the rotary table (8) is fixed at 0°. The tightening screw (12) is undone, and the handle (2) is used to tilt the machine head (4) to the left until the pointer (a) aligns with the required angle value (15). The tightening screw (12) is then re-tightened.
  • Precision Adjustment for 45° Mitre Cuts: The machine head (4) is lowered and fixed with the lock pin (16). The rotary table (8) is fixed at 0°. The tightening screw (12) is undone, and the handle (2) is used to tilt the machine head (4) to the left until it reaches 45°. A 45° stop angle (A) is placed between the saw blade (5) and the rotary table (8). The counter nut (25) is slackened, and the setting screw (26) is adjusted until the angle between the saw (5) and the rotary table (8) is exactly 45°.
  • Mitre Cuts 0-45° and Rotary Table 0-45°: For mitre cuts on the left at an angle of 0°-45° relative to the work top and 0°-45° relative to the stop rail. The machine head (4) is lifted, the rotary table (8) is adjusted to the required angle, and the machine head (4) is tilted to the required angle by undoing and re-tightening the tightening screw (12).
  • Laser Function (35): Activated by a switch (a), the laser projects a beam onto the workpiece for precise cutting guidance.

Maintenance Features

  • Dust Bag (14): The saw is equipped with a dust bag to collect sawdust and chips. It can be pulled off by pressing together two clips (27) and emptied by undoing the zip at the bottom.
  • Saw Blade Replacement: To replace the saw blade (5), the power plug must be removed. The machine head (4) is swung up, and two bolts (27, 28) are unscrewed to flip up the cover plate and saw blade guard (6). The saw shaft lock is pressed while holding the wrench (32) on the flange bolt (25). The flange bolt (25) is slowly rotated clockwise until the saw shaft lock engages, then slackened further and removed. The old blade is removed, and the new blade is mounted in reverse order, ensuring the cutting bevel of the teeth conforms to the direction of the arrow marked on the housing. The saw blade flanges should be thoroughly cleaned before mounting. The movable blade guard (6) is reattached. After changing the blade, it's crucial to check that safety devices are in good working order and that the blade spins freely in the groove of the turntable in both perpendicular and 45° angle settings.
  • Cleaning: Ventilation slots should be kept clean to prevent engine overheating. Dust and dirt should be removed regularly using compressed air or a rag.
  • Lubrication: All moving parts should be re-lubricated at regular intervals.
  • Chemicals: Never use caustic agents or solvents such as petrol, alcohol, or ammonia water to clean plastic parts, as these may damage them.
  • Service: Damaged switches or connecting cables (or mains plugs) must be replaced by an authorized after-sales service department or a qualified electrician. The manufacturer is not liable for changes made to the machine or damage resulting from such changes.

Powerplus POW8130 Specifications

General IconGeneral
BrandPowerplus
ModelPOW8130
CategorySaw
LanguageEnglish

Related product manuals