EasyManua.ls Logo

Powerplus POWX0782 - User Manual

Powerplus POWX0782
23 pages
Print Icon
To Next Page IconTo Next Page
Loading...
POWX0782 EN
Copyright © 2015 VARO P a g e | 1 www.varo.com
1 APPLICATION ................................................................................. 4
2 DESCRIPTION ................................................................................ 4
3 PACKAGE CONTENT LIST ............................................................ 4
4 SYMBOLS ....................................................................................... 5
5 GENERAL SAFETY WARNINGS ................................................... 5
5.1 Working area .......................................................................................................... 5
5.2 Electrical safety ...................................................................................................... 5
5.3 Personal safety ...................................................................................................... 5
5.4 Power tool use and care ........................................................................................ 6
5.5 Service .................................................................................................................... 6
6 ADDITIONAL SAFETY INSTRUCTIONS FOR CROSS-CUT AND
TABLE SAWS ................................................................................. 6
7 ELECTRICAL SAFETY ................................................................... 8
8 SPECIAL PRODUCT CHARACTERISTICS ................................... 8
9 INSTALLATION AND TRANSPORT .............................................. 9
9.1 Installation (Fig. 14) ............................................................................................... 9
9.2 Transport (Fig. 5, 12, 13) ........................................................................................ 9
9.2.1 Table saw operating mode (Fig. 2, 5, 6, 12) ............................................................. 9
9.2.2 Cross-cut and mitre saw operating mode (Fig. 6) ................................................... 10
9.2.3 Turntable (Fig. 7-9) ................................................................................................ 10
9.2.4 Adjustment of the bevelling angle (Fig. 10-11)........................................................ 10
9.2.5 Mitre and width guide (Fig. 12-13) .......................................................................... 10
9.2.6 Connection to a dust collector ................................................................................ 10
9.2.7 Connection to AC power ........................................................................................ 11
10 OPERATIONS ............................................................................... 11
10.1 Cross-cut sawing mode ....................................................................................... 11
10.1.1 Safety instructions for the movable saw blade guard (Fig. 16) ................................ 11
10.1.2 Safety lock (Fig. 2-3) .............................................................................................. 11
10.1.3 Installation (Fig. 12 and 13) .................................................................................... 11
10.1.4 Normal cross-cut operations .................................................................................. 12
10.1.5 Mitre sawing (Fig. 7)............................................................................................... 13

Table of Contents

Question and Answer IconNeed help?

Do you have a question about the Powerplus POWX0782 and is the answer not in the manual?

Overview

This document describes the POWERPLUS POWX0782 Cross-Cut and Mitre Saw with Top Table, a versatile power tool designed for sawing wood, metal, and plastic. It is intended for non-commercial use.

Function Description

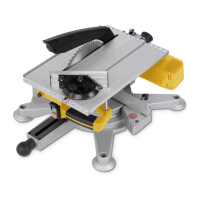
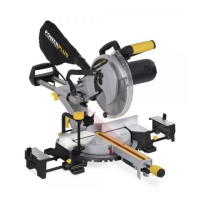
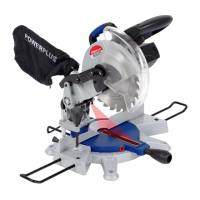
The POWX0782 operates as both a cross-cut saw and a table saw, offering flexibility for various cutting tasks. Its primary function is to accurately cut workpieces at different angles and depths.

Cross-cut sawing mode: In this mode, the saw head is lowered to cut the workpiece. It features a movable saw blade guard (C1) that protects against accidental contact with the blade and flying splinters, automatically returning to its start position when the saw head is lifted. A safety lock (6) blocks the saw head in the topmost position, preventing accidental exposure of the saw blade. This mode allows for normal cross-cut operations, mitre sawing, and bevelling.

Table saw mode: In this mode, the saw blade protrudes through a top table (1), allowing for rip cuts. It incorporates a saw blade guard (3) to protect against accidental contact and flying wood splinters, and a riving knife (2) to prevent the workpiece from being grasped by the rising teeth of the saw blade and thrown towards the operator. A lower saw blade guard (14) provides additional protection. A push block (24) is recommended for smaller workpieces to keep hands and fingers away from the saw blade.

The machine is equipped with an ON/OFF switch (7) for starting and stopping the motor. Switch A (8) is activated when the mitre and width guide is correctly installed in cross-cut mode, while Switch B (29) is used for starting the motor in table saw mode. A restart protection feature prevents the machine from starting automatically after a power supply interruption.

Important Technical Specifications

  • Mains voltage: 220-240 V ~ 50Hz
  • Power: 1800 W
  • Saw blade rpm: 5000 min⁻¹
  • Saw blade dimensions: 254 x 30 x 3 mm - 60T TCT (Tungsten Carbide Tipped)
  • Cutting capacity:
    • As Table saw: 46 mm
    • As mitre saw:
      • 0x90°: H70xW110mm
      • 45°x90°: H40xW110mm
      • 0°x45°: H70xW70mm
      • 45°(L)x45°: H35xW60mm
      • 45°(R)x45°: H40xW90mm
  • Machine dimensions: 700x585x420mm
  • Protection class (IP): 20
  • Insulation class: II (double insulated, no earthing wire necessary)
  • Weight gross/net: 24 kg / 19 kg
  • Noise levels (K=3):
    • Acoustic pressure level LpA: 93 dB(A)
    • Acoustic power level LwA: 106 dB(A)
  • Vibration (aw): 1.7 m/s² (K = 1.5 m/s²)
  • Engine power: 1800 Watts in S6 25%

Usage Features

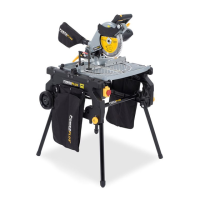
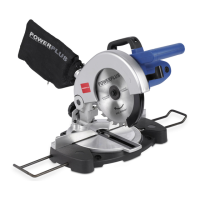
Versatility: The POWX0782 offers quick change-over between cross-cut and table saw modes, enhancing its adaptability for different cutting requirements.

Precision Cutting:

  • Bevelling: Features a 90° sawing range for bevelling (45° left or 45° right) with five preset stops, allowing the support arm to be tilted vertically. The bevel lock (16) must be released to tilt the arm and tightened to prevent angle changes during sawing.
  • Mitre Sawing: Provides a 110° sawing range for mitre sawing (50° left or 60° right) with ten preset stops. The turntable (11) can be turned and fixed at preset positions (0°, 15°, 22.5°, 30°, 45°, and 60°). The mitre locking knob (9) must be released to turn the table and tightened to secure the angle.
  • Guides: A mitre and width guide (4) is provided for accurate cuts. Additional guides can be installed if needed.

Safety Features:

  • Saw Blade Guards: Upper and lower saw blade guards (3, 14) are crucial for operator safety, protecting against accidental contact and flying debris. The movable saw blade guard (C1) in cross-cut mode automatically covers the blade.
  • Riving Knife: The riving knife (2) in table saw mode prevents kickback by keeping the workpiece from pinching the saw blade.
  • Push Block: Essential for longitudinal sawing of smaller workpieces in table saw mode, ensuring hands are kept clear of the blade.
  • Safety Lock: Prevents accidental lowering of the saw head in cross-cut mode.
  • Restart Protection: Prevents the machine from automatically restarting after a power outage.
  • Dust Extraction: Equipped with an exhaust pipe (27) and dustbag (28) for connection to a dust collector, reducing dust-related hazards. The dust collector must conform to specific requirements regarding pipe diameter (43 mm), air flow volume (≥ 550m³/h), vacuum (≥ 740 Pa), and air speed (≥ 20 m/s).

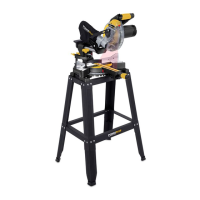
Portability: Its low weight and small dimensions make it perfectly suited for mobile use.

Durability: Constructed with robust, cast aluminum for precision sawing and long-term reliability.

Maintenance Features

Regular Cleaning:

  • Ventilation Slots: Keep ventilation slots clean to prevent engine overheating.
  • Machine Housing: Regularly clean with a soft cloth, preferably after each use.
  • Dust and Dirt: Remove sawdust and wood splinters from the machine using a brush, dust cloth, or vacuum cleaner.
  • Resin Residues: Remove resin residues from support surfaces with a suitable cleaner or maintenance spray.
  • Avoid Solvents: Never use solvents like petrol, alcohol, or ammonia water, as they can damage plastic parts.
  • Saw Blades: Keep cutting tools sharp and clean to prevent jamming and ensure easier control.

Pre-Use Checks (Before Every Use):

  • Power Cable and Plug: Check for damages and replace if necessary by a certified electrician.
  • Moving Parts: Ensure all moving parts move freely and smoothly.
  • Riving Knife: Verify the distance between the riving knife and saw blade is between 3 mm and 8 mm.
  • Saw Blade: Check for small cracks or damages and replace immediately if found. Never use saw blades made of high-speed steel (HSS).
  • Saw Blade Guard: Ensure the saw blade guard is always installed and functions correctly.

Monthly Checks (If Used Daily):

  • Drive Belt: Check the condition and tension of the drive belt and adjust if necessary.

Every 300 Operating Hours:

  • Screws: Check and tighten all screws.
  • Saw Head Tolerance: Check and adapt the lateral tolerance of the saw head by tightening bolt (P1).
  • Saw Head Return: Verify the saw head returns to its starting position when released; replace springs if needed.
  • Movable Saw Blade Guard: Ensure it functions correctly.

Saw Blade Replacement (Fig. 19-21):

  • Safety First: Always remove the power plug before changing the saw blade. Wear gloves. Allow hot saw blades to cool off.
  • Procedure: Set the support arm to 0° (vertical) and tighten the bevelling lock nut. Remove the topmost sawing table. Pull the saw blade lock (D1) forward and turn the saw blade slowly until the latch activates. Loosen the driveshaft bolt (E1) (left-turning thread). Remove the shaft bolt (E1), outer saw flange (E2), saw blade (18), shaft nut (E4), and inner saw flange (E3). Clean all components.
  • Installation: Fasten the shaft nut (E4) of the inner saw flange (E3) on the saw shaft, ensuring the bevelled collar (Q1) points right and the spring groove points left. Mount the new saw blade (18), checking the rotating direction (arrow on blade matches arrow on guard). Install the outer saw flange (E2) and insert the shaft bolt (E1) (left-turning thread), tightening with a hexagonal spanner.
  • Important: Only use saw blades that conform to standards and maximum speed indicated in the technical data sheet. Do not use loose reduction rings or damaged blades.

Drive Belt Tensioning (Fig. 23-26):

  • The drive belt should be tensioned if there is more than 8 mm of play or if drive power is not transmitted.
  • Loosen screws (J1) between the motor and support arm. Use hexagonal screw (K1) to move the motor backward for tensioning. Tighten screws (J1) crosswise.

Modifications and Adjustments:

  • Mitre and Width Guide (Fig. 27): Loosen attachment screws (L1), adapt the guide to be exactly at right angles to the saw blade when the mitre table (11) is at 0°, then retighten.
  • Mitre Scale Indicator (Fig. 28): Loosen screw (M2), adapt indicator (M1) to match the preset stop position of the turntable.
  • Bevelling Angle Indicator (Fig. 29): Lock support arm (N2) at 0°, loosen screw (N1), adapt the arm until the saw blade is at 90°/45° to the turntable, retighten screw (N1). Loosen screw (N4), adapt indicator (N3) to match the preset stop position of the support arm.
  • Sawing Depth Stop (Fig. 30): Loosen attachment screw (O1), adapt the stop so the saw blade extends up to the mitre and depth guide in the opening, then retighten.

Storage:

  • Clean the machine and accessories thoroughly.
  • Store in a cool, dry, stable, and secure place, out of reach of children, avoiding extreme temperatures and direct sunlight.
  • Avoid storing in plastic bags to prevent humidity build-up.

Powerplus POWX0782 Specifications

General IconGeneral
BrandPowerplus
ModelPOWX0782
CategorySaw
LanguageEnglish

Related product manuals