EasyManua.ls Logo

powersoft DigiMod IS integration kit User Manual

powersoft DigiMod IS integration kit
3 pages
To Next Page IconTo Next Page
Page #1 background imageLoading...
Page #1 background image
Tech Note’s
Number
Keep This Technical Note For Future Reference
1 Preliminary consideration
This article is related to the following products:
f DigiMod 1000
f DigiMod 1500
f DigiMod 2000HV
The kit that allows to transform a DigiMod module to DigiMod
IS (integrated solution) is labeled KT000276, and comprehends:
f N°1 Heat Sink
f N° 1 interface (already mounted on Heat Sink)
f N° 1 DSP-C
f N° 1 PowerCon Blue (already mounted on Heat Sink)
f N° 1 PowerCon Grey (already mounted on Heat Sink)
f N° 6 Screws for xing DigiMod module on Heat Sink
f N° 2 Screws for xing DSP-C board on Heat Sink
f 1 Bolt for xing ground wire (on PowerCon connection)
to DigiMod module
2 Tools needed
f Phillips cross-wing screwdriver
3 Procedure
1. Fix the DSP-C on DigiMod SIMM board connector with the
two screws.
TECHNICAL NOTE #18 rev. 01
DigiMod IS integration kit
How to transform a DigiMod module to DigiMod IS (integrated solution)
2. Remove all jumpers located on DigiMod on CN18/CN17
FIGURE 1: phillipsscrewdriver.jpg
FIGURE 2: Installing DSP-C
FIGURE 3: Jumpers to be removed, overview
FIGURE 4: Jumpers to be removed, detail
© 2012 - 2013 Powersoft
powersoft_TN018_DigiModISKit_en_v1.0
Question and Answer IconNeed help?

Do you have a question about the powersoft DigiMod IS integration kit and is the answer not in the manual?

powersoft DigiMod IS integration kit Specifications

General IconGeneral
TechnologyClass D
Power Output1000W per channel @ 4Ω
Frequency Response20Hz - 20kHz
Signal-to-Noise Ratio>100dB
Input Impedance20 kOhms balanced
Cooling SystemConvection
Operating Voltage100-240V
Power SupplySwitching Mode Power Supply (SMPS)

Summary

Preliminary Considerations and Kit Contents

Compatible DigiMod Products

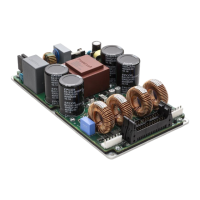
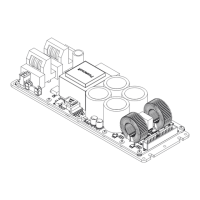
Lists products compatible with the DigiMod IS integration kit, including DigiMod 1000, 1500, and 2000HV.

DigiMod IS Integration Kit Components

Details the items included in the KT000276 kit for transforming a DigiMod module into DigiMod IS.

Tools Needed for Integration

Required Screwdriver Type

Specifies the Phillips cross-wing screwdriver as the necessary tool for the integration process.

Procedure for DigiMod IS Integration

Install DSP-C Board

Fix the DSP-C board onto the DigiMod SIMM board connector using two screws.

Remove Jumpers CN18/CN17

Remove all jumpers from the DigiMod's CN18 and CN17 connectors as per the procedure.

Mount DigiMod on Heat Sink

Secure the DigiMod module onto the heat sink using six provided screws.

Attach Grounding Wire

Fix the grounding wire to the DigiMod module using a bolt.

Connect PowerCon Mains

Connect the PowerCon mains cable to the DigiMod unit.

Connect Programming Cables

Connect the programming flat cables from the interface to the DSP-C on board.

Procedure Completion

Indicates the final step where the DigiMod IS integration procedure is finished.

Related product manuals