EasyManua.ls Logo

PowerTec 71847 - User Manual

PowerTec 71847
4 pages
Print Icon
To Next Page IconTo Next Page
Loading...
INSTRUCTION SHEET
35mm Concealed Hinge Jig
WARNING
Do not use the 35mm Concealed Hinge Jig until you have read and
understood all the operating instructions and the operating manual of
the drill being used with this Hinge Jig.
WARNING
To avoid serious injury, turn off and unplug the machine before
attaching or changing accessories or adjusting the router bit.
WARNING
BEFORE beginning any cutting operation, ALWAYS make sure ALL
parts of the 35mm Concealed Hinge Jig are assembled correctly
before operation.
DANGER
Risk of serious injury. The Hinge Bit is extremely sharp. Always
wear proper gloves when handling the Hinge Bit. Keep hands and
ngers away from spinning router bits. Be aware of the cutting
apparatus at all times.
WARNING
When using the 35mm Concealed Hinge Jig do not drill through any
metal material.
CAUTION
Think safety! Safety is a combination of operator common sense
and alertness at all times when a tool is being used.
Model No. 71847
PACKAGING CONTENTS
ITEM DESCRIPTION QTY
A Base Guide 1
B Bearing Washer 1
C Drill Guide 1
D Stop Collar 1
E Spring 1
F 35mm Forstner Bit 1
G Set Pins 2
H Pilot Hole Template 1
I Hex Wrench 1
Bit Assembly:
Figure 2
1. First remove Drill Guide (C) by
turning it counterclockwise
to remove it from Base (A).
Remove Pins (G) by pushing
them out from the bottom.
2. To assemble, slide the shaft
of Concealed Hinge Bit (F)
through the opening in the
bottom of Drill Guide (C).
3. Slide Bearing Washer (B) over
the shaft of the Concealed
Hinge Bit and seat it into the
inset on top of the Drill Guide.
4. Place Spring (E) over the Hinge
Bit shaft.
5. Seat Stop Collar (D) on the
shaft shoulder. Tighten with
Hex Wrench ( I ) conveniently
stored beneath the base.
23-0629
WARNING
To avoid serious injury wear gloves when handling the drill bit.
It is extremely sharp.
NOTE: This is a custom 35mm Concealed Hinge Bit. The
shoulder length accurately positions the Stop Collar and is
designed to drill a pocket 1/2" deep.
Question and Answer IconNeed help?

Do you have a question about the PowerTec 71847 and is the answer not in the manual?

Summary

PACKAGING CONTENTS

Bit Assembly

Bit Assembly Steps

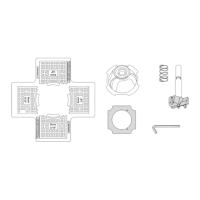
Detailed instructions for assembling the hinge bit, spring, and stop collar.

Measure for Concealed Hinge Jig Placement

Hinge Jig Placement Procedure

Step-by-step guide for measuring and marking cabinet doors for hinge placement.

Cut the Hinge Pockets

Hinge Pocket Cutting Procedure

Instructions for drilling hinge pockets using the jig and drill bit.

Install the Concealed Hinge

Hinge Installation Steps

Guidance on installing the actual concealed hinge into the drilled pocket.

GENERAL MAINTENANCE

Maintenance and Cleaning Warnings

Safety precautions for servicing, cleaning, and handling the hinge jig.

Overview

The POWERTEC 35mm Concealed Hinge Jig, Model No. 71847, is a specialized tool designed to assist in the precise installation of 35mm concealed hinges for cabinet doors. Its primary function is to guide a drill bit to create the necessary cup pocket and pilot holes for concealed hinges, ensuring accurate and consistent placement.

Function Description:

The jig facilitates the creation of a 35mm hinge cup pocket, typically 1/2" deep, and two 1/16" pilot holes for hinge mounting. It is designed to work in conjunction with a power drill equipped with a 3/8" chuck. The process involves measuring and marking the hinge placement on the cabinet door, securing the jig with clamps, drilling the pilot holes, and then using the jig to guide the 35mm Forstner bit for the main hinge cup pocket. The jig's design incorporates a custom 35mm Concealed Hinge Bit with a specific shoulder length to accurately position the stop collar and ensure the correct drilling depth. The jig also features adjustable offset measurements for hinge placement, accommodating common hinge specifications.

Important Technical Specifications:

  • Hinge Cup Pocket Size: 35mm diameter.
  • Pocket Depth: 1/2" (designed by the custom Forstner bit).
  • Pilot Hole Size: 1/16" diameter.
  • Drill Chuck Compatibility: 3/8" chuck for the Forstner bit.
  • Offset Measurements: Adjustable for 3mm-1/8", 4mm-5/32", 5mm-3/16", and 6mm-1/4".
  • Components:
    • Base Guide (A)
    • Bearing Washer (B)
    • Drill Guide (C)
    • Stop Collar (D)
    • Spring (E)
    • 35mm Forstner Bit (F)
    • Set Pins (G) (2 included)
    • Pilot Hole Template (H)
    • Hex Wrench (I)

Usage Features:

The jig is designed for ease of use and precision.

  1. Measurement and Marking: Users first determine the required hinge distance from the door edge, consulting hinge manufacturer instructions or templates. The jig supports various offset measurements (3mm-1/8", 4mm-5/32", 5mm-3/16", 6mm-1/4") which are selected using set pins. Horizontal center lines are marked on the cabinet door to align with the jig's notches.
  2. Jig Assembly: The 35mm Forstner Bit, Bearing Washer, Spring, and Stop Collar are assembled onto the Drill Guide. The Stop Collar's shoulder length is critical for controlling the drilling depth.
  3. Jig Placement and Securing: The jig is placed on the cabinet door, aligning its center notches with the marked lines. Non-marring clamps are used to secure the jig firmly in place on both sides.
  4. Pilot Hole Drilling: The magnetic Pilot Hole Template is positioned on the underside of the base. Two 1/16" pilot holes are drilled through the template.
  5. Hinge Cup Pocket Drilling: The Drill Guide Assembly, with the Forstner bit, is attached to a power drill and locked into the Base by turning it clockwise. The drill is engaged to full speed before drilling into the wood. Drilling continues until the Stop Collar makes contact with the Drill Guide, ensuring the correct 1/2" depth.
  6. Removal: After drilling, the Concealed Hinge Guide Assembly is removed by turning it counterclockwise, revealing a perfectly cut hinge cup pocket.
  7. Hinge Installation: The final step involves installing the concealed hinge and its mounting plates according to the hinge manufacturer's instructions, using the pilot holes and cup pocket created by the jig.

Maintenance Features:

  • Cleaning: The Concealed Hinge Jig should be kept dry, clean, and free from oil and grease. A clean cloth should always be used for cleaning.
  • Chemical Avoidance: It is crucial to avoid using brake fluids, gasoline, petroleum-based products, or any strong solvents to clean the jig. These chemicals can damage, weaken, or destroy the plastic components, potentially leading to serious personal injury.
  • Replacement Parts: When servicing, only identical replacement parts should be used to prevent hazards or product damage. All repairs should be performed by a qualified service technician to ensure safety and reliability.
  • Storage: The instructions and original sales invoice should be kept in a safe, dry place for future reference.

Safety Precautions:

The manual emphasizes several safety warnings:

  • Read Instructions: Users must read and understand all operating instructions for both the jig and the drill before use.
  • Power Disconnection: Always turn off and unplug the machine before attaching or changing accessories or adjusting the router bit.
  • Correct Assembly: Ensure all parts of the jig are assembled correctly before operation.
  • Sharp Bit: The Hinge Bit is extremely sharp. Always wear proper gloves when handling it and keep hands/fingers away from spinning router bits.
  • Material Restriction: Do not drill through any metal material with this jig.
  • Eye Protection: Always wear eye protection during use.
  • Common Sense: Safety is a combination of operator common sense and alertness.

The POWERTEC 35mm Concealed Hinge Jig is a practical tool for anyone needing to install concealed hinges accurately and efficiently, from DIY enthusiasts to professional cabinet makers.

PowerTec 71847 Specifications

General IconGeneral
BrandPowerTec
Model71847
CategoryPower Tool
LanguageEnglish

Related product manuals