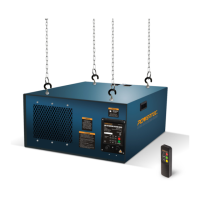
The POWERTEC AF1045 is a remote-controlled, 3-speed air filtration system designed to circulate and filter non-metallic dust in a workshop environment. It can be used on a workbench, hung from an overhead support, or mounted to the ceiling or wall.
Function Description
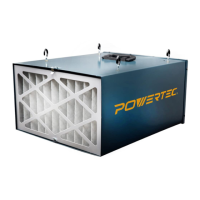
The primary function of the AF1045 is to filter airborne wood dust, improving air quality in a workspace. It is equipped with a 1/5 HP universal motor and utilizes a two-stage filtration system: a 5-micron pleated-type outer filter and a 1-micron bag-type inner filter. The system offers three speed settings (Low, Medium, High) and can be operated manually via a control panel on the unit or remotely using a handheld remote control.
Usage Features
Controls
The AF1045 can be controlled using either the control panel located at the rear of the unit or the remote control. The remote control has a range of up to 65 feet (20 meters).
ON/SPEED Control
To turn the unit on and select a speed, press the "ON/SPEED" button on either the remote control or the control panel.
- Press once for LOW speed. The LOW LED light on the control panel will illuminate.
- Press twice for MID speed. The MID LED light will illuminate.
- Press three times for HI speed. The HI LED light will illuminate.
Filtration Timing
The filtration timing feature allows the user to set the unit to operate for a specific duration before automatically turning off. This feature can only be controlled with the remote control.
- Press the "TIMER" button once for 1 hour. The 1HR LED light on the control panel will illuminate.
- Press the "TIMER" button twice for 2 hours. The 2HR LED light will illuminate.
- Press the "TIMER" button three times for 4 hours. The 4HR LED light will illuminate.
If no filtration timing LED light is illuminated, the system will operate continuously until manually turned off.
Turning the Unit OFF
To turn the unit off, press the "OFF" button on either the remote control or the control panel.
Installation
The air filtration system is shipped assembled but requires minimal installation.
- Work Bench Location: For workbench use, the unit should be placed on a stable surface, ensuring unrestricted airflow and away from corners or heating/cooling vents. Four rubber feet, attached with double-sided tape, are provided for stability. If not permanently mounted, the unit should be clamped in place.
- Hanging Mount: For ceiling or overhead support mounting, the unit must be hung at least 7 feet above the floor and away from corners or heating/cooling vents. Four eye bolts are threaded into the cabinet top and secured with flange nuts. These eye bolts are then connected to chains, cables, or steel strapping lines (not supplied) anchored to a building structure capable of supporting a minimum of 100 pounds. The unit must be level horizontally.
- Flush Mounting: For direct mounting to a building structure, mounting brackets are secured to the unit with M6 bolts (including flat and lock washers). The unit is then lifted and bolted to the mounting surface, aligning with pre-drilled holes. Lag bolts (1/4" shank) for studs or 1/4" nuts, bolts, and washers for supports are recommended. The bolt pattern for flush mounting is 17-1/4" from left to right and 31" from front to rear.
Power Source and Grounding
The unit is wired for 120 volts, 60 Hz alternating current. It must be connected to a properly grounded 3-prong receptacle. An approved 3-conductor cord with a 3-prong grounding-type plug is supplied. If a 2-prong receptacle is the only option, a temporary 3-prong to 2-prong grounding adapter may be used, but a properly grounded outlet should be installed by a qualified electrician as soon as possible. Extension cords, if used, must be 3-wire, of the correct gauge (16 gauge for up to 100 ft), and in good condition.
Maintenance Features
Changing the Filters
The inner and outer filters should be regularly cleaned or replaced, depending on usage and workshop environment, as clogged filters reduce air circulation.
- Lift the clips at the top and bottom of the cabinet to remove the outer filter.
- Pull the inner filter from the cabinet. The inner filter can be shaken out or washed to extend its life, but must be completely dry before reinstallation. Do not use compressed air to clean the inner filter, as high pressure can damage it and reduce filtering quality.
- Insert the new or cleaned inner filter, then install the new outer filter. Ensure the arrow on the outer filter, indicating airflow direction, is positioned correctly.
Remote Control Battery Replacement
The remote control requires two AA batteries.
- Remove the battery compartment cover.
- Replace the batteries, ensuring correct orientation.
- Replace the battery compartment cover.
Dispose of old batteries responsibly according to local regulations.
Checking and Replacing the Fuse
If the unit overloads, a fuse will break to cut the circuit and protect the unit.
- Turn the fuse cap counterclockwise and pull the fuse out of the control panel.
- If the fuse (Part No. 1045-009, 4 Amps) is damaged, replace it with a new one.
- Place the new fuse into the fuse cap and tighten the fuse cap.
Troubleshooting
The manual provides a troubleshooting guide for common issues such as the motor not running, motor stalls, system vibration/noise, poor airflow, and fuse blows, along with corrective actions.
Shipping Blocks Removal
Before initial operation, styrofoam shipping blocks installed around the motor to prevent damage during shipping must be removed.
- Lift the clips at the top and bottom of the cabinet and remove the outer filter.
- Pull the inner filter from the cabinet.
- Remove the four Phillips head screws securing the inner grate and remove the inner grate.
- Remove the shipping blocks.
- Replace the inner grate and filters.