1
Before you begin installation
Before you begin, you will need tools, supplies and adapters. It is best to make sure you have everything
you need before you start.
Amplifier Location
Allow air circulation around the amplifier.
When selecting a location, remember that amplifiers generate heat. Select a location where air can
circulate around the amplifier.
Do not cover the AMPLIFIER with carpets or enclose it behind interior trim panels.
Every installation will be a bit different based upon vehicle design, Check all locations and placements
carefully before making any cuts or connections.
Disconn ect Battery
Before you begin, always disconnect the battery negative terminal.
Important :
Emissions — This is a class A product. In a domestic environment this product may cause radio
interference in which the user may be required to take adequate measures. The cable recommended
length < 0,4 m. If the cable length is more than 0,4 meter, amplifier may cause radio interference.
Immunity — Amplifiers are sensitive to interference from radiated EMI and conducted EMI.
Permissible deviation from normal operation such as beeping noise.
Things to remember when installing your amplifiers.
The design philosophy of the amplifiers and mode of regulation requires that proper installation and load
impedance instructions be adhered to at all times.
Minimum impedance recommended for UNO
2
, UNO PLUS
2
and UNO XL
2
is 1ohm.
Minimum impedance for DUE
2
, QUATTRO
2
, QUATTRO PLUS
2
and QUATTRO XL
2
is 2 ohm stereo or
4ohm mono. Fuses are equipped with for UNO
2
(40A ATC), UNO PLUS
2
(35 A x 2 ATC), UNO XL
2
(30A X 4 ATC)
DUE
2
(30A ATC), QUATTRO
2
(30A X 2 ATC), QUATTRO PLUS
2
(40A X 2 ATC), QUATTRO XL
2
( 40A X 3 ATC)
These fuse ratings should be sufficient under normal working conditions. However, if the amplifiers are
overloaded (see minimum impedance above) fuses may blow.
Therefore, please try to avoid operating the amplifiers under these conditions.
1. Mount the amplifiers where air flow is the best.
2. Mount the amplifiers to a solid surface away from vibration, as these amplifiers are very heavy and
the vibration can damage the amplifiers.
3. Take extreme caution when mo
unting the amplifiers, so as not to damage the chassis with a drill or
screwdriver.
4. Run 4 AWG or 8 AWG wire from the battery, using fuses with 12″ of the positive battery terminal.
The fuse is to protect the car and your car audio system from the fire that could be caused by a
short circuit.
5. Run 4 AWG or 8 AWG ground wire as short as possible, to the closest chassis ground point.
Be sure to remove the paint around the chassis ground point to provide a more solid electrical
connection.
6. Run a 16 AWG (or larger) wire to the remote turn-on lead of the headunit.
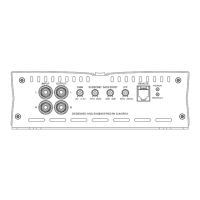
7. Connect the speakers as per wiring diagrams in the manual.
 Loading...