16
Weld deposit “stringy” and incom-
plete
Weld deposit too thick
Rusty, painted, damp, oil or greasy workpiece
Rusty or dirty wire
Poor ground contact
Incorrect gas / wire combination
Torch moved over workpiece too quickly
Gas mixture incorrect
Torch moved over workpiece too slowly
Welding voltage too low
Ensure workpiece is clean and dry.
Ensure wire is clean and dry.
Check ground clamp/workpiece connection
Check on the manual for the correct combination
Move the torch slower
See shielding gas table
Move the torch faster
Increase welding voltage
14.0 PROTECTION GASES GUIDE
METAL
Mild steel
Aluminium
Stainless steel
Copper, Nickel and Alloys
GAS
Argon + CO2
Argon + CO2 + Oxygen
Argon (thick < 25mm)
Argon + Helium (thick > 25mm)
Argon + CO2 + Oxygen
Argon + Oxygen
Argon
Argon + Helium
NOTE
Argon controls spatters
Oxygen improves arc stability
Arc stability, good fusion and minimum spatter
Higher heat input suitable for heavy sections. Minimum porosity.
Arc stability
Minimum spatter
Suitable for light gauges because of low flowability of the weld
pool
Higher heat input suitable for heavy sections.
Contact the technical service of your gas supplier to know the percentages of the different gases which are the most suitable to your application.
15.0 TECHNICAL DATA INFORMATION GUIDE
11
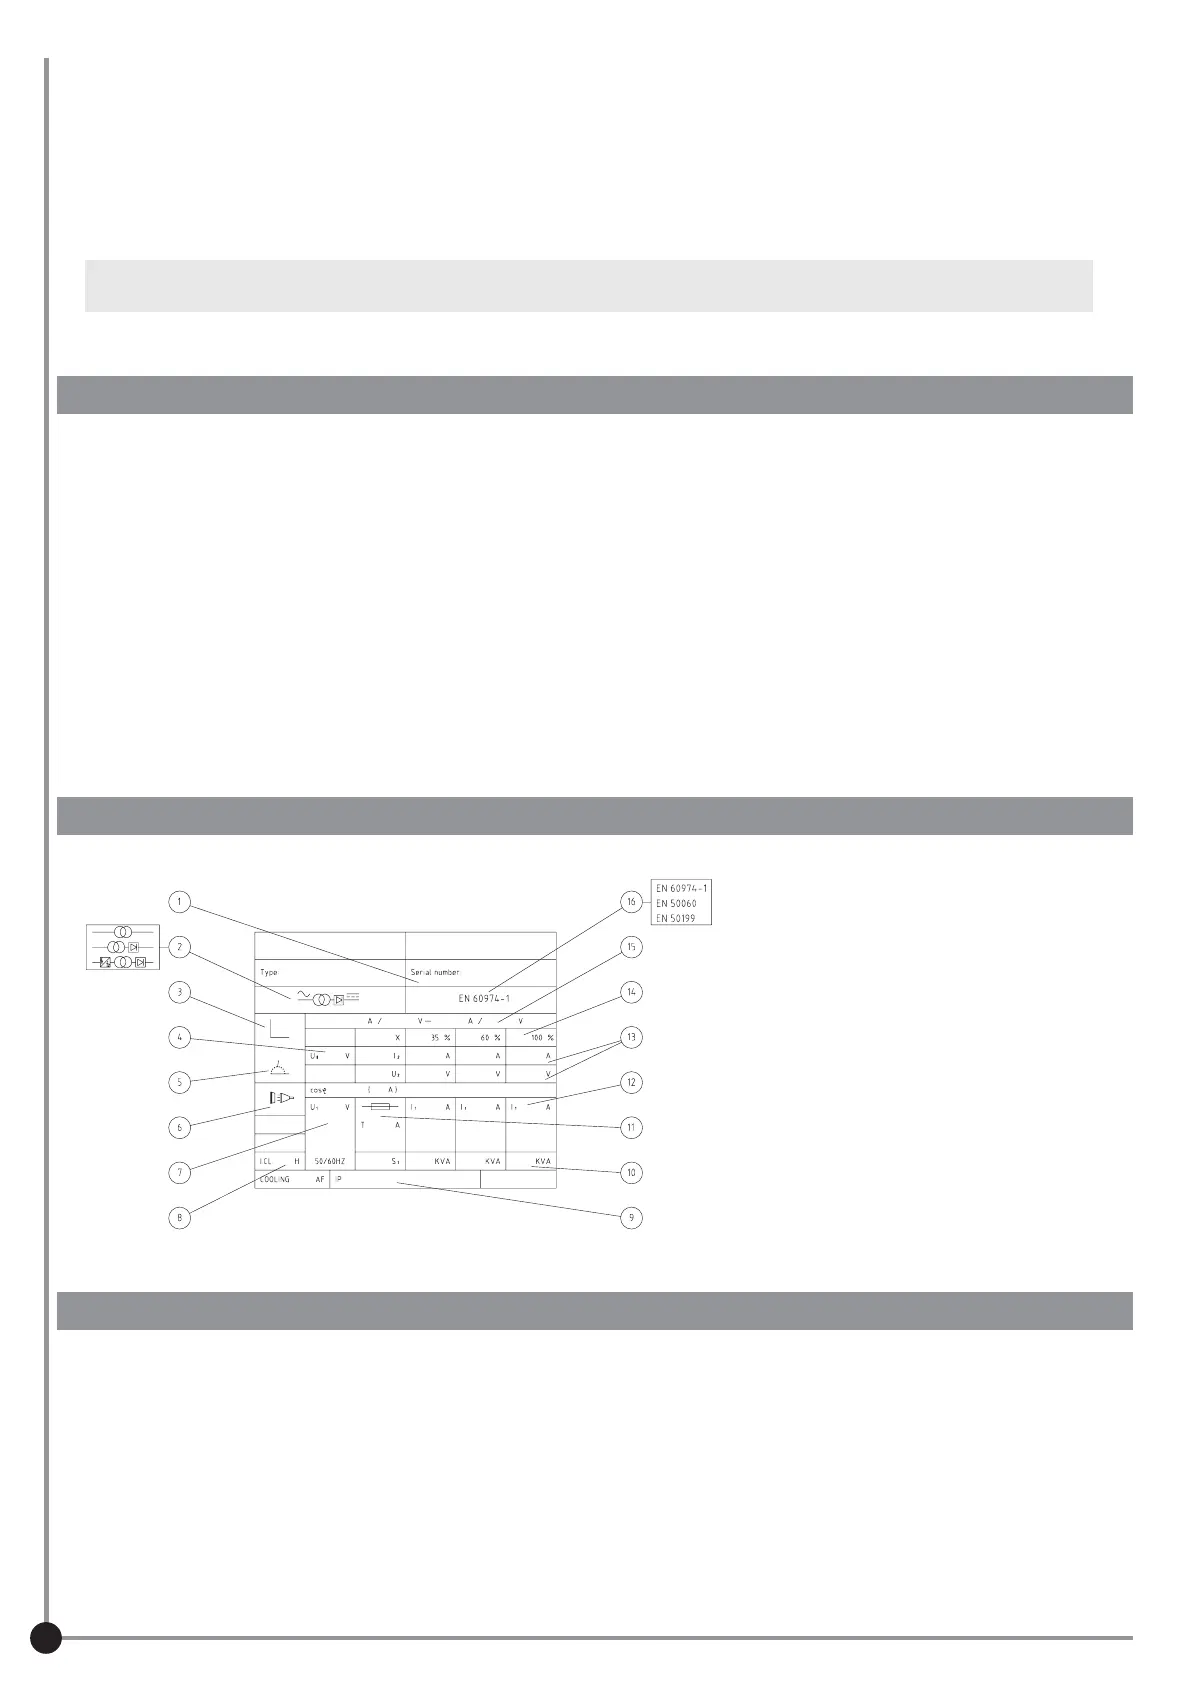
11
1 Serial Number of the Unit
22
22
2 Power source model
33
33
3 Kind of characteristic
44
44
4 Min. - Max rated No Load Voltage
55
55
5 Kind of welding
66
66
6 Symbol for the main supply and no. of phases
77
77
7 Rated value of the supply voltage
88
88
8 Code letter for degree of insulation
99
99
9 Protection degree
1010
1010
10 Power
1111
1111
11 Size of the necessary main fuse
1212
1212
12 Supply current
1313
1313
13 Welding supply and voltage
1414
1414
14 Power Factor
1515
1515
15 Control range (current / voltage)
1616
1616
16 Referring standard
16.0 WELDING HINTS AND MAINTENANCE
√√
√√
√ Always weld clean, dry and well prepared material.
√√
√√
√ Hold gun at a 45° angle to the workpiece with nozzle about 6mm from the surface.
√√
√√
√ Move the gun smoothly and steadily as you weld.
√√
√√
√ Avoid welding in very drafty areas. A weak pitted and porous weld will result due to air blowing away the protective welding gas.
√√
√√
√ Keep wire and wire liner clean. Do not use rusty wire.
√√
√√
√ Sharp bends or kinks on the welding cable should be avoided.
√√
√√
√ Always try to avoid getting particles of metal inside the machine since they could cause short circuits.
√√
√√
√ If available, use compressed air to periodically clean the hose liner when changing wire spools
IMPORTANT: Disconnect from power source when carrying out this operation.
√√
√√
√ Using low pressure air (20-30 PSI), occasionally blow the dust from the inside of the welder. This keeps the machine running cooler. Note: do
not blow air over the printed circuit board and electronic components.
√√
√√
√ The wire feed roller will eventually wear during normal use. With the correct tension the pressure roller must feed the wire without slipping. If
the pressure roller and the wire feed roller make contact (when the wire is in place between them), the wire feed roller must be replaced.
√√
√√
√ Check all cables periodically. They must be in good condition and not cracked.