This document provides an instruction manual for the Princess Smart Infrared Panel Heater models 350, 540, and 700. These models are identified by product numbers 01.348035.02.001, 01.348054.02.001, and 01.348070.02.001, respectively.
Function Description
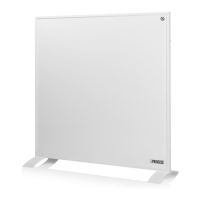
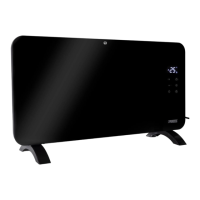
The Princess Smart Infrared Panel Heater is designed to provide heating for indoor spaces. It can be used as a standalone unit with feet or mounted on a wall. The heater features smart capabilities, allowing it to be controlled manually via built-in controls or remotely using the Princess Home app on a smartphone or smart speaker. It incorporates Wi-Fi technology for remote control and includes a timer function for scheduled operation. The device is intended for household purposes and is suitable for well-insulated spaces or occasional use.
Important Technical Specifications
The Princess Smart Infrared Panel Heater series includes three models with varying power outputs:
- Model 348035: 350W
- Model 348054: 540W
- Model 348070: 700W
All models share the following specifications:
- Voltage: 220-240V~
- Frequency: 50/60Hz
- Wireless technology: Wi-Fi
- Operating frequency: 2400MHz~2483.5MHz
- Max. radio-frequency power: 18 dBm
Usage Features
The heater offers both manual and smart control options:
- On/Off Switch (Side of Heater): A physical switch to completely turn the heater on or off.
- On/Off Touch Button: Press to turn the heater on; press again to set it to stand-by mode.
- Temperature Regulation: Use the '+' and '-' buttons to adjust the desired temperature between 0°C and 37°C. Holding these buttons will continuously increase or decrease the target temperature.
- Timer Button: When the device is on, pressing the timer button makes the time display blink "00:00". Use the '+' and '-' buttons to set the hours. The timer stops blinking if no button is pressed for 5 seconds. Setting the time to "00:00" disables the timer. Pressing the timer button again while it's blinking allows changing the duration. The remaining time is visible on the display. The device powers off after the set time expires. A long-press while the timer is running cancels the timer mode.
- Heating Indicator Lamp: On when the heating element is active, off when it's inactive.
- Display Screen:
- When the red on/off switch is off, the display screen is also off.
- When power is on (on/off switch is on) and the machine is in stand-by mode, the display screen is off, but if the device is connected to Wi-Fi, only the Wi-Fi icon is visible.
- Pressing the on/off touch button when power is on shows the Wi-Fi icon, current temperature, and time (if set on the phone) with a background light.
- After 10 seconds without pressing a touch button, the background light goes off, leaving only the Wi-Fi icon, current temperature, and time visible.
Smart Control (Princess Home App):
- App Download: The Princess Home app is available for Android and iOS devices. Users can download it from princesshome.eu/nl-nl/princess-home-app or by scanning the provided QR codes.
- Pairing Process:
- Ensure the heater is powered on.
- Open the Princess Home app.
- Select your country code, enter your cell phone number, and tap "Get" to receive a verification code.
- Enter the verification code and tap "Log in".
- Click "Add Device" and select the heater model to connect.
- Follow the in-app instructions to complete the connection.
- To put the heater into pairing mode, press and hold the Wi-Fi button for 6 seconds (it will beep 3 times).
- Automatic Time Update: When connected to the Princess Home App, the heater automatically updates its local time according to the phone's time.
Installation:
- Wall Mounting:
- The product must be installed at least 15 cm from the floor and 50 cm from the ceiling.
- It must be mounted at 4 points with a 300mm clearance on all sides.
- Measure the distance between the center of each bracket horizontally and vertically.
- Mark the positions of the 4 holes on the wall using the supplied wall mount drawings for correct measurements.
- Drill holes, insert plastic expanded plugs, and screw the 4 supplied screws into the plugs.
- Attach the panel heater onto the screws and slide it to the left so the screws drop into the securing slots.
- Foot Assembly (for freestanding use):
- Remove the bottom screws from the heater housing.
- Place the supplied feet and secure them by reinserting the screws into the housing.
- Ensure the feet are correctly located at the bottom end of the heater.
Safety Instructions:
- Do not move the appliance by pulling the cord.
- Place the appliance on a stable, level surface.
- Do not leave the appliance unattended when connected to the supply.
- This appliance is for household purposes only.
- Children aged 8 and above, and persons with reduced physical, sensory, or mental capabilities or lack of experience and knowledge, can use the appliance if supervised and instructed safely.
- Children shall not play with the appliance.
- Cleaning and user maintenance should not be performed by children without supervision.
- Children under 3 years should be continuously supervised.
- Children aged 3 to 8 years can switch the appliance on/off if it's in its intended operating position and they are supervised or instructed safely. They should not plug in, regulate, clean, or perform user maintenance.
- Do not immerse the cord, plug, or appliance in water or any other liquid.
- WARNING: Some parts of this product can become very hot and cause burns. Exercise particular attention when children and vulnerable people are present.
- Do not use this heater near a bath, shower, or swimming pool.
- Joists, beams, and rafters should not be cut or notched for installation.
- Do not install the appliance close to curtains or other combustible materials to prevent fire.
- The appliance must not be covered with insulating or similar material.
- The heater must not be located immediately below a socket-outlet.
- Do not use the heater if it has been dropped or if the glass panels are damaged.
- Use the heater on a horizontal and stable surface, or fix it to the wall.
- WARNING: Do not use this heater in small rooms occupied by persons unable to leave the room on their own, unless constant supervision is provided.
- WARNING: To reduce the risk of fire, keep textiles, curtains, or any other flammable material at a minimum distance of 1m from the air outlet.
- The heater must be installed so that switches and controls cannot be touched by a person in the bath or shower.
- WARNING: To avoid overheating, do not cover the heater.
Maintenance Features
- Cleaning: Before cleaning, unplug the appliance and allow it to cool down. Clean the appliance with a damp cloth. Do not use harsh or abrasive cleaners, scouring pads, or steel wool, as these can damage the device.
First Use Considerations:
- Ensure the voltage indicated on the device matches the local voltage (220V-240V 50/60Hz).
- A slight odor may occur during the first use; this is normal and temporary. Ensure adequate ventilation.
- Noises caused by the heater casing expanding and contracting during heating and cooling are normal and do not indicate a fault.
- Waste electrical products should not be disposed of with household waste. Recycle where facilities exist. Check with your local authority or store for recycling advice. The appliance materials are recyclable.
Support:
- All available information and spare parts can be found at www.princesshome.eu.