INSTALLATION
LOCATION: Though most often thought of as an under the kitchen sink counter
device, locating the system in a basement or garage may also be convenient,
depending on your circumstances.
PLACEMENT: The unit should not be further than 10 feet from a drain. Hang the
main unit on a wall or cabinet side wall using the holes in the back of the bracket.
Leave at least 3” clearance below the unit so that filter cartridges can be easily
replaced. A tank base has been provided to permit mounting the tank either
vertically or horizontally in the cradle portion of the base.
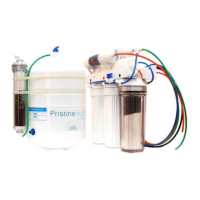
INSTALLATION:
1. View the TYPICAL INSTALLATION DIAGRAM and locate and identify all
components.
2. Mount the main unit to a wall or cabinet side wall.
3. Turn OFF the water supply.
4. On the COLD-WATER fitting to the sink, disconnect the flex line from the
stand pipe. For traditional piping, an Angle Stop Valve has been supplied.
5. Using Teflon tape, thread the female portion of the Angle Stop Valve on
to the pipe and re-connect the flex lines to the male threads. If your
plumbing is different, connect to the COLD-WATER line with a Saddle
Valve or another Valve that is applicable.
6. Place the Drain Saddle Valve on the sink drain assembly above the water
level in the P trap. Once secure, carefully drill through the hole in the tube
connecter to pierce the drain tube. Us a 1/8” dia. drill bit.
7. The Storage Tank is already pressurized, however, if it loses pressure use
a tire pump to put 7 psi of air pressure in the Storage Tank while empty.
The Storage Tank must be emptied of water for an accurate reading.
8. Mount the Faucet assembly.
9. Connect the BLUE 1/4" tubing from the unit to the Faucet.
10. Connect the BLACK 1/4" tubing from the unit to the Drain Saddle.
11. Connect the ORANGE 1/4" tubing from the unit to the Feed Water
Adapter.
12. Connect the GREEN 1/4" tubing from the unit to the Storage Tank.