EasyManua.ls Logo

Prodeco Technologies Mariner User Manual

Prodeco Technologies Mariner
30 pages
To Next Page IconTo Next Page
Page #1 background imageLoading...
Page #1 background image
Some of the content of this manual may differ from
your bicycle depending on the options of the bicycle
and what your dealer provided.
© 2013 PRODECO TECHNOLOGIES. All rights
reserved. PRODECO TECHNOLOGIES and the
PRODECO TECHNOLOGIES logo are trademarks of
PRODECO TECHNOLOGIES. Printed in USA.
USER GUIDE
2
2
2
0
0
0
1
1
1
3
3
3
IMPORTANT: ALUMINUM FRAME. NOT INTENDED
FOR ABUSIVE RIDING. DO NOT JUMP OR HIT
CURBS AND AVOID IMPACTS. INSPECT FRAME
FOR FRACTURES. SERIOUS BODILY HARM CAN
OCCUR IF MISUSED.
SEE MANUAL FOR ADDITIONAL INFORMATION.

Table of Contents

Question and Answer IconNeed help?

Do you have a question about the Prodeco Technologies Mariner and is the answer not in the manual?

Prodeco Technologies Mariner Specifications

General IconGeneral
BrandProdeco Technologies
ModelMariner
CategoryBicycle
LanguageEnglish

Summary

Chapter 2: Getting Started

Registering your new bike

Explains the process and importance of registering the bicycle for warranty activation.

Chapter 3: Basic Instructions

Mechanical safety check

Procedure for performing a pre-ride inspection to ensure the bicycle is safe to operate.

Using your twist throttle

Detailed explanation on operating the twist throttle for speed and power control.

Using your brakes

Proper techniques and adjustments for using both front and rear brakes effectively.

Charging your battery

Instructions for safely charging the bicycle's Li-ion battery.

Chapter 5: Perfect Fit and Ride

Brake lever adjustments

Instructions for adjusting brake lever reach and position for comfort and control.

Chapter 6: Tire, Tube, Wheel and Axle Repair

Removing the front motor wheel

Step-by-step guide to safely remove the front wheel with the motor.

Installing the front motor wheel

Detailed instructions for reinstalling the front motor wheel correctly.

Removing and installing the rear wheel

Procedure for removing and reinstalling the rear wheel without specialized tools.

Replacing a tube or tire

Instructions for changing bicycle tubes and tires, including bead and pressure tips.

Chapter 7: Maintenance and Replacement

Brake Bed-In and adjustments

Essential procedure for breaking in new brake pads and rotors for optimal performance.

Front Brake Fine Tuning

Detailed steps for adjusting and tuning the front disc brake system.

Disc Brake Pad Replacement

Instructions for replacing worn brake pads on the disc brake system.

Rear Brake Pad Replacement

Procedure for replacing worn brake pads on the rear V-brake system.

Maintenance schedule

A comprehensive schedule outlining routine maintenance tasks.

Torque specifications for common parts

Chart detailing correct torque values for various bicycle bolts and nuts.

Chapter 8: Battery Management

Removing the battery

Instructions for safely removing the battery from the bicycle.

Installing and locking the battery

Guidance on correctly installing and securing the battery onto the mount.

Charging the battery

Step-by-step instructions for charging the battery on or off the bicycle.

Chapter 9: Electrical Components

Chapter 10: Warranty Service and Repair

2 Year limited warranty

Overview of the warranty coverage for bicycle components and frame.

Registering your bike

Instructions and importance of registering the bicycle for warranty validation.
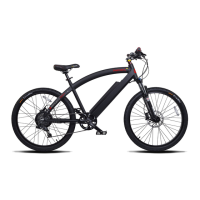
Chapter 11: Specifications

Chapter 12: Parts

Related product manuals