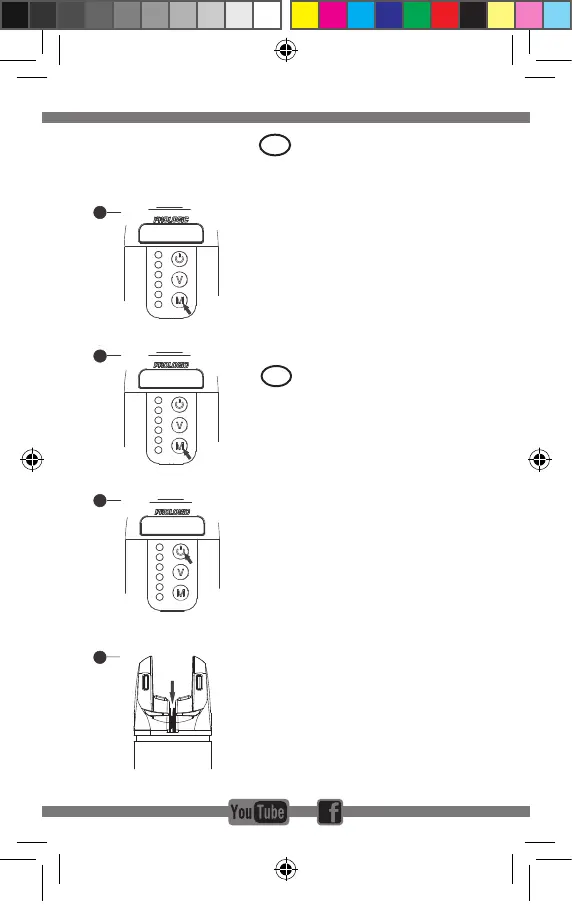
PAIRING ALARM
HEADS TO RECEIVER
1. OnthereceiverpressandholdMbutton,therst
lightonthereceiverwillbeactivatedandash
2. Short press M button to select the colour of LED of
your choice
3. Once you have selected your colour choice LED
conrmbypressingtheON/OFFbutton
4. Trigger a bite on your preferred alarm head to
registerandconrmthelink
5. Once the receiver beeps the operation is now
complete
To relocate any pre-programmed alarm heads, you
mustrstwipe/clearthereceivermemory.
To wipe/clear the memory on the receiver press and
hold M button for 8 seconds, the receiver will sound
with5beepstoconrmallthelinkshasbeencanceled.
UK
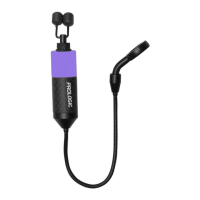
K3 ALARM
1.Two places for isotope
2.Rubble plate for rod
3.Left button:
Short press:Volume:0(silence) to 3
Long press:Mute 30 seconds
4.Bite Light:
Run=Left+right flash,continue 15 seconds
5.Battery:CR2*1
6.Low power warning(2.4V)
10 minutes warning 3 times ;stop after 1 hrs
7.Range:150M~300M
8.Drop back=right flash,continue 15 seconds
9.Right button:
Short press:sensitivity 1-5
Long press:Power off/on
10.Green,yellow,red,blue,purple,white
11.Carbon shell
12.Small size (Φ32*79mm)
13.Rubber ring on the boby:
Extra increase Green/Yellow/Red/Blue/
Purple/White in a plastic bag
14.TPR case for bite alarm
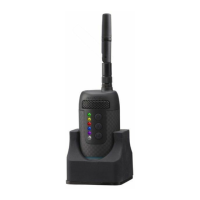
K3R RECEIVER
1 2
1
4
5
8
9
11
2
3
6
10
7
12
14
13
R1
R2
R3
R4
R5
R6
R7
R8
R9
R10
R1.Multinmedia speaker
R2.Bite lights:
Green,Yellow,Red,Blue,Purple,White
R3.Carbon shell
R4.Battery:3*AAA
R5.Bivvy light
A)Clour:White
B)Mode:Always on,Always off,
Automatic(trigger when continuous bites)
R6.Collapsible antenna
R7.Low power warning(4V)
10 minutes warning 3 times ;stop after 1 hrs
R8.Buttons
A)First button:Long press for power on/off;
Short press for Bivvy light on/off
B)Middle button:Long press for Tone(1-4);
Short press for Volume(0-4)
C)Bottom button:Short press for memory(last
bite light);Long press for register
R9.Sling with buckle
R10.Rubber base (magnet) with Metal plate.
It can fix on the bivvy,also available on Bivvy
table
Battery Type:CR2*1 PCS for Alarm
Battery Type :AAA*3 PCS for Receiver
K3 ALARM
1.Two places for isotope
2.Rubble plate for rod
3.Left button:
Short press:Volume:0(silence) to 3
Long press:Mute 30 seconds
4.Bite Light:
Run=Left+right flash,continue 15 seconds
5.Battery:CR2*1
6.Low power warning(2.4V)
10 minutes warning 3 times ;stop after 1 hrs
7.Range:150M~300M
8.Drop back=right flash,continue 15 seconds
9.Right button:
Short press:sensitivity 1-5
Long press:Power off/on
10.Green,yellow,red,blue,purple,white
11.Carbon shell
12.Small size (Φ32*79mm)
13.Rubber ring on the boby:
Extra increase Green/Yellow/Red/Blue/
Purple/White in a plastic bag
14.TPR case for bite alarm
K3R RECEIVER
1 2
1
4
5
8
9
11
2
3
6
10
7
12
14
13
R1
R2
R3
R4
R5
R6
R7
R8
R9
R10
R1.Multinmedia speaker
R2.Bite lights:
Green,Yellow,Red,Blue,Purple,White
R3.Carbon shell
R4.Battery:3*AAA
R5.Bivvy light
A)Clour:White
B)Mode:Always on,Always off,
Automatic(trigger when continuous bites)
R6.Collapsible antenna
R7.Low power warning(4V)
10 minutes warning 3 times ;stop after 1 hrs
R8.Buttons
A)First button:Long press for power on/off;
Short press for Bivvy light on/off
B)Middle button:Long press for Tone(1-4);
Short press for Volume(0-4)
C)Bottom button:Short press for memory(last
bite light);Long press for register
R9.Sling with buckle
R10.Rubber base (magnet) with Metal plate.
It can fix on the bivvy,also available on Bivvy
table
Battery Type:CR2*1 PCS for Alarm
Battery Type :AAA*3 PCS for Receiver
CONNECT THE ALARM TO THE RECEIVER
5 6
A)Long press the bottom button on the receiver
B)Short press the bottom buttonthe receiver to choose which
colour you want to register
C)Press the first button on the receiver to confirm
D)Turn the roller on the bite alarm
E)You head “BIBIBI”form receiver ,It means success
for register
VERBINDEN DES BISSANZEIGERS MIT DEM K3
RECEIVER
1. Drücken sie den M Knopf auf dem Reciever, bis
die erste LED anfängt zu blinken.
2. Drücken sie den M Knopf so oft, bis sie die
gewünschte LED Farbe erreicht haben.
3. Wenn sie die passende LED ausgewählt haben,
drücken sie den AN/AUS Knopf.
4. Bringen sie nun den Bissanzeiger, den sie für
diese LED auswählen möchten zum Piepen, um
die Verbindung herzustellen.
5. Sobald der Reciever anfängt zu piepen ist die
Programmierung abgeschlossen.
Um bereits zuvor eingespeicherte Bissanzeiger auf
andere LEDs zu verlegen, müssen sie zunächst den
Recieverspeicher löschen.
Um den Speicher zu löschen, drücken sie den M Knopf
für 8 Sekunden. Der Reciever wird nun 5 Pieptöne
von sich geben. Dies bestätigt, dass alle registrierten
Bissanzeiger gelöscht wurden.
DE
Manual K3 Receiver.indd 8 19/06/18 12:17
 Loading...