UNPACKINGANDINSTALLATION/DISIMBALLOEDINSTALLAZIONE/DEBALLAGEET
INSTALLATION/AUSPACKENUNDINSTALLATION
I
GB
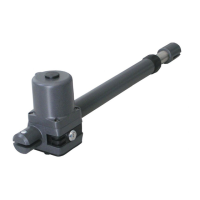
ForarightinstallationofthegearmotorSHARK,doasfollows:
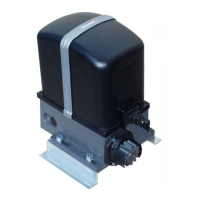
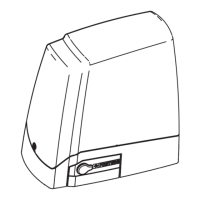
1-OpenthepackandtakethegearmotorSHARK,bymakingsurethatithasnotbeendamagedduringthetransport.
2-Makesurethatthewingofthegateisperfectlyhorizontal.
3-Establishthepositionwhereyouwanttoinstallthegearmotor,byrespectingtheopeningthatyouwanttodo,fromaminimumof
90°toamaximumof110°(figure3).
4-Itisadvicedtoputashoulderofarrestduringtheclosing(figure4).
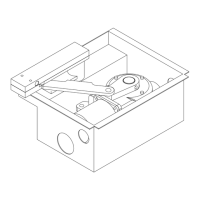
5-Intheestablishedposition,digonthegroundanddoatrenchofsuchdimensions,thattheprotectionboxmanagesto besettled
respectingthemisuresshowninthefigure5.
6-Makesurethatneartheholes"F1"(figure5)thereisanoutletforthewater.Asaconsequence,itwillbeadvicedthepresenceof
waterpodsandafollowingoxidationofthegearmotor.
7-Puttheboxintothetrench,andmakesurethatthepinisalinedwiththepivotofthewingofthegateandthatthemisureshownin
figure6isrespected.
8-Planthepassageoftheelectricalcablesthroughthehole"F2"(figure6)
9-Makesurethattheboxlaysinahorizontalperfectpositionandundergronditbyusingsomeconcrete.
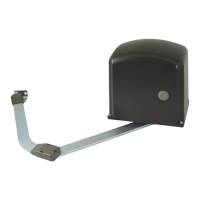
10-Putthegearmotorontebottomoftheboxandfixitattheturnedpinswiththesuitablenut(figure7).
11-Mountthelever"L1"onthepincomingoutfromthebox(figure8).Mountthentheleveroftransmission"L2"onthelever"L1"(just
mounted)andthelever"L3"(comingoutfromthegearmotor),passingthroughthetwopinsonthesuitableholes(figure9).
12-Closetheboxwiththecover,byfixingitwiththesuitablebolts.
13-Putthewingofthegateandthelever"L1"comingoutfromtheboxsothattheyareperfectlyalined(inaxis).Fixthemwithsolding
(figure10).
14-Repeatthesameoperationfortheotherwing.
PerunacorrettamessainoperadelmotoriduttoreSHARK,agirecomesegue:
1-Aprirel'imballoedestrarreilmotoriduttoreSHARK,avendocuradiverificarechelostessononabbiasubitodanniduranteil
trasporto.
2-Assicurarsichel'antadelcancellosiaperfettamenteorizzontale.
3-Stabilirelaposizioneincuisivuoleinstallareilmotoriduttore,asecondadell'aperturachedovràeseguire,daunminimodi90°a
unmassimodi110°(figura3).
4-Siconsigliadisistemareunabattutadiarrestoinchiusura(figura4).
5-Nellaposizionestabilita,praticaresulterrenounoscavodidimensionitalidapoteraccoglierelacassettadiprotezione
rispettandolemisureindicateinfigura5.
6-Assicurarsicheinprossimitàdeifori"F1"(figura5)visiaunaviadiscaricoperl'acqua.Saràcosìevitatalaformazionediristagni
d'acquaeunaconseguenteossidazionedelmotoriduttore.
7-Sistemarelacassettaall'internodelloscavo,assicurandosicheilpernosiaallineatoalcardinedell'antadel cancelloechesia
rispettatalamisuraindicatainfigura6.
8-Prevedereilpassaggiodeicavielettriciattraversoilforo"F2"(figura6).
9-Assicurarsichelacassettasiainperfettaposizioneorizzontaleeinterrarlautilizzandodelcalcestruzzo.
10-Sistemareilmotoriduttoresulfondodellacassettaefissarloaipernifilettaticongliappositidadi(figura7).
11-Montarelaleva"L1"sulpernouscentedallacassetta(figura8).Montarepoilalevaditrasmissione"L2"sullaleva"L1"(appena
montata)elaleva"L3"(uscentedalmotoriduttore),infilandoidueperninegliappositifori(figura9).
12-Chiuderelacassettaconilcoperchio,fissandoloconleappositeviti.
13-Posizionarel'antadelcancelloelaleva"L1"uscentedallacassettainmodochesianoperfettamenteallineate(inasse).Fissarle
mediantesaldatura(figura10).
14-Ripeterelastessaoperazioneperl'altraanta.
PourunecorrectemiseenoeuvredumotorèducteurSHARK,fairecommesuit:
1-Ouvrirl'emballementetextrairelemotorèducteurSHRK;enverifiantquelemêmen'apassubidomagespendantletransport.
2-S'assurerquelevantaildelagrillesoitperfectementhorizontal.
3-E'tablirlapositionoùonveutinstallerlemotorèducteurselonlaoeuverturequeondevràfaire,deunminimumde90°jusqu'àun
maximumde110°(figure3).
4-Onconseilledemettreunefeuilluredearrêtenfermeture(figure4).
F
6
CANCELLIAUTOMATICI
 Loading...