TR3100 Thermostat Instructions
ver 1.4
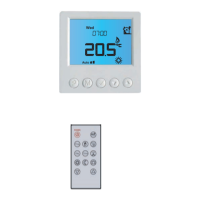
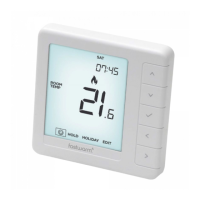
Buttons and LCD symbols
Wed
Auto
Buttons Short Press
Press and Hold for 3 seconds
Power button (Turning on/off thermostat), with thermostat
turned off, you will only see temperatrue display on LCD.
With thermostat turned on, you will see more detailed
information on LCD, such as time,day,mode, etc.
Setting the schedules(programmes) while
thermostat is turned on.
Setting the menus(with thermostat turned off)M button,Mode selection( Auto mode / manual mode )
Up arrow button, increase the set value
Show floor temperature in AF model
Down arrow button, decrease the set value
Set the time and week days
Bring up vacation mode
Confirmation button, accept the set values
M
The buttons are locked.
Heating is turned on
Auto mode
Manual mode
Vacation mode
Room or floor temperature is below 0
°C
Room or floor temperature is greater than 50
°C
meaning that floor sensor is short-circuit or broken.
Err
LO
HI
Temporary temperature override
Model
Frost protection activated
Set temperature
Programmes number
Room temperature
RT
AF/F/A
AUTO
SET
Floor temperature
Economy temperature
Comfort temperature
FT
The difference between set
temperature and room
temperature,
more bars means more difference.
override
P
Symbols Description Symbols Description
Configuration Menu
To enter into menu settings, follow below 2 steps,
Then by each press of button M will cycle the thermostat throug
each menu, press button M to accept and proceed to the next menu. To store the menu settings and exit, press button P.
h available menus as below. Use up or down arrow button to change the setting for
This thermostat is a combination model allowing you to
choose between 3 different models. A, AF and F model.
A model: air onl y, with built in sensor
rAF model: air & floo , with both built in and remote sensor
F model: floor only, with remote sensor
Menu #
01 Model (model selection)
Sd (switching differential)
FTC (floor temp calibrate,
AF, F model only)
TR (Temperature readout,
AF model only)
MAXFT (set maximum floor
temperature in AF model)
BL (backlight turning-on time
setting)
TF (temperature format)
CLOCK
24 (default), 12- hour or 24-hour clock system
ON = activated; OFF = deactivated
PTD (program time delay)
02
04
05
06
07
08
09
10
11
12
13
14
Features description
Features Explanation
Adjustment
1 = 1 degree(default), 2 =2 degrees.........
5s , 10s , 15s ,20s (default) , 25s, 30s.
A= to show air temperature only, F=to show floor
temperature only, A--F = to show both in 5 second intervals
40 °C by default, setting range 20°C ~ 40°C
30 seconds(default) On= always on, OFF= always off
C or F
A
Remarks:
Not all menus are visible in certain models. For example, if you set the thermostat to or F model, menu 6 and menu 7 will not be visable.
A, AF, F
(press up or down button to adjust)
-1 = decrease 1 degree, 1 = increase 1 degree...
The numbers of degree difference before switching.
The default is 1°C which means the thermostat will
switch the
heating on 0.5°C below the set temperature
and will turn it off 0.5°C above the set temperature.
With a 2°C differential,
the heating will switch on 1°C
below the set temperature and will switch off 1°C
above the set temperature.
ATC (air temp calibrate)
03
-1 = decrease 1 degree, 1 = increase 1 degree...
This is to calibrate air temperature if required.
This is to calibrate floor temperature if required.
This gives more time for user to set the programmes
before reverting back to standard display
This gives option to choose to show air temperature,
floor temperature or to show both floo& air in interval.
This is to protect the floor surface.
This is to set the backlight turning-on time. User
can also set the backlight always on or off.
This alows users to select between °C or °F.
12/24 HOUR clock system selection
SC(setpoint configuration)
MD(model display)
See overleaf for further setting up information
AL( Auto lock)
4 means 4 independent setpoints, 2 means: setpoint 1 is the
same to setpoint 3 , setpoint 2 is the same to setpoint 4
This allows user to select 2 kinds of default setpoints
To display model A/AF/F on LCD
To lock the buttons automatically after 20 minutes of no
operation on buttons.
FP(Frost protection)
ON= activated, OFF= deactivated
ON= activated, OFF= deactivated
This is to avoid room temperature goes below 5
°C
Optional
Remote
Control
Step 1, Turn the thermostat off by pressing P button; Step 2, Press and hold button M for 3 seconds until you see Menu 01 on LCD