Do you have a question about the prowarm TR3100 and is the answer not in the manual?
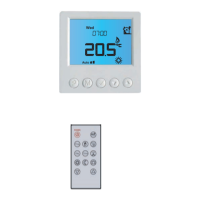
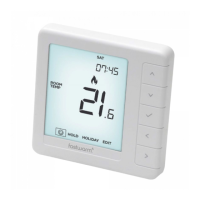
Switches the thermostat unit on and off.
Accesses menu, settings, and toggles between manual/auto modes.
Allows adjustment of time/day and removes override when held.
Increases temperature, adjusts settings, or activates holiday mode when held.
Decreases temperature, adjusts settings, or activates holiday mode when held.
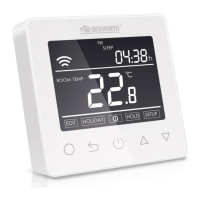
Indicates that the control buttons on the thermostat are locked.
Shows that a temporary temperature override is active.
Indicates the thermostat is using only the air temperature sensor.
Signifies that the thermostat is executing pre-programmed schedules.
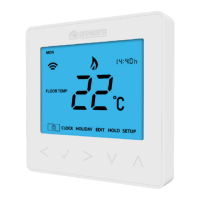
Indicates that the heating system is currently active.
Shows that the frost protection feature is currently active.
Indicates the thermostat uses both air and floor temperature sensors.
Denotes that the thermostat is operating in vacation mode.
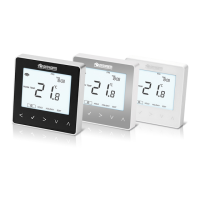
Shows the current ambient room temperature.
Indicates the thermostat is maintaining a comfort temperature.
Indicates the thermostat is using only the floor temperature sensor.
Shows the current temperature measured by the floor sensor.
Signifies the thermostat is operating in an energy-saving mode.
Shows the active program number (1, 2, 3, or 4).
Notes the absence of a red light on the thermostat itself.
Uses air sensor only; suitable for non-underfloor heating devices.
Uses air and floor sensors; ideal for primary underfloor heating.
Uses floor sensor only; for secondary heating or remote placement.
Press the button to start the time adjustment process.
Use arrow buttons to change time; hold for 15-minute increments.
Press the button again to make the day of the week flash.
Use arrow buttons to select the correct day of the week.
Press the button to accept settings and exit the configuration.
Thermostat follows pre-programmed schedules for heating control.
Maintains a constant user-set temperature 24/7.
Use the Menu (M) button to toggle between Auto and Manual modes.
Hold the Clock button for 3-5 seconds to exit override and return to AUTO.
Press arrow button, then adjust set temperature and wait 5 seconds.
Hold Menu (M) for 5s in AUTO mode until 'PROG' appears.
Press UP to select individual days or hold UP for Mon-Sun.
Use Menu (M) and arrows to set start time and temperature for Program 1.
Use Menu (M) and arrows to set start time and temperature for Program 2.
Use Menu (M) and arrows to set start time and temperature for Program 3.
Use Menu (M) and arrows to set start time and temperature for Program 4.
Press the Menu (M) button to accept and exit programming.
Use the programmed button to erase times (e.g., for Sat/Sun).
Hold Down button for 3s to show floor temp; reverts to air temp in 5s.
Temporarily change set temperature until the next scheduled set-point.
Press and hold the Clock button for 5 seconds to cancel override.
Hold Menu (M) and Clock buttons for 5s in standby to reset all settings.
Hold Up and Down arrows for 3s to lock/unlock buttons.
Hold Vacation button for 3s to enter vacation mode, maintaining a set temp.
Use the same procedure (hold Vacation button) to exit vacation mode.
Use arrow buttons to set desired vacation temperature.
Use a flat head driver to carefully separate the front and back plates.
Carefully unplug the ribbon connector from the front half.
Screw the thermostat back plate onto the wall or back box.
Terminate the thermostat wiring as per the diagram provided.
Reconnect ribbon cable and clip the front and back halves together.
Illustrates connections for Heating Mat, Sensor, and AC power.
Provides overall dimensions for the thermostat unit.
Press the power button to turn the thermostat on or off.
Hold Menu (M) button for 3-5 seconds in off position to enter menu.
Choose between Air, Air/Floor, or Floor temperature modes.
Set temperature change required for on/off switching (0.5 or 1 degree).
Calibrate the air temperature sensor for accuracy.
Calibrate the floor temperature sensor for accuracy.
Set delay before returning to home screen during programming.
Select display: Air, Floor, or alternating Air/Floor temperature.
Set a maximum limit for the floor temperature in AF mode.
Configure backlight duration or set it to be permanently on/off.
Choose between Celsius or Fahrenheit display.
Select display format: 12-hour or 24-hour clock.
Activate or deactivate frost protection feature.
Configure programming options for different temperature settings.
Details on LO, HI, and ERR messages and their causes.
Control power state of the thermostat via remote.
Confirm selected settings on the thermostat.
Access or initiate programming functions.
Lock or unlock the thermostat's physical buttons.
Access the settings menu when the thermostat is turned off.
Set the current day of the week.
Set the current time on the thermostat.
Switch between automatic and manual operating modes.
Display floor temperature when in AF mode.
Cancel any temporary temperature override.
Activate or deactivate vacation mode.
Decrease the target temperature or setting value.
Increase the target temperature or setting value.
| Brand | prowarm |
|---|---|
| Model | TR3100 |
| Category | Thermostat |
| Language | English |