Do you have a question about the PT W5706 and is the answer not in the manual?
Instructions on how to extend, lock, and retract the tape measure.
Steps to verify and adjust the accuracy of the horizontal laser line.
How to power on and adjust the laser head for different patterns.
Details the product warranty, exclusions, and claims process.
Lists and describes the measuring, leveling, and laser projection capabilities.
Warnings about laser radiation, eye exposure, and use by children.
Step-by-step guide for installing the required LR44 batteries.
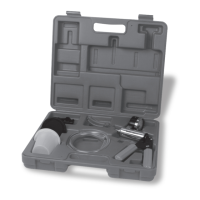
The device is a 4-in-1 Laser Pro Measuring Tool, designed for various measuring and leveling tasks. It combines the functionalities of a tape measure, a laser level, and a spirit level, making it a versatile tool for both professional and household use.
The primary function of this device is to provide accurate measurements and project laser lines for leveling purposes. It integrates a tape measure for linear measurements, a laser for projecting straight lines in different patterns, and three bubble levels for verifying horizontal, vertical, and 45-degree angles. This combination allows users to perform multiple tasks with a single tool, such as hanging pictures, installing shelves, laying tiles, or any other task requiring precise alignment and measurement.
The device includes an 8 ft. (250 cm) tape measure reel. To use it, simply draw out the tape to the desired length. The tape measure features an auto-locking mechanism, meaning it will stay extended at the desired length without needing to hold it. To retract the tape, press the tape measure lock release button (6). It is important to feed the tape in slowly when reeling it back to avoid cuts or injuries.
The laser function is a key feature, allowing the projection of straight lines. The laser head (1) can be adjusted to project different patterns: a horizontal line, a vertical line, or a cross beam. To activate the laser, turn the laser power switch (2) from "O" (off) to "I" (on). The laser will remain on until the switch is turned off. The laser head can be moved to the top position for a horizontal line, the bottom position for a vertical line, or the middle position for a cross beam. When using the laser, it is crucial to point it towards the intended surface and away from anyone's eyes. The laser line is not self-leveling, so manual adjustment is required to ensure accuracy.
The device incorporates three bubble levels: a vertical bubble level (7), a horizontal bubble level (8), and a 45-degree bubble level (9). These levels allow users to quickly and accurately check for plumb, level, and 45-degree angles. By placing the tool on a surface, the bubbles indicate whether the surface is perfectly aligned.
The tool also features both SAE (Standard American English) ruled straight edge (4) and Metric ruled straight edge (10) for direct measurements and drawing straight lines.
The device requires three LR44 / AG13 button cell batteries. The battery compartment (3) is located near the power switch (2). To install or replace batteries, remove the securing screw with a PH0 Phillips head screwdriver, open the compartment, and insert the new batteries, paying attention to polarity. The negative contact is indicated inside the compartment, and the positive side of the battery should face towards the spring. After inserting the batteries, replace the battery cover and turn the screw until snug, being careful not to overtighten to avoid damage.
Before initial use, it is recommended to verify the accuracy of the horizontal laser line. Place the tool on a level surface and adjust the laser head to the cross setting. Project the laser onto a wall approximately 5-10 ft. away. Use a ruler to verify that the left and right sides of the laser line are equal distances from the floor. If adjustment is needed, the angle of the projected laser line can be adjusted by carefully turning the laser head (1) using a straight edge or a large screwdriver. Care must be taken not to scratch or damage the laser lens during this process.
The device comes with a 1-year warranty from the original retail purchase date. This warranty covers defects in materials and workmanship under normal use and service. If a product is found to be defective within 90 days of purchase, it can be returned for a free replacement. After 90 days and up to one year, any defective parts will be replaced at no charge, provided a sales receipt showing the purchase date accompanies the returned product or parts. For parts returned after 90 days, requests should be remitted, postage prepaid, to PERFORMANCE TOOL, P.O. Box 88259 Tukwila, WA 98138.
The warranty does not cover consumables such as blades, bits, punches, dies, bulbs, fuses, and hoses, which are expected to be replaced under normal use. It also does not apply to products or parts used for purposes other than their design, or those that have been repaired or altered in a way that affects performance or reliability. Misuse, neglect, accident, or normal wear and tear are also not covered.
To ensure the longevity and accuracy of the tool, it should be handled with care. Avoid dropping it from heights, as this can damage the glass indicators and other sensitive components. When reeling in the tape measure, do so slowly to prevent injury. Always store the tool in a safe place, away from children under 14, to prevent misuse and potential eye damage from the laser.
It is crucial to read, understand, and follow all instructions and warnings before operating the tool. Failure to do so can result in personal injury, property damage, and void the warranty. The laser emits radiation, and direct eye exposure should be avoided. Do not stare into the beam or view it directly with optical instruments. This device is not suitable for children under 14, and misuse can lead to permanent eye damage. The laser product is Class IIIA, with specific power output and accuracy, and is not suitable for outdoor use. The laser may require a simple adjustment to plumb level before its first use.
| Type | Multimeter |
|---|---|
| Display | LCD |
| Safety Rating | CAT III 600V |
| Current Range | 10A AC/DC |
| Frequency Range | 10MHz |