10
11
Stage One. Matching the attachment with the daylight sight’s reticle.
Keep the encoder (5) pressed for two seconds to enter the menu.
Choose the icon by rotating the encoder. Push the encoder. Figure “1”
and horizontal arrows 1 will show up next to the icon.
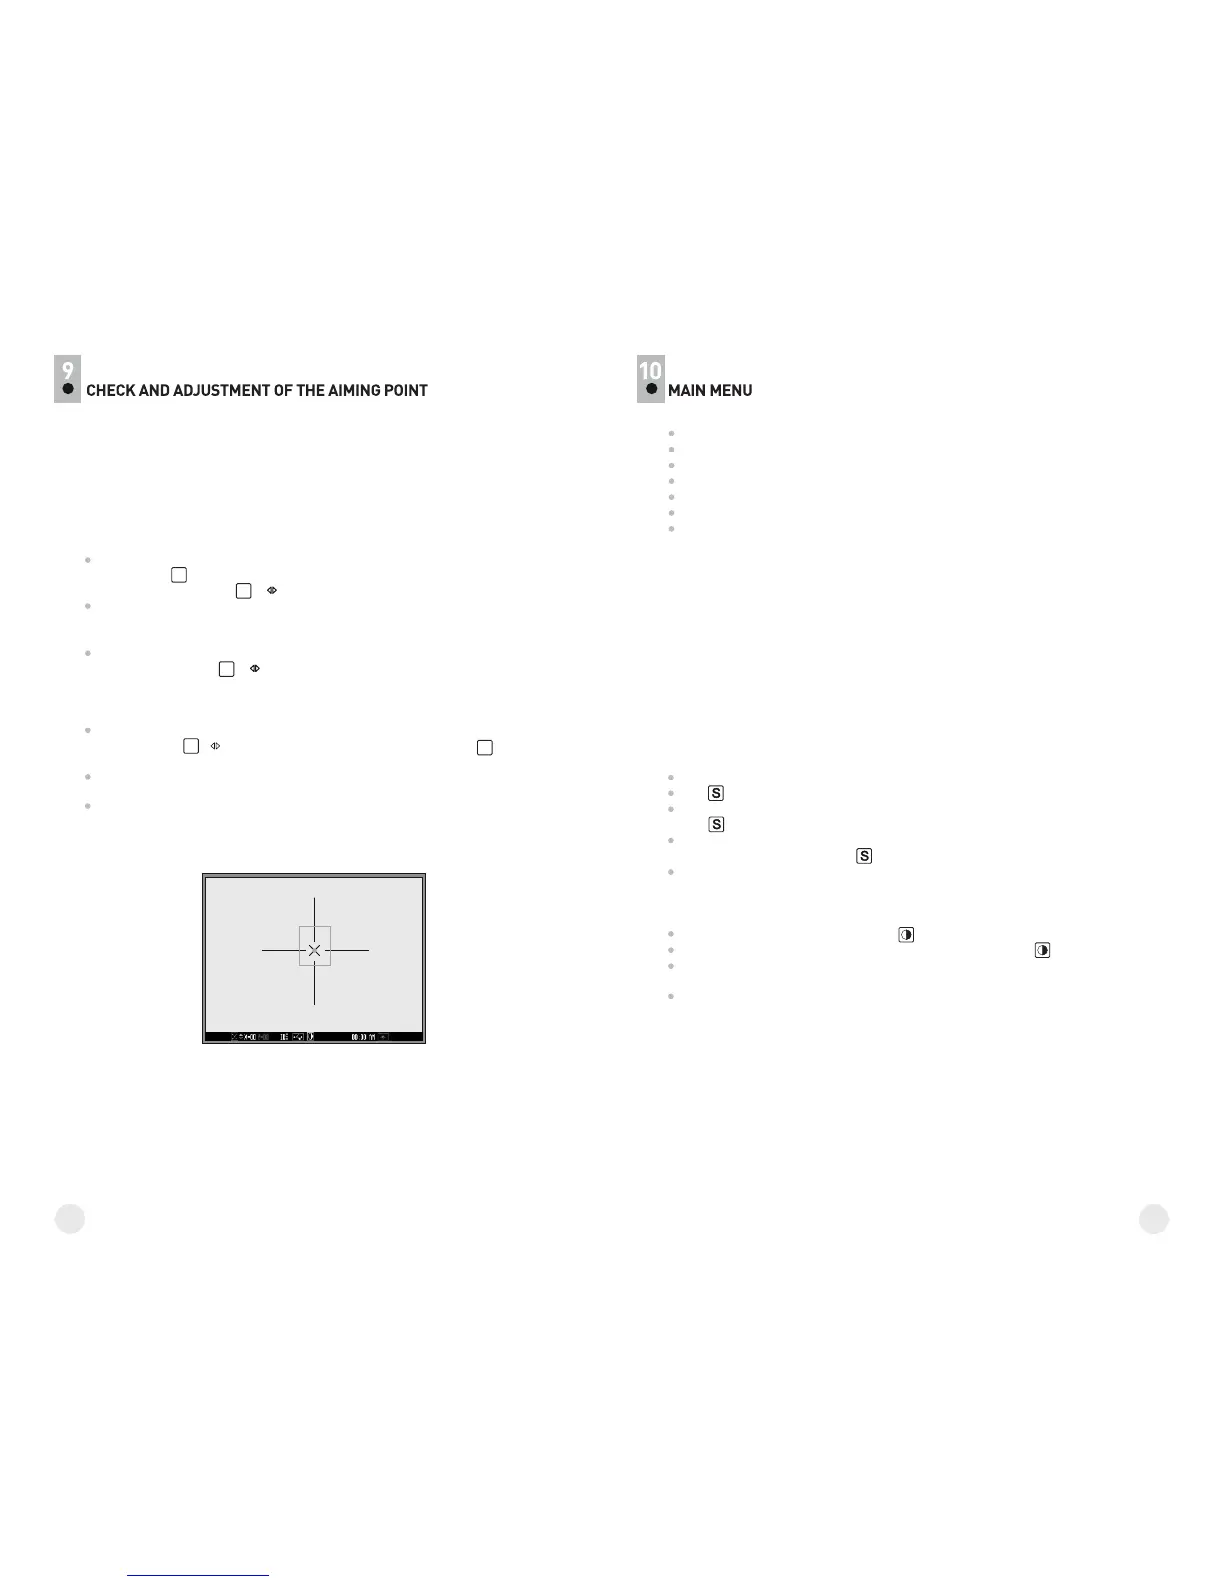
Put the auxiliary cross into the centre of the daylight sight’s reticle (the
limiting frame moves along with the cross). To do this, rotate the encoder
to move the cross and limiting frame along the X coordinate.
To switch from the X to the Y coordinate, push the encoder - Figure “1”
and vertical arrows 1 will show up next to the icon. Rotate the
encoder.
Stage Two. Matching the auxiliary cross with the point of impact.
Keep the encoder pressed for two seconds. Figure “2” and horizontal
arrows with coordinates will show up next to the icon (current
coordinate values correspond to factory settings).
Rotate the encoder to move the auxiliary cross within the limiting frame
along the X coordinate. To switch to the Y coordinate, push the encoder.
The auxiliary cross should eventually match the target centre.
Keep the encoder pressed for two seconds - you will exit the menu and
the image of the target centre should now coincide with the centre of the
of sight’s reticle.
Note: the auxiliary cross can only move within the red limiting frame (see
pic.) that defines the click range – 80 clicks horizontally, and 100 clicks
vertically.
X
X
X
X
The menu of the attachment includes items as follows:
Sum Light™ mode
Contrast mode
Clock
Adjustment of the aiming point
Wireless remote control
Video output selection
Horizon adjustment function
SumLight™ mode
The attachment features the Sum Light™ function based on the accumulation
of signals inside the CCD array. The use of Sum Light™ increases sensitivity
of the CCD array several times in case of low illumination levels thus making it
possible to conduct observation virtually in complete darkness.
NOTE: higher sensitivity causes an increased noise level in the picture,
lower frame rate; image slows down, if the unit is rapidly moved from
one side to the other, the picture may be blurred for a moment. Neither of
these effects is a flaw of the unit. After the SumLight™ Signal
Processing Program is activated, light dots (pixels) may appear in the
field of view which is explained by operation peculiarities of this
function. This is not a defect either.
• Keep the encoder (5) pressed for two seconds to enter the menu.
• Icon will show up on the data panel.
• Push the encoder to activate the mode. “On” sign will show up next to the
icon .
• To deactivate the mode, re-enter the Sum Light™ mode item. “Off” sign
will show up next to the icon .
• To exit main menu, hold the encoder (5) pressed for two seconds. Or wait
ten seconds to exit automatically.
Contrast mode
• Rotate the encoder to choose icon .
• Push the encoder, “On” sign will show up next to the icon .
• To deactivate the mode, push the encoder again - “Off” sign will show up
and icon will disappear.
• To exit main menu, keep the encoder (5) pressed for two second. Or wait
ten seconds to exit automatically.
The attachment is adjusted at the factory so that after mounting it on a duly
zeroed daylight sight, you will not need to adjust the aiming point.
However you can check the aiming point, to do this: install the rifle on a bench
rest, take aim at the target, mount the attachment and fulfill checking
procedure. If after installation the sight’s reticle is off the target centre, adjust
the aiming point using the settings as described below.
X
2
Y