Visit: www.tester.co.uk / Call: 01642 931 329
15
16
= Wi-Fi – off (default password)
= Digital zoom – off
= PiP – off
= Colour palette – White Hot
= Unit of measurement - metric
Warning: date and time settings, default pixel map
and remote control activation are not restored.
Lens
selection
Lens selection is used when replacing objective
lenses for the models: HELION XP28; HELION
XP38; HELION XP50.
Selection of the lens type is important for the correct
display of the optical magnification and adequate
operation of the Stadiametric rangefinder.
= Replace the objective lens: to do this, move the
latch (13) backwards, turn the lens counter-
clockwise all the way and remove the lens.
= Install a new lens, move the latch backwards and
move clockwise until the latch snaps.
= Enter the submenu with a short press of the M
button.
= With a short press of the UP/ DOWN buttons
select the desired lens: 28; 38 or 50.
= Confirm selection with a long press of the M
button.
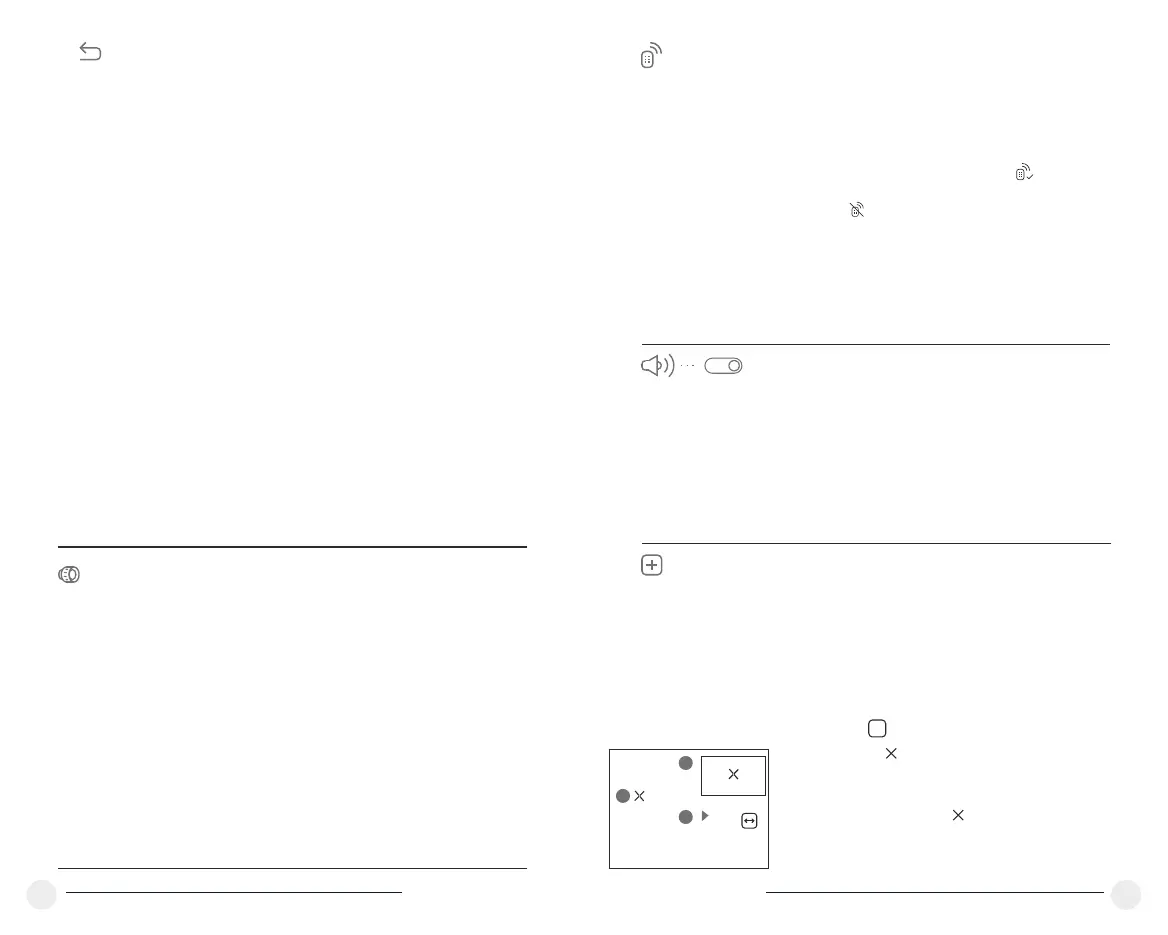
= Enter the submenu with a short press of the M
button.
= Select icon with a short press of the M button.
= A marker (H) appears on the left side of the
display.
= On the right side of the display appears
“magnifying glass” (G) – a magnified image in a
frame with a fixed cross , designed for easier
detection of a defective pixel and to match the
pixel with the marker, horizontal and vertical
arrows for X and Y axes (I) showing marker's
movement.
+
The defective pixels on the sensor may proportionally increase in size
when digital zoom is activated. HELION thermal imagers allow the user
to repair defective pixels on the detector using a software-based method
or to abort deletion.
G
H
I
x=95
y=99
Reset
Restore default settings
= Enter the Reset submenu with a short press of the
M (9) button.
= With a short press of the UP/ DOWN buttons
select “Yes” to restore default settings or “No” to
abort.
= Confirm selection with a short press of the M
button.
= If “Yes” is selected, display will show “Return
default settings?” and “Yes” and “No” options.
Select “Yes” to restore default settings.
= If “No” is selected, action is aborted and you
return to the submenu.
The following settings will be restored to their
original values before changes made by the user:
= Operating mode of video recorder – video
= Operating mode – Forest
= Calibration mode – automatic
= Language – English
Defective
pixel repair
Defective pixel repair
When operating a thermal imager, defective (dead)
pixels (bright or dark dots with constant brightness)
may become visible on the sensor.
= Hold down the M (9) button to enter the main
menu.
= Select submenu with UP (8) and DOWN (10)
buttons.
= Press briefly the M button the enter the submenu.
= Turn the microphone on/off with a short press of
the M button.
= With the microphone on, you will have audio track
in your video. Microphone is off by default.
Microphone
Off
Remote
Control
Remote control (bought separately)
Before operating the remote control (RC),
remember to activate it as follows:
= Press the M button, countdown starts (30 sec),
within which hold down for two seconds any RC
button.
= If activation is successful, the message
«Connection complete» appears .
= If error occurs the message «Connection failed»
appears . Repeat the procedure.
= The RC is activated and ready for use.
= To unlink the RC, press the М button, wait for the
countdown to expire without pressing any RC
button for 30 sec.
= All remote controls previously linked to your sight
are now unlinked.
 Loading...