Visit: www.tester.co.uk / Call: 01642 931 329
This option allows the user to view the following
information about the device:
= Full name
= SKU number
= serial number
= software version
= hardware version
= service information
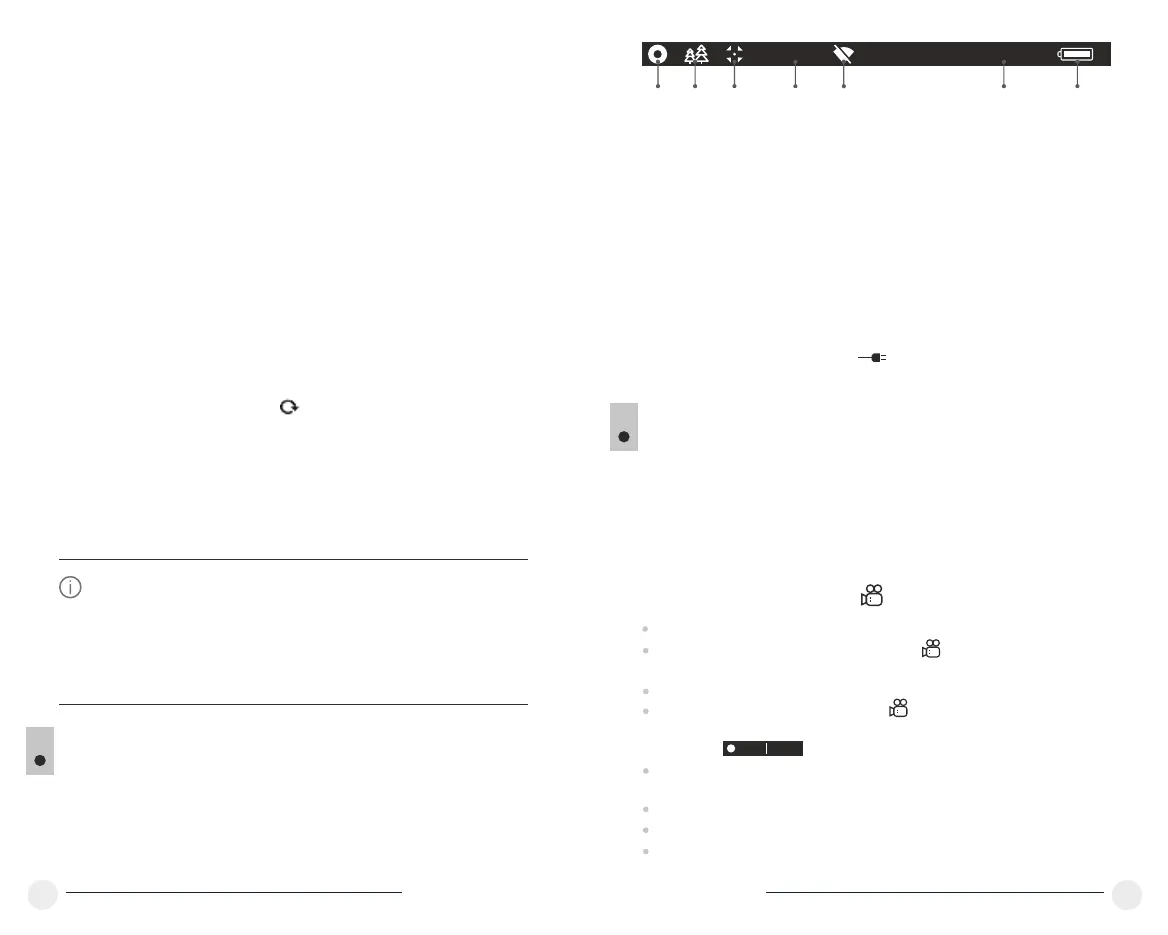
STATUS BAR
The status bar is located in the lower part of the display and shows
information on the actual operating status of the device, including:
13
VIDEO RECORDING AND PHOTOGRAPHY
HELION thermal imagers feature video recording and photography of
the image being ranged to the internal memory card.
Before using this feature please read the menu options “Date setup”,
“Time setup” of the section “Main menu functions”.
14
Select menu option Device information with a short
press of the M button to review information.
The built-in recorder operates in two modes - VIDEO and PHOTO
18
17
16x
12:30AM
A
1 2 3 4 5 76
(1) Colour palette
(shown only if the “Black Hot” palette is selected)
(2) Operating mode
(3) Calibration mode
(in the automatic calibration mode, three seconds before automatic
calibration a countdown timer 00:01 is shown in place of the calibration
mode icon).
(4) Current full magnification (for example, 16x)
(5) Wi-Fi connection status
(6) Running time
(7) Battery charge level
(if the device is powered by the Battery Pack) or
External battery power indicator
(if the device is powered by an external power supply)
VIDEO mode. Video recording
The device in the VIDEO mode upon turning on.
In the top left corner you will see icon and remaining recording
time 5:12.in the format HH:MM (hours: minutes)
Start video recording with a short press of the REC (7) button.
Upon start of video recording icon disappears, and icon REC and
recording timer in the format MM:SS (minutes : seconds) appear
instead:
Pause and resume recording video with a short press of the REC
button.
Stop recording video with a long press of the REC button.
Video files are saved to the memory card after stopping video.
Switch between modes (Video-> Photo-> Video) with a long press of
the REC button.
REC 00:25
Return to default defective pixel pattern
This option allows you to cancel deletion of the
defective pixels and return them to the original
state.
= Enter the submenu with a short press of the M
button.
= Select icon and press М.
= Select “Yes” if you wish to return to default
defective pixel pattern, or “No” if you do not.
= Confirm selection with a short press of the M
button.
Device
information
= Switch the direction of the marker from horizontal
to vertical and vice versa with a short press of the
M button.
= Align the defective pixel with the fixed cross in the
frame – the pixel should disappear.
= Delete the defective pixel with a short press of the
REC (7) button.
= A brief message “OK” appears in the frame in
case of success.
= Then you can delete another defective pixel by
moving the marker along the display.
= Exit “Defective pixel repair” option with a long
press of the M button.
= With a short press of the UP/ DOWN buttons
move the marker to align it with a defective pixel.
Attention! The display of a thermal imager may have 1-2 pixels
represented as bright white or color (blue, red) dots which cannot be
deleted and are not a defect.
 Loading...