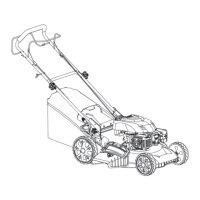
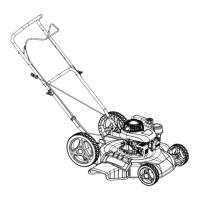
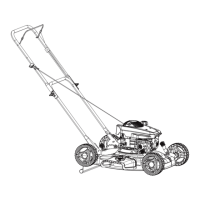
This document is an operator's manual for a Pulsar gasoline-powered lawn mower, model PTG1221D. It provides comprehensive instructions for safe operation, maintenance, and storage of the device.
Function Description:
The Pulsar PTG1221D is a rotary-blade, walk-behind lawn mower designed for cutting grass on well-maintained lawns in residential or commercial settings. It is not intended for cutting brush or for agricultural uses. The mower is capable of amputating hands and feet and throwing objects, emphasizing the critical need to follow all safety instructions. It meets or exceeds CPSC blade safety requirements for walk-behind rotary lawn mowers and the B71.1 of the American National Standards Institute.
Important Technical Specifications:
- Model: PTG1221D
- Rated Speed: 2800 RPM
- Displacement: 200cc
- Cutting Width: 21 inches
- Height Adjustment: Toolless Height Adjustment
- Wheels: 7" Front, 7" Rear
- Net Weight: 44 lbs
- Engine Oil Capacity: Max 15.8 oz (0.45 L) of SAE 10w30 weight engine oil with an API service rating of SF or higher.
- Spark Plug Gap: 0.75mm
- Blade Bolt Torque: 30-38 ft-lb (40-50 N-m)
Usage Features:
The manual outlines general operation guidelines, including:
- Safety First: Always read and understand the manual before starting. Keep hands and feet away from the machine and discharge opening. Ensure the area is clear of bystanders.
- Footwear: Operate only while wearing substantial footwear; never barefoot or in sandals.
- Backward Movement: Avoid pulling the machine backward unless absolutely necessary, always looking down and behind.
- Discharge Material: Never direct discharged material toward anyone. Stop the blade when crossing gravel surfaces.
- Safety Devices: Do not operate without the grass catcher, discharge guard, rear guard, or other safety protective devices in place and working.
- Unattended Operation: Never leave a running machine unattended.
- Stopping the Engine: Stop the engine and wait for the blade to come to a complete stop before cleaning, removing the grass catcher, or unclogging the discharge guard.
- Daylight Operation: Operate the machine only in daylight.
- Substance Use: Do not operate under the influence of alcohol or drugs.
- Wet Conditions: Never operate in wet grass.
- Vibration: If abnormal vibration occurs, stop the engine immediately and check for the cause.
- Eye Protection: Always wear eye protection.
- Lightning: Seek shelter if lightning or thunder is present.
- Accessories: Use only manufacturer-approved accessories.
- Slope Operation: Exercise extreme caution on slopes. Mow across the face of slopes, never up and down. Watch for hidden objects. Do not mow on wet or excessively steep slopes, or near drop-offs.
- Children Safety: Keep children out of the mowing area and turn off the mower if a child enters the area. Never allow children to operate the machine.
- Handle Installation: Align the lower handle section with rear bracket pins and secure with cotter pins. Position the upper handle to match pre-drilled holes, insert bolts with washers and handle knobs, and hand tighten.
- Wheel Installation: Install washer wheels and nuts onto bolts, then place wheel covers by tapping them in.
- Side Discharge Installation: Insert flange bolts into the deck and side discharge hole, then fasten with flange nuts.
- Oil Filling: The engine is shipped without oil. Fill with SAE 10w30 engine oil to the full range on the dipstick (max 15.8 oz).
- Fuel Filling: Fill the fuel tank outdoors with fresh unleaded regular gasoline. Add fuel stabilizer to fuel less than 30 days old to reduce starting problems.
- Starting the Engine: Press the primer three times, then hold the blade control bar against the handle and pull the starter cord.
- Stopping the Engine: Release the blade control bar. The engine and blade should stop within 3 seconds.
- Cutting Height Adjustment: Stop the engine and wait for all moving parts to stop. Pull the adjuster lever toward the wheel to move the wheel up or down. Ensure all four wheels are at the same height.
- Mowing Tips: Clear the area of debris. Avoid striking solid objects. If the mower strikes an object or vibrates, stop the engine and inspect for damage. For grass over 6 inches, mow at the highest setting slowly, then adjust to desired height and mow again. Alternate mowing direction for even fertilization.
- High Altitude Operation: Carburetor modification (re-jetting) may be necessary for operation above 5,000 feet to optimize performance and reduce emissions.
Maintenance Features:
The manual provides a detailed maintenance schedule and procedures:
- General Service: Keep all nuts and bolts tight. Never tamper with safety devices. Keep the machine free of grass, leaves, and debris. Stop the engine and disconnect the spark plug wire before any adjustments or repairs. Maintain or replace safety labels.
- Gasoline Handling: Use extreme care. Extinguish all ignition sources. Use an approved container. Allow the engine to cool before refueling. Never refuel indoors. Store gasoline in an approved container away from ignition sources. Never overfill the fuel tank.
- After First 5 Hours: Change the engine oil.
- Before Each Use or Daily: Check engine oil level. Ensure the engine stops within 3 seconds after releasing the blade control bar. Remove grass clippings and dirt from under the mower.
- Every 25 Hours: Replace the air filter (more frequently in dusty conditions).
- Before Storage: Empty the fuel tank.
- Yearly: Change the engine oil. Replace or sharpen the blade. Refer to the engine operator's manual for additional yearly maintenance.
- Spark Plug Maintenance: Once the engine has cooled, remove the spark plug wire, clean the spark plug with a wire brush, set the gap to 0.75mm, install carefully, and tighten with a wrench to compress the washer.
- Air Filter Replacement: Unlock the latch, pull upward to open the compartment, replace the element, and press down to lock the latch.
- Blade Replacement: Examine the blade regularly. If damaged, cracked, dull, or nicked, replace or sharpen it. Disconnect the spark plug wire and wear heavy gloves. Install the new blade with all mounting hardware, ensuring the curved ends point up toward the mower deck. Tighten the blade bolt to 30-38 ft-lb (40-50 N-m) using a torque wrench.
- Cleaning the Mower: With the engine running on a flat paved surface, spray water in front of the right rear wheel to clean clippings from under the deck. Run the engine for a few minutes to dry the deck.
- Storage: Store the mower in a cool, clean, dry place. Add fuel stabilizer to the fuel. Remove the spark plug and spray penetrating oil into the spark plug hole, then pull the starter rope. Install the spark plug and tighten to 15 ft-lb. Tighten all nuts, bolts, and screws. Leave the spark plug cable disconnected.
- Folding the Handle: Loosen the handle knobs and move the handle forward to fold it for storage. Be careful not to damage the cables.