• Avoid strong vibration, do not disassemble, modify or repair by yourself.
• Avoid storing in humid, high temperature, oily smoke and other places.
• Avoid water or other liquids from entering the Stick, which may affect the function
of the Stick.
• Children should be under adult’s supervision at all times when using this product.
Attention
Interactive communication function is available on PS4 and Xbox one/Series platform.
Audio Function
Product Model
Connection Method USB cable, the cable length is about 2 meters
Working current
Packaging Size
Product Size
Product Weight
About
392 * 279 * 87 mm
About
335 * 230 * 48 mm
About
1100
g
About 40mA
Usage Temperature
Usage Humidity
Product Specifications
PXN-X8
10 - 40 ℃
20 ~ 80 %
05
Compatible
Platforms
PC , Android , PS3 ,PS4 , Xbox One/Series , Switch
System Requirement
on PC
Windows 7 / 8 / 10 / 11
System Requirements
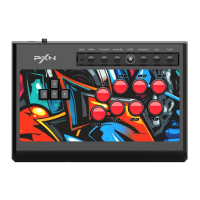
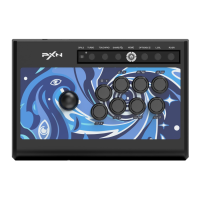
Product Overview
Guidance Port
for Controller
DP/LS
TURBO TOUCHPAD HOME
L3/SL
R3/SRSHARE/ OPTIONS/
X
Y R1 RB L1 LB
A
B R2 RT
L2 LT
Action Buttons
Secondary Buttons
Direction Buttons
USB Cable
Headphone Plug
01
• Using on PS3
Step 1 Plug the USB cable of the Arcade Stick into the PS3, then turn on the power
of the PS3.
Step 2 The PS3 will assign a channel to the Arcade Stick automatically when the
connection is successful. Then the corresponding channel light will be on.
• Using on PS4
Step 1 Power OFF the original PS4 controller, then connect original PS4 controller
with the Arcade Stick via USB cable.
Step 2 Plug the USB cable of the Arcade Stick into the PS4, then turn on the power
of the PS4.
Step 3 Press the button on the Arcade Stick once, then the will be on,
and the connection is successful.
Diagram of XBOX ONE Connection
• Using on XBOX ONE/SERIES
Step 1 Power OFF the original Xbox One/Series controller, then connect original
Xbox One/Series PS4 controller with the Arcade Stick via USB cable.
Step 2 Plug the USB cable of the Arcade Stick into the Xbox One/Series, then turn
on the power of the Xbox One/Series.
Step 3 The indicator light on the Arcade Stick will be on when the connection
is successful.
PS4
P S 4
XBOX ON E
XBOX ONE
03
• The buttons that can set the TURBO function are:A , B , X , Y , LB , RB , LT , RT.
• TURBO setting: Press and hold the TURBO button + the button that needs to set
the TURBO at the same time, the LED flashes.
• TURBO deleting: Press and hold the TURBO button + the button that has been set
to TURBO at the same time, the LED goes out.
TURBO function setting
The joystick is set to "SOCD 2nd input priority" mode by default. Press and hold
"L3+R3" for 3 seconds to switch to "SOCD Cleaning" mode. At this time, LED1 +
LED4 will remain ON.
SOCD Mode Switching
• When the stick switch is set to DP, the direction buttons work as D-pad.
• When the stick switch is set to LS, the direction buttons work as Left Joystick.
Direction Control Switching
• Using on SWITCH
Enter Homepage of SWITCH, select Setting → Controllers and Sensors→ select
Pro Controller Wired connection, make sure that the option state is ON.
Step 1 The OTG Adapter is needed when connect
with Switch Console. Connect the Type-C OTG Adapter
with the Arcade Stick USB cable, plug the Type-C
Adapter into SWITCH console port.
Step 2 The indicator light remains on when the
connection is successful.
(Note: Type-C OTG Adapter is not included)
- Connect with Switch
Step 1 Plug the USB cable of the Arcade Stick into the USB port of the Switch Dock,
and turn on the power of the Switch.
Step 2 The Switch will be automatically
assign a channel to the Arcade Stick
when the connection is successful. Then the
corresponding channel lightwill be on.
- Connect with Switch Dock
OTG Adapte
USB port of Switch Dock
04
• Using on PC
Step 1 Plug the USB cable of the Arcade Stick into the computer, the indicator
light will be on when connected successfully.
Step 2 When connecting to the computer for the first time, it will prompt to find new
hardware and automatically complete the driver installation.
Function testing is available on computer. The specific steps show below:
Win7 or above Systems: Open the Control Panel → Device and Printer → Right-click
on the Game pad icon → Game Controller Setting,Click the Properties Testing.
Instructions
• Using on Android
Connect the Arcade Stick to the Android
mobile phone via OTG to control it.
(Note: Please open OTG function on phone before
connection, Type-C OTG Adapter is not included)
Plug the USB cable of the Arcade Stick into the Android TV to control it.
(Note: Due to the customization of the Android TV system, some Android system TVs
do not support the insertion of peripheral devices)
OTG Adapter
Connect with mobile phone
Connect with Android TV
PC
TV
02
15
• 激しい振動を避けてください。ご自分での分解・改造・修理はしないでください。
• 湿気の多い場所、高温の場所、油煙のあたる場所などでの保管は避けてください。
• ジョイスティック内 部 に 水 やその 他 の 液 体 が 入らな いようにしてくだ さい 。ジョイスティ
ックの機能に影響を与える可能性があります。
• お子さまが本製品を使用する場合は、大人の監督の下で使用するようにしてください。
• 品質に問題が生じた場合、またはご提案がある場合、販売業者またはアフターサービ
ス担当者までご連絡ください。
注意事項
PS4、Xbox One/Series本体で双方向音声通信機能を利用でき、ゲーム内でボイスチャ
ットすることができます。
オー ディオ機 能
「SOCD 二次入力優先」モードになっており、同時に「L3+R3」を 3秒間長押しすると、
「SOCDクリーニング」モードに切り替えられ、その際にLED1とLED4が点 灯します。
ス ティック は デ フォルト で
製品仕様
製品型番
接続方式
USBケ ー ブ ル 、長 さ 約 2 m
動作電流
パッケージサイズ
製 品サイズ
製品重量
約 392 * 279 * 87 mm
約 335 * 230 * 48 mm
約
1100
g
約
40mA
PXN-X8
使用温度
10 - 40 ℃
使用湿度
20 ~ 80 %
• TURBO機能を設定できるボタン: A、B、X、Y、LB、RB、LT、RT。
• TURBO設定: TURBOボタン + 連射させたいボタンを同時に長押しすると、LEDが
点滅します。
• TURBO解除: TURBOボタン + 設定済みのボタンを同時に長押しすると、LEDが消
灯します。
TURBO機能の設定(連射)
• ス ティック 切 替 ス イッチ が DP に設定されている場合、方向ボタンは方向パッドとして
動作します。
• ス ティック 切 替 ス イッチ が LS に設定されている場合、方向ボタンは左ジョイスティッ
クとして 動 作します。
方 向 コ ントロ ー ル の 切 り替 え
• SWITCH 本体
HOMEメニューの「設定 」 → 「コントローラーとセンサー」を選択し、「Proコ ント
ローラーの有線通信」がオンになっていることを確認してください。
- Switch本体との接続
Step 1 Switch本体との接続にはOTGアダプタが
必要です。Type-C OTGアダプタと接 続したUSBケ
ーブルをSwitch本体のUSBポートに 差し込 みます。
Step 2 接続に成功すると、 が点灯したまま
に な り ま す 。
Step 1 ア ー ケ ー ドス ティック の USBケーブルを
Switchドック の USBポートに差し込み、Switch本
体の電源を入 れます。
Step 2 接続に成功すると、本体が自動
の に ア ー ケ ード ス ティック に チャン ネ ル を
割 り 当 て 、対 応 す る チ ャ ン ネ ル の ラ ン プ が
点灯したままになります。
※注:Type-C OTGアダプタは別途購入する必要が
あります。
- Switchドック との 接 続
14
OTGアダプタ
SwitchドックのUSBポート
• PC
Step 1 ア ー ケ ー ドス ティック の USBケーブルをPCのUSBポートに差し込 むと、
表示ランプが点灯します。
Step 2 初めてPCに接 続する場合、「新しいハードウェアが見つかりました」 画面が表
示され、自動的にインストールが完了します。
PCのゲームコントローラーを通して、動作テストを行うことができます。具体的な手順は
以 下の 通りです。 Windows 7またはそれ以降のOS:「コントロールパネル」 → 「デバイ
スとプリンター 」 → 「 ゲ ー ム パ ッ ド 」の ア イ コ ン を 右 ク リ ッ ク → 「 ゲ ームコ ントロ ーラ ー
の設定」を開き、「プロパティ」を選択して、テストを行います。
使用方法
12
• Androidプ ラットフォ ー ム
アーケードスティックをOTGでスマホに
接続すれば、操作できます。
※注:接続前にスマホでOTG機能を有効にしてください。
Type-C OTGアダプタは別途購入する必要があります)
※注:Android TVの カ ス タ マ イ ズ に よ っ て 、一 部 の Android TVは周辺機器の接続に対
応しない場 合もあります)
OTGアダプタ
スマホとの 接 続
ア ー ケ ー ド ス ティック の USBケーブルをAndroid TVのUSBポートに差し込 め ば、
操作できます。
Android TVとの接続
PC
TV
• PS3 本体
Step 1 ア ー ケ ー ドス ティック の USBケーブルをPS3本体のUSBポートに差し込み、
PS3本体の電源を入れます。
Step 2 接続に成功すると、PS3本体が自動的にアーケードスティックにチャンネルを
割り当て、対応するチャンネルのランプが点灯したままになります。
• PS4 本体
Step 1 PS4の純正コントローラーの電源がオフの状態で、USBケーブルでアーケード
ス ティック と 接 続 し ま す 。
Step 2 ア ー ケ ー ドス ティック の USBケーブルをPS4本体のUSBポートに差し込み、
PS4本体の電源を入れます。
Step 3 アーケードスティックの ボタンを押し、 が点灯したままになると、 接続
成功です。
• XBOX ONE/SERIES 本体
Step 1 Xbox One/Seriesの純正コントローラーの電源がオフの状態で、USBケーブル
で ア ー ケ ー ドス ティック と 接 続 し ま す 。
Step 2 ア ー ケ ー ドス ティック の USBケーブルをXbox One/Series本体のUSBポートに
差し込み、Xbox One/Series本体の電源を入れます。
Step 3 接続に成功すると、対応するチャンネルのランプが 常時点灯になります。
PS4
P S 4
XBOX ON E
XBOX ONE
13
XBOX ONE本体との接続イメージ図
サポートされるプ
ラットフォ ー ム
PCのシステム要件
PC , Android , PS3 ,PS4 , Xbox One/Series , Switch
Windows 7 / 8 / 10 / 11
システム要件
製品外観
ハンドル
接 続 ポート
DP/LS
TURBO TOUCHPAD HOME
L3/SL
R3/SRSHARE/ OPTIONS/
X
Y R1 RB L1 LB
A
B R2 RT
L2 LT
アク ション ボ タン
補 助 ボタン
方 向 ボタン
USBケーブル
イヤホ ン ジャック
11
“ ” is a registered trademark of ShenZhen PXN Electronics Technology Co., Ltd
PS4/PS3 is a registered trademark of Sony Computer Entertainment Inc.
Xbox is a registered trademark of Microsoft Corporation.
SWITCH is a registered trademark of Nintendo Co., Ltd.
All trademarks are the property of their respective owner. Technical specifications are subject
to change. Information contained herein is subject to change without prior notice. ShenZhen
PXN Electronics Technology Co., Ltd. shall not be made liable for any errors that may appear.
Please keep this information for later reference.
使 用マニュアル
DP/LS
TURBO TOUCHPAD HOME
L3/SL
R3/SRSHARE/ OPTIONS/
X
Y R1 RB L1 LB
A
B
R2 RT
L2 LT
DP/LS
TURBO TOUCHPAD HOME
L3/SL
R3/SRSHARE/ OPTIONS/
X
Y R1 RB L1 LB
A
B
R2 RT
L2 LT
 Loading...