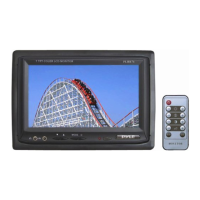
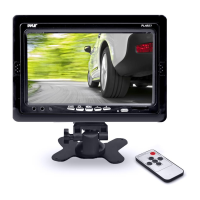
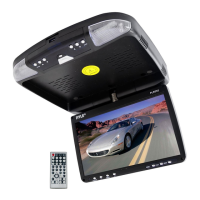
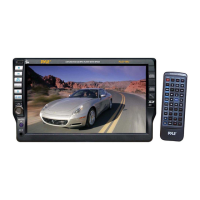
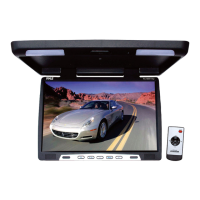
The Pyle PLHR78W and PLHR79 are stand-alone color TFT LCD monitors designed for displaying video content, typically from sources like VCD or DVD players. These monitors are equipped with a 7-inch screen and offer a 16:9 aspect ratio, making them suitable for a variety of in-car entertainment or other compact display applications.
Function Description
The primary function of these devices is to display video signals from external sources. They support both PAL and NTSC systems, ensuring compatibility with a wide range of video equipment. The monitors feature two video inputs (AV1 and AV2), allowing users to connect multiple video sources and switch between them as needed.
When powered on and connected to a video source, the monitor will display the incoming video signal. If no signal is detected, the screen will typically show a "NO SIGNAL" message or a blue screen with an "AV" character in the top left corner, indicating that the AV display mode is active but no video input is present.
Users can control various display parameters to optimize the viewing experience. These include brightness, contrast, color, and tint (for NTSC systems only). The monitors also offer a scaling function, allowing users to switch between 16:9 and 4:3 aspect ratios to best fit the content being displayed.
Usage Features
The monitors can be operated using either the buttons located on the display unit itself or via a full-function remote control.
On-Display Controls:
The front panel of the monitor features a series of buttons for basic operation:
- V1/V2 (Video1, Video2): This button allows users to switch between the two available video inputs.
- Reduce Button (◄): Used to decrease values or navigate menus.
- Menu Button: Activates the on-screen display (OSD) menu, which provides access to brightness, volume, color, and contrast settings. Pressing this button repeatedly cycles through different menu options.
- Increase Button (►): Used to increase values or navigate menus.
- Power On/Off Button: Toggles the monitor's power state.
- Remote Controller Receiver: An infrared receiver that allows the monitor to respond to commands from the remote control.
- Power Indicator Light: Illuminates to show that the monitor is powered on.
Remote Control Features:
The remote control offers a comprehensive set of functions, providing greater convenience and control over the monitor's settings:
- Power: Switches the monitor on or off.
- Mute: Silences any audio output (though these monitors are primarily video displays, this function might be relevant if connected to an audio system or if a future model includes speakers).
- V1/V2: Switches between video input sources.
- Reverse: Flips the picture horizontally (left to right) or vertically (up to down), which can be useful for specific mounting configurations, such as rearview camera applications.
- Vol+/-: Adjusts volume (again, likely for models with integrated audio or when connected to an audio system).
- Bright+/-: Increases or decreases the screen brightness.
- Col+/-: Increases or decreases the color saturation.
- Contrast+/-: Increases or decreases the contrast ratio.
- Mode: Allows selection of predefined display modes (e.g., standard, brightness, soft, vividness, self-defined), which apply different combinations of brightness, contrast, and color settings.
Operating the AV Display Mode:
To use the AV display mode, simply press the "AV1/AV2" button on the remote control. If a VCD or DVD signal is connected, the monitor will display the picture. If no signal is present, "NO SIGNAL" will appear.
Adjusting Display Settings (Brightness, Color, Contrast, Tint, Scaling):
These settings can be adjusted using either the MENU button on the display unit or the remote control.
- Brightness: Press the MENU button once (or use the remote's MENU button), then use the "◄" or "►" buttons on the display, or the "◄" or "►" keys on the remote, to adjust brightness.
- Color: Press the MENU button three times, then use the "◄" or "►" buttons on the display, or the "◄" or "►" keys on the remote, to adjust color.
- Contrast Ratio: Press the MENU button twice, then use the "◄" or "►" buttons on the display, or the "◄" or "►" keys on the remote, to adjust contrast.
- Tint (NTSC only): Press the MENU button four times, then use the "◄" or "►" buttons on the display, or the "◄" or "►" keys on the remote, to adjust tint.
- Scaling (16:9/4:3): Press the MENU button five times, then use the "◄" or "►" buttons on the display to choose the desired aspect ratio.
Maintenance Features
Troubleshooting Guide:
The manual provides a simple trouble-shooting guide to help users diagnose common issues before seeking professional repair.
- Black Screen:
- Probable Cause: No 12V voltage, brightness/contrast too small, or no high-voltage.
- Solution: Check power connection, ensure the A/V cable is secure, and increase brightness/contrast.
- No Picture:
- Probable Cause: No source output or loose video concentric plug.
- Solution: Check VCD/DVD output, replace A/V cable, or tighten video input cable.
- Color Picture Issues:
- Probable Cause: Video sources have no output or color ratio needs readjustment.
- Solution: Check video sources and re-adjust color in the Menu.
- Regular Light Spots/Color Spots/Black Horizontal Line:
- Probable Cause: This is a normal symptom in active matrix display technology.
- Solution: It is considered normal within the view range for such displays.
- Unclear Picture:
- Probable Cause: Poor quality video sources or incorrect brightness/contrast settings.
- Solution: Use high-quality videodiscs and reset brightness/contrast.
- Deformed Outer Cover:
- Probable Cause: High external temperature or prolonged power-on time.
- Solution: Ensure ambient temperature is within 0°-60°C and turn off the power after use.
Remote Control Battery Replacement:
The remote control uses a Lithium battery (CR2025).
- To replace, insert fingernails into points A and B on the diagram, press A, and pull out the battery holder.
- Remove the old battery and insert the new battery with the "+" side facing upwards.
- Slide the battery holder back into place.
Note on Battery Maintenance:
To prevent fluid leakage from the lithium battery, it is recommended to remove the battery if the remote control unit will not be used for long periods (one month or more). If the battery leaks fluid, carefully wipe out the battery case and replace with a new battery.