Do you have a question about the Qtx DMX-192 and is the answer not in the manual?
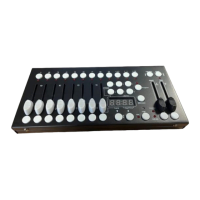
Press to select the desired lighting fixture.
Lit to indicate the current selected fixture.
Slide to adjust DMX parameter values.
Press to store and select scenes.
Displays current parameters or status.
Step forward/backward scenes/steps in banks/chases.
Switches faders between 1-8 and 9-16.
Press to confirm current procedure or add to it.
Activate Auto mode/Delete key during Program mode.
Press to set all fixtures to zero.
Slide to adjust scene hold time or step time.
Slide to adjust the rate of fading or cross fading.
Press to enter Program mode.
Activate music mode/Copy key during program mode.
Tap tempo sync during playback/Switch DMX display.
Chase memory selection 1-6.
Operate the controller in manual mode to adjust fixture parameters.
Review and adjust previously recorded scenes and chases.
Learn to create and store static lighting states (scenes) in banks.
Learn how to run programmed banks of scenes automatically or via tap sync.
Review programmed banks and individual scenes.
Modify existing scenes within programmed banks.
Duplicate programmed banks to new locations.
Build chases by arranging scenes as steps, up to 240 steps.
Execute programmed chases manually or via auto-del.
Review the sequence of scenes within a chase.
Copy an entire bank of scenes into a chase.
Copy individual scenes into a chase from a bank.
Insert a scene at a specific point within a chase.
Remove a specific scene from a chase sequence.
Permanently remove an entire chase program.
Clear all stored chase programs from memory.
Add a scene into a chase at a specific step.
Duplicate a scene to a different location.
Remove a scene from its current bank, setting values to zero.
Reset all scenes to zero values, an irreversible process.
Trigger programs and chases using the built-in microphone.
Run programmed banks or chases automatically.
The DMX-192 is a versatile 192-channel DMX controller designed for small theatres or stage applications. It offers comprehensive control over lighting fixtures, scenes, and chases, with a user-friendly interface for programming and playback.
The DMX-192 controller manages up to 12 fixtures, with each fixture capable of controlling up to 16 DMX channels. It features 23 programmable bank buttons, each storing 8 scenes, allowing for a total of 184 scenes. These scenes can be organized into 6 chase sequences, with each chase capable of holding up to 240 steps (scenes). Chases can be triggered by sound, manually via a tap tempo function, or automatically with adjustable time faders ranging from 0.1 seconds to 10 minutes.
The controller operates in several modes:
| Brand | Qtx |
|---|---|
| Model | DMX-192 |
| Category | DJ Equipment |
| Language | English |