EasyManua.ls Logo

Quantum LTO-3 - User Manual

Quantum LTO-3
24 pages
Print Icon
To Next Page IconTo Next Page
Loading...
LTO-3, LTO-4, LTO-5, LTO-6, LTO-7 and
LTO-8
Contents
Connecting the Drive Interface and Power
Cables .....................................................2
Installing a Second Tape Drive or
Replacing a Tape Drive ...........................4
Preinstallation Requirements .............4
Installation Procedure ........................4
SCSI Cable Configurations ...............12
Installing the 1U Rackmount Enclosure in
a Rack ...................................................15
Tools Required ..................................15
Installation Procedure ......................15
Completing the Installation .............22
Class A Device Declarations..................24
1U Rackmount Enclosure
Installation Guide
The 1U Rackmount enclosure is provided with either one or two of the
following supported tape drives already installed:
LTO-3 (Model B) Half-Height, SCSI model TC-L33CX-EY-B
LTO-3 (Model B) Half-Height, SAS model TC-L33CN-EY-B
LTO-4 (Model B) Half-Height, SCSI model TC-L43CX-EY-B
LTO-4 (Model B) Half-Height, SAS model TC-L43CN-EY-B
LTO-5 Half-Height, SAS model TC-L53CN-AR
LTO-6 Half-Height, SAS model TC-L62AN-BR
LTO-7 Half-Height, SAS model TC-L72AN-BR
LTO-8 Half-Height, SAS model TC-L82AN-BR
You can upgrade a single-drive enclosure to the two-drive configuration by
installing a second tape drive using any supported model of the same type
interface.
This guide references the instructions for installing the 1U Rackmount
enclosure in an equipment rack, and provides the procedures for:
Connecting the drive interface and power cables
Installing a second tape drive into the 1U Rackmount enclosure
Question and Answer IconNeed help?

Do you have a question about the Quantum LTO-3 and is the answer not in the manual?

Overview

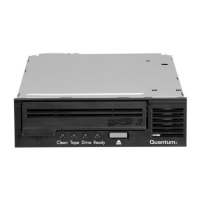
The Quantum 1U Rackmount Enclosure is a storage solution designed to house one or two LTO tape drives, supporting LTO-3, LTO-4, LTO-5, LTO-6, LTO-7, and LTO-8 models. This enclosure provides a compact and organized way to integrate tape backup and archiving capabilities into an existing equipment rack.

Function Description

The primary function of the 1U Rackmount Enclosure is to securely mount and operate LTO tape drives within a standard equipment rack. It acts as a housing unit that provides power, cooling, and interface connections for the installed tape drives, enabling them to communicate with a host server. The enclosure supports both SCSI and Serial-Attached SCSI (SAS) interface types, accommodating a range of LTO tape drive models. This flexibility allows users to choose the appropriate drive technology based on their existing infrastructure and performance requirements.

The enclosure is designed to facilitate data backup, recovery, and archiving operations by providing a stable environment for the tape drives. It ensures that the drives receive adequate power and cooling, which are crucial for reliable performance and longevity. By consolidating tape drives into a rack-mountable unit, it helps optimize space utilization in data centers and server rooms, contributing to a more organized and efficient IT environment.

Usage Features

The 1U Rackmount Enclosure offers several features that enhance its usability and integration into various IT setups:

  • Drive Compatibility: It supports a wide range of LTO tape drive generations, from LTO-3 to LTO-8, including both Half-Height SCSI and SAS models. This broad compatibility ensures that users can leverage their preferred LTO technology within the enclosure.
  • Single or Dual Drive Configuration: The enclosure can be configured with either one or two tape drives. This allows for scalability, enabling users to start with a single drive and add a second one later as their storage needs grow, without requiring a completely new enclosure. The ability to install a second drive of the same interface type (SCSI or SAS) provides flexibility for expansion.
  • Easy Rack Installation: The enclosure comes with rack rails designed for installation in racks with round, square, or threaded holes in the vertical mounting bars. The rails are identical and can be mounted on either the left or right side, simplifying the installation process. Clear instructions are provided for aligning and securing the rails, ensuring a stable mount. For racks with threaded holes, the mounting pins on the rails can be removed, and the rails can be secured with user-supplied screws.
  • Intuitive Cable Management: The enclosure provides clear guidance for connecting drive interface and power cables. For SCSI drives, it details connections for the SCSI cable, power cable, and SCSI ID selector switch. For SAS drives, it outlines connections for the external SAS interface cable and power cable, with specific instructions for different LTO generations (LTO-3/LTO-4 and LTO-5/LTO-8). Cable support clips are also provided to help organize and secure cables at the back of the rack rails, preventing disconnections and maintaining a tidy setup.
  • SCSI Bus Configurations: For SCSI tape drives, the enclosure supports two main configurations: connecting two drives per SCSI bus or connecting one drive per SCSI bus. Detailed diagrams and notes explain how to properly route and connect SCSI cables, including the use of SCSI terminators and ensuring unique SCSI IDs for each device on the bus. This guidance helps prevent data errors and ensures optimal performance in SCSI environments.
  • Front Panel Controls: The enclosure features a power pushbutton switch on the front panel, which illuminates an LED when the drive power is on. This allows for easy power management of the installed tape drives.
  • Host Server Integration: The installation process includes steps for shutting down and restarting the host server, as well as connecting the enclosure's interface cables to the server, ensuring proper communication and integration into the existing network.
  • Power Connectivity: The enclosure connects to a standard AC power receptacle, with clear instructions for connecting the supplied AC power cable to the back panel of the enclosure.

Maintenance Features

The 1U Rackmount Enclosure is designed with maintenance and serviceability in mind, allowing for easy access to internal components and straightforward drive replacement or addition:

  • Top Panel Removal for Access: The top access panel of the enclosure can be easily removed to gain access to the internal components, including the tape drive bays. This is achieved by loosening a latch screw, lifting a latch, and sliding the panel towards the back of the enclosure. This design simplifies internal maintenance and drive installation.
  • Drive Installation and Replacement: The enclosure provides detailed procedures for adding a second tape drive or replacing an existing one. This involves removing a drive blank (if adding a second drive) or disconnecting cables and removing mounting brackets (if replacing a drive). The process is guided by spring-loaded buttons and keyhole slots, making it relatively tool-free for the main drive installation steps.
  • Mounting Bracket System: Tape drives are secured within the enclosure using mounting brackets. These brackets are attached to the tape drive with screws and then positioned over mounting posts within the enclosure, sliding into place until a spring-loaded button snaps to secure them. This system ensures that drives are held firmly while allowing for easy removal and installation.
  • Cable Disconnection for Service: Before any internal work or drive replacement, the instructions emphasize disconnecting the AC power cable from the enclosure and, for drive replacement, disconnecting all cables from the tape drive. This safety measure protects both the user and the equipment.
  • ESD Precautions: The manual highlights the importance of practicing Electrostatic Discharge (ESD) procedures when handling tape drives to prevent damage to the equipment. This is a critical maintenance consideration for electronic components.
  • Rack Removal for Service: If necessary, the enclosure can be easily removed from the equipment rack by pressing latches on each side and pulling the unit forward, after disconnecting cables from the back. This allows for convenient access for deeper maintenance or relocation.
  • Troubleshooting Guidance: Notes within the manual provide specific troubleshooting tips, such as cycling the tape drive power after changing a parallel SCSI ID to ensure the change takes effect, and ensuring unique SCSI IDs for devices on the same bus to prevent data errors.
  • Component Leveling: For rack installation, a warning emphasizes the importance of ensuring the rack leveling jacks are extended, the rack rests on them, and stabilizing feet are attached to prevent instability, which is crucial for safe and stable operation and maintenance.
  • Parallel Enclosure Alignment: A caution advises keeping the enclosure parallel to the floor when sliding it into the rack rails to prevent damage to the rails, ensuring smooth operation and longevity of the rack system.

Quantum LTO-3 Specifications

General IconGeneral
BrandQuantum
ModelLTO-3
CategoryEnclosure
LanguageEnglish

Related product manuals