install iron tip
The second screens
The first screens
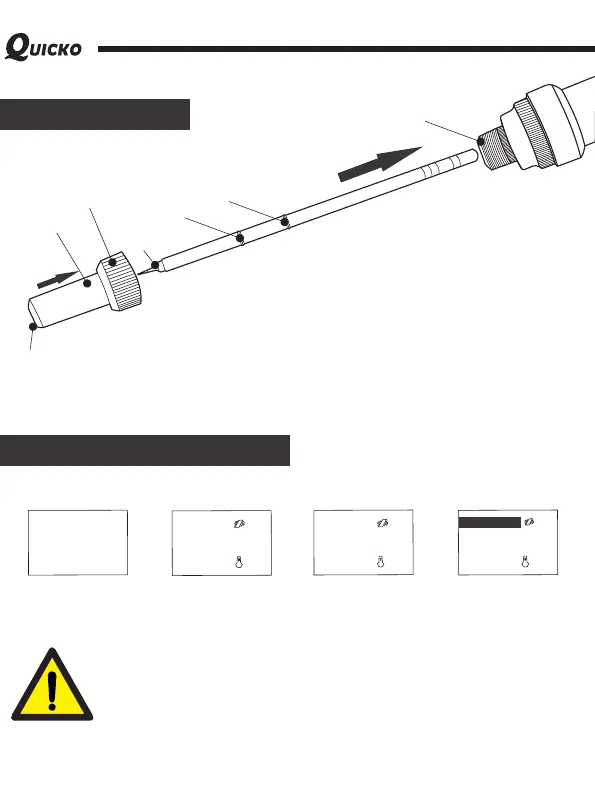
The second step: Put the tube to the locking nut, let the nut and the tube
from the iron head nozzle tip into the iron tip, the nut head and the iron tip is
flat with first clamping, then tighten the nut, the installation is complete!
Socket of iron tip
Locking nut
Head of nut
Note: Turn on the button, the display screen shows ERROR, indicating that the iron
tip may not be well installed, please try to install the iron tip again.
Description for display
SE
T
:30
0
℃
0%
2
5℃
24V
ERR
O
R
T12 SO LDE RIN G
IR ON S TATI ON
SET:
3
00
℃
1
3
%
25
℃
24
V
300
℃
Initial state of
power off
Non plugged
iron tip
Normal
working state
Tighten
sleeve
Tsui tip
BO O
S
T: 3
5
0
℃
1
3
%
25
℃
24
V
300℃
One press
strong temperature
The first step: remove the handle locking nut, insert the
iron tip to iron head socket, let the second clamping
and handle iron head socket is flat!
Note: after confirming the installation of the components is right,
the new iron tip is inserted into the handle and the display screen will
be a flash or ERROR, and the host buzz is wrong. It’s normal. After
heating 5-20 minutes, it will return to normal gradually. Temperature
control range of mamin engine: 200 -480 .The common welding ℃ ℃
temperature is 300 -380 . In order to protect the working life of ℃ ℃
the soldering iron tip, it is recommended that the temperature do not
more than 380 !℃