Do you have a question about the Quoizel SNN8406K and is the answer not in the manual?
Attach the crossbar assembly to the outlet box using outlet box screws and ground screw.
Secure the fixture's backplate to the crossbar assembly using mounting balls.
Connect fixture wires to house wires using wire connectors and electrical tape.
Attach the fixture body to the outlet box and secure with mounting balls.
Insert bulb, caulk around backplate for weather sealing.
Important safety precautions before starting installation, including turning off power.
List of required tools and essential preparation steps before assembly.
Detailed steps for removing and replacing glass panels on the fixture.
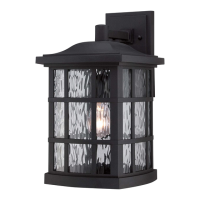
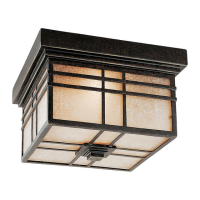
This document provides assembly instructions for the Quoizel outdoor light fixture, specifically for styles SNN8406K, SNN8406PN, and SNN8406W. The fixture is designed to be mounted on an exterior wall, providing illumination for outdoor spaces.
The Quoizel outdoor light fixture serves as a permanent lighting solution for exterior environments. It is designed to house a single A19 medium base bulb with a maximum wattage of 100W, offering ample light output for various outdoor settings. The fixture's design incorporates a backplate that mounts directly to an existing electrical outlet box, ensuring a secure and weather-resistant installation. The main body of the fixture, referred to as the "Fixture Body" or "Cage," encloses the bulb and features glass panels that protect the light source while allowing light to diffuse. The fixture is intended for fixed installation and is not designed for portable use. Its primary function is to provide consistent and reliable outdoor lighting, enhancing visibility and aesthetic appeal. The fixture's construction is designed to withstand outdoor elements, with proper sealing and material choices to ensure longevity and performance in varying weather conditions.
The installation process for this Quoizel fixture is straightforward, requiring common household tools such as screwdrivers, pliers, wire cutters, wire strippers, electrical tape, and safety glasses. The estimated assembly time is between 20-30 minutes, making it a relatively quick project for those with basic DIY skills. Before starting, users are advised to identify and inspect all parts to ensure completeness and integrity, preventing issues during assembly. A critical safety feature emphasized is the need to turn off electricity at the circuit breaker or main fuse box before installation to prevent electrical shock. Consulting a licensed electrician is recommended if there is any doubt regarding the electrical work.
The assembly begins with installing the Crossbar Assembly (A) to the existing electrical Outlet Box. This crossbar provides the foundational support for the entire fixture. The supply wires from the outlet box are passed through the crossbar, and the crossbar is then secured with Outlet Box Screws (C), ensuring the green ground screw faces outward for easy access.
Next, the backplate of the Fixture Body (B) is fitted to the Crossbar Assembly (A). This step involves removing mounting balls from the crossbar, positioning the backplate, and then re-securing it with the mounting balls. A key adjustment feature here is the ability to adjust the length of the mounting screws on the crossbar. If the backplate is not snug against the wall, users can unscrew the preassembled hex nut and lock washer, then screw the mounting screws in or out until the correct length is achieved, ensuring a tight fit against the wall. This adjustability is crucial for a flush and secure installation, especially on uneven surfaces.
Electrical connections are made using standard wire connectors (D). The bare or green ground wire from the fixture is wrapped around the green ground screw on the crossbar, providing an essential safety ground. The white wire from the fixture is connected to the white wire from the outlet box, and the black wire from the fixture is connected to the black (or red) wire from the outlet box. These connections are twisted until tightly joined and then wrapped with approved electrical tape for insulation and security. All connected wires are then carefully tucked into the Outlet Box to prevent pinching or damage.
After wiring, the Fixture Body (B) is positioned over the outlet box, aligning the holes in the backplate with the mounting screws. Caulk (not supplied) is then applied to the previously removed mounting balls, and the fixture body is attached using these mounting balls, hand-tightening them until snug. This caulking step is vital for creating a weather-resistant seal, preventing moisture intrusion into the electrical components.
The final step in initial setup involves installing the light bulb. The fixture accommodates one A19 medium base bulb with a maximum of 100 watts. The bulb is inserted and screwed snugly into place. Following bulb installation, an exterior-grade caulk is applied over the top of the backplate and down its sides. It is explicitly noted not to caulk the bottom of the fixture backplate. This intentional gap at the bottom allows for proper moisture drainage, preventing water from accumulating inside the fixture, which could lead to damage or electrical hazards. This design feature highlights the fixture's consideration for long-term outdoor durability.
The Quoizel fixture is designed with ease of maintenance in mind, particularly concerning bulb replacement and glass panel replacement.
For routine bulb replacement, the process is straightforward: first, disconnect the fixture from the power source by turning off electricity at the circuit breaker. Allow the bulb sufficient time to cool before removal to prevent burns. Once cooled, the old bulb can be unscrewed and a new A19 medium base bulb (maximum 100W) can be screwed into place.
The document also provides detailed instructions for replacing the glass panels, a common maintenance task if a panel becomes cracked or broken. This process is designed to be user-friendly:
This modular design for glass panel replacement ensures that individual components can be serviced without needing to replace the entire fixture, extending its lifespan and reducing waste. The use of Allen screws and standard screws for these components suggests that common tools are sufficient for maintenance tasks.
For general cleaning, users are directed to the Quoizel website for product cleaning tips, indicating that specific care instructions might be available to maintain the fixture's appearance and performance over time. The emphasis on ensuring the exterior wall surface and fixture backplate are free of dirt before applying caulk also points to a maintenance best practice for ensuring a durable seal.
Overall, the Quoizel outdoor light fixture is designed for reliable outdoor illumination with a focus on safe installation, secure mounting, and user-friendly maintenance, particularly for bulb and glass panel replacement.
| Category | Outdoor Light |
|---|---|
| Style | Traditional |
| Finish | Kennebec Black |
| Material | Aluminum |
| Weight | 3.5 lbs |
| Bulb Type | Candelabra |
| Bulb Included | No |
| Number of Bulbs | 1 |
| Wattage | 60W |
| Voltage | 120V |
| Safety Rating | Wet |
| Bulb Wattage | 60W |
| Bulb Base | Medium (E26) |
| Glass | Clear Seeded |