Do you have a question about the Quoizel SNN8409PN and is the answer not in the manual?
Turn off electricity at circuit breaker or fuse box before installation. Consult an electrician if unsure.
Do not subject glass parts to shock during operation to prevent shattering.
Inspect all parts against the content list and diagrams before assembly to ensure completeness.
Attach mounting screws, lock washers, and hex nuts to the crossbar and backplate.
Attach the crossbar to the outlet box using outlet box screws and tighten securely.
Connect white, black, and ground wires using standard connectors and tape.
Place fixture body backplate over mounting screws and secure with lock balls.
Insert a medium base bulb, maximum 100 watts, and screw it in snugly.
Apply exterior caulk over the top and sides of the backplate, avoiding the bottom for drainage.
Unscrew lock screws to remove the cage assembly from the fixture hood.
Remove glass holder, replace broken panel, and reattach glass holder with screws.
Reattach the cage with glass panels to the fixture hood and secure with lock screws.
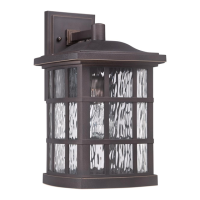
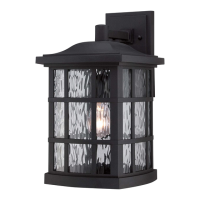
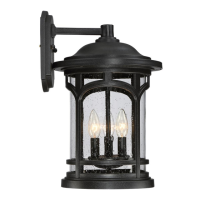
This document provides comprehensive assembly and maintenance instructions for the Quoizel SNN8409PN outdoor wall lantern, designed to enhance the exterior of your home with its classic aesthetic and functional illumination. The fixture is intended for permanent installation on an exterior wall, providing ambient lighting for porches, patios, or entryways. Its robust construction is designed to withstand outdoor elements, ensuring long-lasting performance and durability.
The primary function of the SNN8409PN fixture is to provide reliable outdoor lighting. It utilizes a single medium base bulb, allowing for flexibility in choosing the desired light output and color temperature, up to a maximum of 100 watts. This ensures ample illumination for safety, security, and aesthetic appeal around your property. The design incorporates a protective cage and glass panels, which not only contribute to its visual appeal but also shield the bulb from environmental factors such as rain, wind, and debris.
Installation of the SNN8409PN is a straightforward process, estimated to take between 20 to 30 minutes, provided all necessary tools and parts are at hand. The assembly begins with securing the crossbar to the outlet box, which serves as the foundational mounting point for the fixture. This involves threading mounting screws, lock washers, and hex nuts onto the crossbar, ensuring a secure attachment. The crossbar is then affixed to a standard outdoor electrical outlet box using outlet box screws. It is crucial to ensure these connections are tightened until snug to prevent any wobbling or instability.
Following the physical mounting of the crossbar, the electrical wiring connections are made. This step requires careful attention to detail and adherence to safety guidelines, including turning off electricity at the circuit breaker or main fuse box before beginning. The fixture's white supply wire is connected to the white supply wire from the outlet box, and the fixture's black wire is connected to the black (or red) supply wire from the outlet box. A critical safety step involves connecting the ground wire from the outlet box to the ground wire from the fixture. All wire connections should be made using standard wire connectors, twisted tightly, and then wrapped with approved electrical tape to prevent accidental disconnections or short circuits. Once secured, the connected wires are carefully tucked into the outlet box, preparing for the attachment of the fixture body.
The fixture body, which houses the bulb socket and the decorative elements, is then attached to the mounting screws extending from the crossbar. This involves aligning the backplate of the fixture body over the mounting screws and securing it with lock balls. The lock balls are threaded onto the mounting screws and hand-tightened until snug, ensuring the fixture body is firmly in place against the wall. To enhance weather resistance and prevent moisture intrusion, it is recommended to apply exterior-grade caulk around the top and sides of the fixture's backplate where it meets the wall surface. It is important not to caulk the bottom of the backplate, as this allows for proper moisture drainage, preventing water from accumulating inside the fixture.
Once the fixture body is securely mounted and sealed, the final step in the initial setup is to install the light bulb. The SNN8409PN is designed for a medium screw base bulb, with a maximum wattage of 100 watts. The bulb is simply screwed into the socket until it is snugly in place. With the bulb installed and the electrical connections complete, the power can be restored, and the fixture is ready for use.
Maintenance features for the SNN8409PN are designed for ease of access and replacement of components, particularly the glass panels and the bulb. Should a glass panel become damaged or broken, the design allows for individual replacement. This process involves unscrewing the lock screws that secure the cage to the fixture hood, allowing the cage to be removed. Once the cage is detached, the glass holder can be removed by unscrewing additional lock screws on top of the cage. The broken glass panel can then be carefully removed and a new replacement panel inserted. After replacing the glass, the glass holder is re-secured, and the entire cage assembly is reattached to the fixture hood by tightening the lock screws. This modular design ensures that repairs are straightforward and do not require specialized tools or extensive disassembly of the entire fixture.
Regular cleaning of the fixture is also recommended to maintain its appearance and ensure optimal light output. The exterior surfaces, including the glass panels and the metal finish, can be wiped down with a soft, damp cloth. For stubborn dirt or grime, a mild, non-abrasive cleaner suitable for outdoor fixtures can be used, followed by a thorough rinse and dry. It is important to avoid harsh chemicals or abrasive materials that could damage the finish or the glass.
The SNN8409PN fixture is built with an emphasis on user-friendliness, from its initial assembly to ongoing maintenance. The detailed instructions, coupled with clear diagrams, guide the user through each step, minimizing potential errors and ensuring a successful installation. The use of common household tools, such as flathead and Phillips screwdrivers, pliers, wire cutters, and wire strippers, makes the installation accessible to individuals with basic DIY skills. However, for those unsure about electrical work, consulting a licensed electrician is always recommended to ensure safety and compliance with local electrical codes.
In summary, the Quoizel SNN8409PN outdoor wall lantern is a functional and aesthetically pleasing lighting solution for any exterior space. Its design prioritizes ease of installation, robust construction for outdoor use, and simple maintenance, including straightforward bulb and glass panel replacement. By following the provided instructions, users can confidently install and enjoy this fixture for many years, enhancing the beauty and safety of their outdoor environment.
| Type | Wall Lantern |
|---|---|
| Material | Aluminum |
| Width | 9 inches |
| Max Wattage | 100 |
| Bulb Quantity | 1 |
| Voltage | 120 |
| Glass | Clear Seeded Glass |
| Safety Rating | Wet |