Do you have a question about the Raisecom RC832-30 and is the answer not in the manual?
Symbols indicating potential safety hazards during product operation or maintenance.
Precautions for safely handling products connected to power sources or telecommunication lines.
General guidelines for safe installation, operation, and maintenance of telecommunications products.
Instructions for safely connecting the device to AC power outlets and ensuring proper grounding.
Guidelines for connecting DC power supply, emphasizing isolation, circuit breakers, and wiring order.
Precautions to prevent damage to sensitive modules from static electricity using wrist straps and proper handling.
General description of the RC832-30(-BL) as a modular PDH multiplexer for fiber optic transmission.
Key features of the RC832-30(-BL), including El transmission, alarms, loopback, and SNMP manageability.
Details on different models of the RC832-30 series, specifying optical transceiver types and transmission distances.
Specifications for the E1 interface, including bit rate, coding, interface type, impedance, and compliance standards.
Technical parameters for various optical transceivers, detailing laser, receiver, wavelength, power, and distance.
Specifies the power consumption of the device, which is less than 3W.
Defines the acceptable operating temperature (0-60°C) and humidity (≤90%) for the device.
Specifies the temperature (-40 to 80°C) and humidity (5-90% no condensation) for storing the device.
Details the physical outline, dimensions (91x25x172mm), and net weight (0.13Kg) of the device.
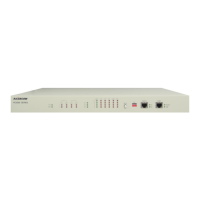
Illustrates the front panel layout of the RC832-30 and RC832-30-BL, showing indicators and ports.
Explains the function and status of various indicators on the device, including PWR, LLOS, RLOS, and ALM/LPR.
Details the interface types for RC832-30 (unbalanced E1) and RC832-30-BL (balanced E1).
Specifies the location of the 8-bit SW1 and 4-bit SW2 DIP switches on the circuit board.
Details the function of SW1 bits for ALS, loopback settings, and reserved functions.
Describes the function of SW2 for identifying optical transceiver types and their factory settings.
Specifies the default factory settings for the DIP switches, indicating they are typically set to OFF.
Illustrates typical application scenarios and basic connection diagrams for RC832-30 and RC832-30-BL devices.
Details the Raisecom NView NNM V5.0 platform for managing RC832-30(-BL) devices.
Lists information that can be queried through the network management platform, such as device version and alarms.
Outlines configurable functions via the network management platform, including loopback and ALS settings.
Ensures the E1 cable meets device impedance and type requirements for proper communication.
Verifies fiber optic cable type and connector compatibility with device specifications.
Specifies cable types for multi-mode (62.5/125um, 50/125um) and single-mode (9/125um) fiber.
Covers chassis and module installation, cable connection, and device powering on.
Troubleshooting for ALM red ON indicator, focusing on fiber connection and receiving signal power.
Troubleshooting for ALM red flickering indicator, checking fiber connection and remote receiving signal power.
Troubleshooting for E1 LOS indicator ON, checking E1 cable connection and pin arrangement.
| Brand | Raisecom |
|---|---|
| Model | RC832-30 |
| Category | Multiplexer |
| Language | English |