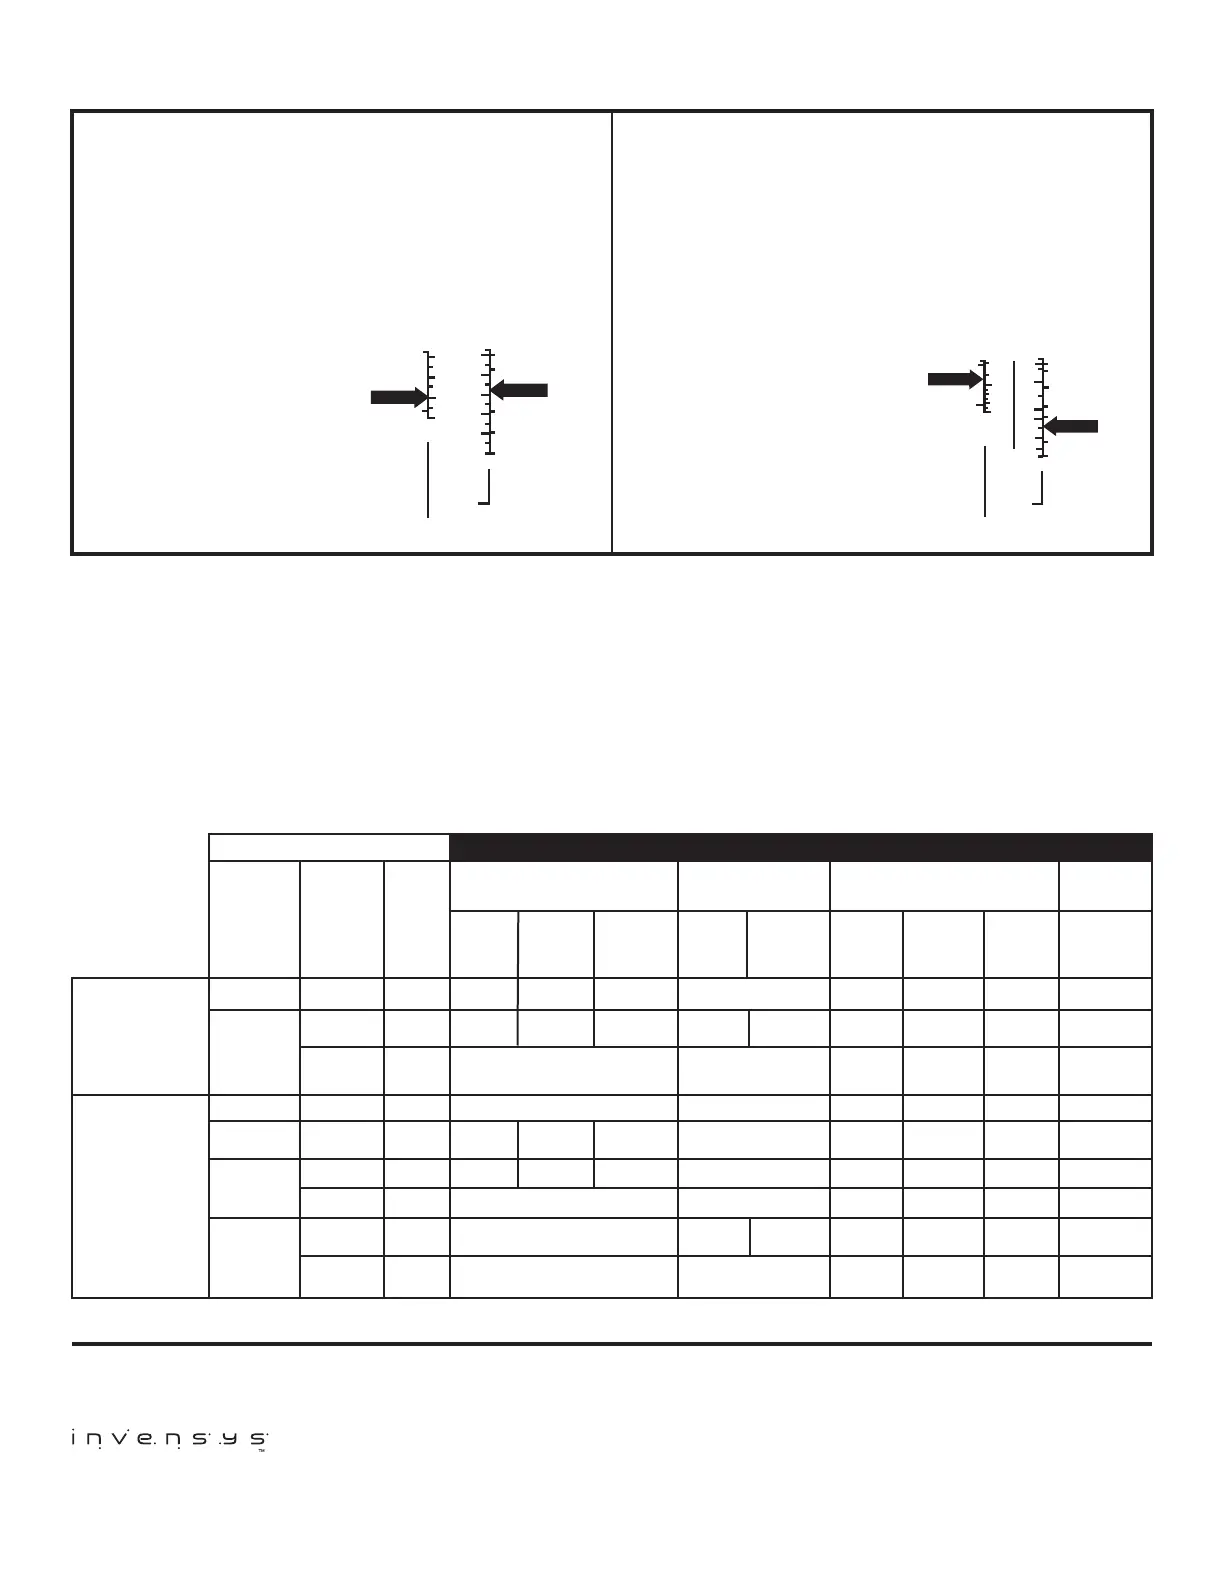
ADJUSTMENT EXAMPLES (See Control Settings and Adjustment P.3)
CLOSE ON RISE CONTROLS with Automatic
reset 010 and 020; 016 terminals 2-3
The scaleplate directly indicates the cut-in and differential.
The cut-out is calculated by subtracting the differential from
the cut-in:
1) Adjust the range screw
until the scale pointer
indicates the desired
cut-in setting.
2) Adjust the differential
screw until the scale
pointer indicates the
desired differential
setting. The cut-out
setting equals the cut-in
setting, less the
differential.
OPEN ON RISE with Automatic reset
011
The scaleplate directly indicated the cut-out and differential.
The cut-in is calculated by subtracting the differential from
the cut-out:
1) Adjust the range screw
until the scale pointer
indicates the desired
cut-out setting.
2) Adjust the differential
screw until the scale
pointer indicates the
desired differential
setting. The cut-in
setting equals the cut-out
setting, less the
differential.
EXAMPLE
Cut In
Differential
Cut Out
36 - 20 = 16
Differential
Cut In
CLOSES ON PRESSURE RISE
CUT OUT IS
CUT IN
MINUS
DIFFERENTIAL
20
36
20
30
40
10
10
20
40
60
80
100
3.0
2.0
1.0
KG.
LBS.
0
1.0
4.0
5.5
7.0
KG.
LBS.
EXAMPLE
Cut Out
Differential
Cut In
360 - 120 = 240
Differential
Cut Out
OPEN ON RISE OF PRESSURE
CUT IN IS
CUT OUT
MINUS
DIFFERENTIAL
120
360
40
100
150
150
250
350
450
1.0
4
KG.
LBS.
10
15
20
30
KG.
LBS.
LOW PRESSURE CHECK
Low pressure controls can be preset by using a container of re-
frigerant and a gauge set. Use a continuity meter to indicate the
closing and opening of the switch. Adjust the control to the de-
sired settings; pressurize the control while adjusting the settings.
Low pressure settings can be rechecked when the unit is running
by connecting a gauge to the section line service valve. Close the
liquid line valve and allow the system to pump down, observing
the low switch opening (or closing). Open the liquid line valve and
allow the pressure to increase, observing the high switch closing
(or opening). Adjust the settings as necessary.
HIGH PRESSURE CHECK
High pressure control settings can be checked by selectively dis-
connecting various stages of fans or by blocking the air ow on
air cooled condensers. On water cooled condensers, reduce or
shut off the water ow while observing the cut-out and adjust as
required.
CAUTION: These checks must be for a brief time only.
LOW
PRESSURE
HIGH
PRESSURE
Pressure
Range
P.S.I.G.
(Inches
Mercury
Vacuum)
(12”) to 50
(10”) to 100
50 to 150
100 to 250
100 to 400
150 to 450
Differential
P.S.I.
5 to 35
10 to 40
Manual*
Reset
10 to 40
20 to 100
40 to 150
17 Fixed
40 to 150
Manual**
Reset
Lowest
Event
P.S.I.G.
(Inches
Mercury
Vacuum)
(20”)
(20”)
(20”)
10
0
0
83
0
110
SPECIFICATIONS
O10 O11 O16 O20
SPST-Opens Low SPST-Opens High SPDT-Opens High or Low DPST-
Opens Low
Male
Flare
O16-120
O16-107
O16-585
-
-
O16-5870
-
O16-503
O16-209
36”
Capillary
with
Flare Nut
O16-557
O16-527
-
O16-166
-
O16-108
O16-142
-
-
48”
Capillary
with
Flare Nut
-
-
O16-261
-
O16-593
-
-
-
O16-200
36”
Capillary
with
Flare Nut
O20-7002
O20-7004
-
-
-
O20-7006
-
-
-
36”
Capillary
with
Flare Nut
Male
Flare
48”
Capillary
with
Flare Nut
36”
Capillary
with
Flare Nut
Male
Flare
O10-1401
O10-1831
Use O16
Use O16
O10-1807
O10-1894
Use O16
Use O16
Use O16
O10-1402
O10-1483
-
O10-2054
O10-1842
O10-1093
O10-2000
-
O11-1799 O11-3099
Use O16
Use O16
Use O16
Use O16
Use O16
011-1713
Use O16
Use O16
011-1711
* Locks on Pressure decrease. Pressure must rise approx. 10 PSI to be reset.
** Locks on pressure increase. Pressure must stop approx. 40 PSI to be reset.
191 E. North Avenue
Carol Stream Illinois 60188 USA
Customer Service Telephone 1.800.304.6563
Customer Service Facsimile 1.800.426.0804
HVACCustomerService@Invensys.com
Invensys™, Robertshaw
®
, Ranco
®
, and Eliwell are trademarks
of Invensys plc., its subsidiaries and/or affiliated companies. All
other brands mentioned may be the trademarks of their respective
owners.
www.Uni-Line.com
www.InvensysControls.com
©2013 Invensys
1515064 Rev C
For Technical Service
Telephone 1.800.445.8299
Facsimile 1.630.260.7294
TechnicalService@Invensys.com
 Loading...