Randall UnIOn lOc k -StItch
Installation
Randall UnIOn lOc k -StItch
Since 1858
Technical Support
1-800-327-9420
2
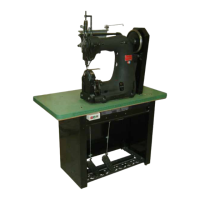
Machine Installation
Please insepect the packaging for any loose parts before discarding.
Motor Table
• Remove table from pallet and place in location
Machine Head
• Remove head from crating and place on table
• Secure the back of the machine with the included hook
bolts, and bolt the front of the machine head through the
table.
• Place the V-belt arounf the motor pulley, through the table
slot, and over the machine pulley. Ensure that the belt is
resting in the grooves of both pulleys, then tighten the belt
tension be lowering the motor with the adjustable motor
bracket. Lock the motor into postion with the bracket nuts
once the re tension is acheived.
Pedal Linkage
• Connect and adjust the right peddle linkage to the clutch
motor. Set the linkage with the center clamping bracket on
the rods.
• Connect the presser
foot cable from the
left pedal, through
the pulleys and up to
the connecting lever
behind the machine
hed. Secure with the
cable clamps.
Pulley Cover
• Secure the inside pulley cover with two screws on the
right hand side of the head, just bellow the hand wheel
• Set the outside cover together with the inside, then secure
with screws on the right hand face.
Tool Tray
• Place the tool tray on the front of the machine and secure
with the two supplied screws.