Do you have a question about the Rapid Shape 3Demax and is the answer not in the manual?
Explanations of hazard symbols (Danger, Warning, Caution, Attention, Instruction) and their meanings.
General safety rules, focusing on electric shock, UV radiation, hand injuries, environmental influences, overheating, and substances.
Manufacturer's declaration of compliance with relevant directives and standards.
Defines the purpose of the 3D printer system and its operating conditions.
Outlines responsibilities for the operating company and machine operator.
States that unauthorized alterations are forbidden; repairs by trained personnel only.
Lists the items included in the machine's delivery package.
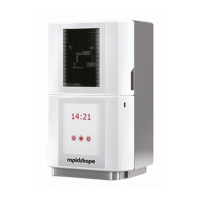
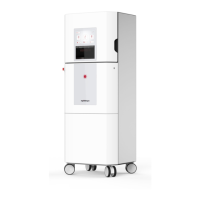
Identifies and illustrates the main components and connection ports of the machine.
Guidelines for safe transportation, including packaging and protection.
Procedure for checking and reporting transport-related damages.
Stipulations for the room setup, environment, and utilities needed for operation.
Lists essential auxiliary equipment for smooth operation.
Information on obtaining material data sheets and contact details.
Details necessary PC hardware, software, network, and internet access for the printing workflow.
Specifies minimum requirements for computer hardware to run slicing software.
Lists required software installations, including OS, TeamViewer, and netfabb.
Explains default IP settings and how to set a static IP.
Details network requirements for updates and remote service access.
Safely removing the machine from packaging.
Positioning the machine correctly.
Connecting power and network cables.
Powering on and initiating the machine startup.
Performing the initial test print with safety precautions.
Instructions for installing the netfabb software.
Setting up the printer's workspace in netfabb.
Adding material and configuring parameters in netfabb.
Importing 3D models (*.stl files) into netfabb.
Generating layer data for the printer system.
Sending print jobs to the machine over a network.
Cleaning and filling the material reservoir and preparing the build platform.
Placing the filled material reservoir and build platform into the machine.
Procedure to select and initiate a printing job.
Steps for safely detaching the completed print from the build platform.
Guide to cleaning the printed component using RS Wash or isopropanol.
Process for curing printed components using the RS Cure unit.
Guide to calibrating the machine's LED for print quality.
Steps to remove residues from the build platform.
Instructions for cleaning the material reservoir.
Pre-print checks and cleaning of reservoir and platform.
Daily checks of protective glass and reservoir bottom.
Weekly checks for parallelism and light intensity.
Information on extensive maintenance performed by Rapid Shape personnel.
Procedure for safely powering off the machine.
Guidelines for storing the machine when not in use.
Instructions for safely disassembling the machine.
Information on returning the machine for disposal and materials used.
| Brand | Rapid Shape |
|---|---|
| Model | 3Demax |
| Category | 3D Printers |
| Language | English |