RISERVATO AL PERSONALE AUTORIZZATO ALL'INSTALLAZIONE - ONLY FOR INSTALLATION-AUTHORIZED STAFF
ENCARGADO DE LA INSTALACION
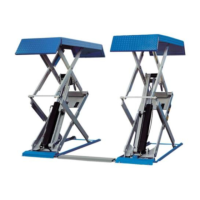
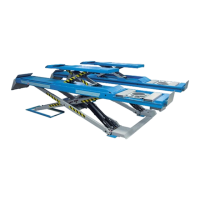
4.8.2 Versioni con semitraverse - tipo OPEN FRONT
Con riferimento alla figura 15:
- Collegare i tratti di tubo A, B e C, presenti all'interno della
traversa posteriore, ai raccordi (1) e (2) presenti
rispettivamente sulla pedana fissa (3) e sulla pedana mobile
(4).
- Collegare i tratti di tubo D, presenti all'interno delle
semitraverse anteriori, ai raccordi (5) e (6) presenti
rispettivamente sulla pedana fissa (3) e sulla pedana mobile
(4).
fissare il tubo ai restanti cavi presenti all'interno della guaina
(7).
- Bloccare la guaina (7) sul tubo (8) della pedana fissa tramite
la fascetta (9).
- Alimentare aria compressa alla elettrovalvola EV3.
L'ARIA DEVE ESSERE FILTRATA E REGOLATA AD UNA
PRESSIONE COMPRESA TRA 6 E 12 BAR.
- Inserire il tratto di tubo E, proveniente dal raccordo (5),
all'interno della guaina (7) e collegarlo all'elettrovalvola EV3
posta sulla centralina; utilizzare le fascette in dotazione per
4.8.2 Versions provided with semi-cross members - - Clamp sheath (7) on fixed platform pipe (8) using tie (9).
A L'INSTALLATION - RESERVADO AL
OPEN FRONT type
With reference to figure 15:
- Connect A, B and C hose sections, set inside rear cross
member, to fittings (1) and (2) on fixed platform (3) and
mobile platform (4), respectively.
- Connect D hose sections, set inside front semi-cross
members, to fittings (5) and (6) on fixed platform (3) and
mobile platform (4), respectively.
- Insert hose section E, coming from fitting (5), in sheath (7)
and connect it to solenoid valve EV3 on the control unit; use
supplied clamps to secure the hose to the other cables inside
sheath (7).
- Supply compressed air to solenoid valve EV3.
AIR MUST BE FILTERED AND SET TO A PRESSURE
BETWEEN 6 AND 12 BAR.
POUR LE PERSONNEL AUTORISE
4.8.2 Versionen mit Querbalkenhälften n - Typ OPEN
FRONT
Mit Bezug auf Abbildung 15:
- Die Schlauchabschnitte A, B und C, im hinteren Querbalken,
an die Anschlüsse (1) und (2) schließen, die jeweils an der
festliegenden Fahrschiene (3) und der beweglichen
Fahrschiene (4) angeordnet sind.
- Die Schlauchabschnitte D, in den vorderen Querbalken, an
die Anschlüsse (5) und (6) schließen, die jeweils an der
festliegenden Fahrschiene (3) und der beweglichen
Fahrschiene (4) angeordnet sind.
- Den Abschnitt der Leitung E, die vom Anschluss (5) wegführt,
in die Ummantelung (7) einfügen, dann das
Elektroventil EV3 an der Zentrale anschließen; die
mitgeleiferten Schellen für die Befestigung der Leitung an die
anderen in der Ummaltelung (7) vorhandenen Kabel
verwenden.
- Die Ummantelung (7) mit der Schelle (9) an der Leitung (8)
der Plattform fixieren.
- Das Elektroventil EV3 mit Druckluft beaufschlagen.
DIE LUFT MUSS GEFILTERT SEIN UND AUF EINEN
DRUCK ZWISCHEN 6 UND 12 BAR REGULIERT WERDEN.
PERSONAL VORBEHALTEN - SEULEMENT
4.8.2 Versions avec demi-poutres - type OPEN FRONT
En référence à la figure 15:
- Relier les sections de tube A, B et C, présentes à l'intérieur de
la poutre arrière, aux raccords (1) et (2) présents
respectivement sur la plate-forme fixe (3) et sur la plate-
forme mobile (4).
- Relier les sections de tube D, présentes à l'intérieur des demi-
poutres avant, aux raccords (5) et (6) présents
respectivement sur la plate-forme fixe (3) et sur la plate-
forme mobile (4).
- Introduire la partie de tuyau E, provenant du raccord (5), à
l’intérieur de la gaine (7) et la relier à l’électrovanne EV3 située
sur la centrale; utiliser les colliers serre-flex livrés
pour fixer le tuyau aux autres câbles à l’intérieur de la gaine
(7).
- Bloquer la gaine (7) sur le tuyau (8) de la plate-forme fixe à
l’aide du collier serre-flex (9).
- Ouvrir l’air comprimé pour l’électrovanne EV3.
L’AIR DOIT ETRE FILTRE ET REGLE A UNE PRESSION
ENTRE 6 ET 12 BARS.
IST DEM ZUR INSTALLATION AUTORISIERTEN
4.4.4 Модели с полу-траверсами– тип ОТКРЫТЫЙ ПЕРЕД
Со ссылкой на Рис.15:
- Подключите трубки A, B и C, которые расположены внутри
задней поперечины, к фиттингам (1) и (2) на стационарной
платформе (3) и подвижной платформе (4).
- Подключите трубку D, расположенную на внутренней стороне
задних полу-поперечин, чтобы соединить (5) и (6),
расположенные на стационарной платформе (3) и
подвижной платформе (4).
- Вставьте трубку Е, выходящую из фиттинга (5), в защитную
оболочку (7) и подключите его к электромагнитному
клапану EV3 на длоке управления; используйте
поставляемые в комплекте хомуты для подключения
шланга к другмим кабелям внутри защитной оболочки (7).
- Зажмите защитную оболочку (7) на трубке фиксированой
платформы (8) с помощью зажима (9).
- Подать сжатый воздух на электромагнитный клапан EV3.
ВОЗДУХ ДОЛЖЕН БЫТЬ ОТФИЛЬТРОВАН И
УСТАНОВЛЕН ДО ДАВЛЕНИЯ ОТ 6 ДО 12 БАР.
0716-M001-0 57
 Loading...