2929
RISERVATO AL PERSONALE AUTORIZZATO ALL'INSTALLAZIONE - ONLY FOR INSTALLATION-AUTHORIZED STAFF
IST DEM ZUR INSTALLATION AUTORISIERTEN PERSONAL VORBEHALTEN - SEULEMENT POUR LE PERSONNEL AUTORISE A L'INSTALLATION - RESERVADO AL PERSONAL ENCARGADO DE LA INSTALACION
0579-M030-2
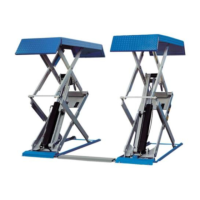
a) RAV516NL - RAV518NL - RAV518Q
Rif. Fig. 7 - Estrarre da sotto la pedana P1 i due tubi indicati con
4 e 5, togliere i rispettivi tappi e collegarli alla valvola di
riallineamento B, posta sotto la pedana P2.
Prestare particolare attenzione a fare passare il tubo 4 tra la
biella ed il raccordo del tubo 5 sul fondello del cilindro; inserire
il tubo 4 nel passacavo 7 (dettaglio A).
Bloccare i tubi 4 e 5 sulla base tramite il morsetto 8.
b) RAV516NL - RAV518NL
Estrarre da sotto la pedana P2 i due tubi indicati con 2 e 3,
togliere i rispetti tappi e collegarli alla centralina come si vede
in Fig. 7.
a) RAV516NL - RAV518NL - RAV518Q
Ref. Fig. 7 - Pull out the two pipes 4 and 5 from under the platform
P1, remove the plugs and connect them with the re-alignment
valve B located under the P2 platform.
Pay the utmost attention when passing the 4 pipe between the
connecting rod and the pipe 5 fitting on the cylinder bottom plate;
insert pipe 4 into fairlead 7 (detail A).
Lock pipes 4 and 5 on the base with the terminal 8.
b) RAV516NL - RAV518NL
Remove the two tubes 2 and 3 from beneath the footboard P2,
remove the plugs and connect them to the central unit as shown
in Fig. 7.
a) RAV516NL - RAV518NL - RAV518Q
Bez. Abb. 7 – Unter der Plattform P1 die beiden mit 4 und 5
gekennzeichneten Schläuche herausziehen, die jeweiligen
Stopfen entfernen und die Schläuche an das Ausgleichsventil
B, das unter der Plattform P2 angeordnet ist, schließen.
Besondere Aufmerksamkeit darauf richten, dass der Schlauch
4 zwischen dem Pleuel und dem Anschluss des Schlauchs 5 am
Zylinderboden verlegt wird. Den Schlauch 4 in die
Leitungsführung 7 (Detail A) einfügen.
Die Schläuche 4 und 5 mit der Klemme 8 am Sockel feststellen.
b) RAV516NL - RAV518NL
Die zwei mit 2 und 3 gekennzeichneten Leitungen unter der
Fahrschiene P2 herausziehen, die entsprechenden Pfropfen
entfernen und die Leitungen gemäss Abb. 7 im Schaltschrank
anschliessen.
a) RAV516NL - RAV518NL - RAV518Q
Réf. Fig. 7 – Sortir du dessous de la plateforme P1 les deux
tuyaux indiqués avec les numéros 4 et 5, ôter les bouchons
correspondants et les relier à la vanne de synchronisation B
placée sous la plateforme P2.
Veiller à bien faire passer le tuyau 4 entre la bielle et le raccord
du tuyau 5 sur le fond du vérin ; insérer le tuyau 4 dans le passe-
câble 7 (détail A).
Bloquer les tuyaux 4 et 5 sur la base au moyen de l’étau 8.
b) RAV516NL - RAV518NL
Extraire les deux tuyaux marqués 2 et 3 par le dessous du
chemin de roulement P2, les libérer de leurs bouchons respectifs
et les relier au boîtier de commande comme indiqué à la fig. 7.
a) RAV516NL - RAV518NL - RAV518Q
Ref. Fig. 7 – Extraer desde abajo de la plataforma P1 los dos
tubos indicados con 4 y 5, quitar los correspondientes tapones
y conectarlos a la válvula de sincronización B, ubicada debajo
de la plataforma P2.
Prestar especial atención a hacer pasar el tubo 4 entre la biela
y el racor del tubo 5 en la placa de fondo del cilindro; introducir
el tubo 4 en el sujetacable 7 (detalle A).
Bloquear los tubos 4 y 5 en la base con la abrazadera 8.
b) RAV516NL - RAV518NL
Extraiga de debajo de la tarima P2 los dos tubos indicados con
2 y 3, quite los respectivos tapones y conéctelos a la centralita
como se ve en la Fig.7.
RAV518Q
Die mit 2 gekennzeichnete Leitung unter der Plattform P2
einführen, die Verschlusskappe abnehmen und der Abb. 7
gemäß an der Steuerzentrale anschließen.
Die Leitung 3 (bestehend aus einem Rohr, Anschluss und
einem Schlauch) wird im zerlegten Zustand in den Versand
gebracht.
Das Rohr 3 an den Anschluss 6 und den Schlauch 3 an die
Steuerzentrale schließen; siehe Abb. 7.
c) RAV516NL - RAV518NL - RAV518Q
Im Hydraulikaggregat den Pfropfen durch die Ölstandschraube
mit Pegelstab 1 ersetzen. Sicherstellen, dass der Ölstand ca.
10 mm unterhalb der Ölstandschraube liegt.
RAV518Q
Sortir le tuyau 2 sous le chemin de roulement P2, ôter le
bouchon et le relier à la centrale comme indiqué en Fig. 7.
Le tuyau 3 (composé d’un tuyau rigide, un raccord et un tuyau
flexible) est livré déposé.
Relier le tuyau rigide 3 au raccord 6 et le tuyau flexible 3
correspondant à la centrale comme indiqué en Fig. 7.
c) RAV516NL - RAV518NL - RAV518Q
Dans l’unité hydraulique, remplacer le bouchon-jauge (1).
Vérifier que le niveau de l’huile se trouve à environ 10 mm du
bouchon.
RAV518Q
Estrarre da sotto la pedana P2 il tubo indicato con 2, togliere il
tappo e collegarlo alla centralina come si vede in Fig. 7.
Il tubo 3 (composto da tubo rigido, raccordo e tubo flessibile)
viene spedito smontato.
Collegare il tubo rigido 3 al raccordo 6 ed il relativo tubo
flessibile 3 alla centralina come si vede in Fig. 7.
c) RAV516NL - RAV518NL - RAV518Q
Sostituire nella centralina idraulica il tappo-asta di livello 1.
Verificare che il livello dell'olio sia circa a 10 mm dal tappo
stesso.
RAV518Q
Remove the tube indicated with number 2 from below the
platform P2, remove the plug and connect it to control unit as
shown in Fig. 7.
Tube 3 (consisting of rigid pipe, coupling and hose) is shipped
disassembled.
Connect rigid pipe 3 to coupling 6 and hose 3 to control unit as
shown in Fig. 7.
c) RAV516NL - RAV518NL - RAV518Q
Replace the plug-dipstick 1 in the hydraulic unit. Check that the
oil level is about 10 mm from the plug itself.
RAV518Q
Extraer de la parte inferior de la plataforma P2 el tubo 2, quitar
la tapa y conectarlo a la central como ilustra la figura 7.
El tubo 3 (compuesto por un tubo rígido, acople y tubo flexible)
se envía desmontado.
Empalmar el tubo rígido 3 al acople 6 y el correspondiente tubo
flexible 3 a la central como ilustra la figura 7.
c) RAV516NL - RAV518NL - RAV518Q
Sustituya el tapón-varilla de nivel 1 en la centralita hidráulica.
Compruebe que el nivel de aceite se encuentre a unos 10 mm.
respecto al tapón.