31
0472-M013-5
6
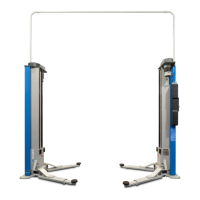
- Infilare sulla barra il supporto, gli anelli elastici ed i giunti.
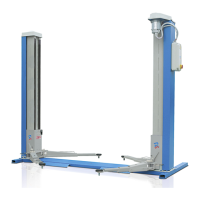
- Posizionare la barra.
- Fissare al pavimento il supporto barra esattamente al centro, spes-
sorando opportunamente qualora il pavimento non sia piano (Fig.
4a).
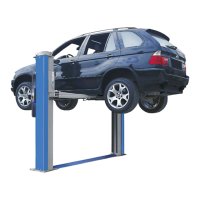
- Verificare che i carrelli siano alla stessa altezza (differenza massima
3 mm). Altrimenti ruotare con una chiave di 17 mm la sommità della
vite di trasmissione (Fig. 6). Un giro della vite di trasmissione sposta
il carrello di 5 mm.
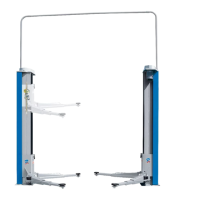
- Lubrificare i giunti con Molikote.
- Infilare i giunti negli alberi delle scatole angolari ed inserire gli anelli
elastici nelle apposite cave (Fig. 4b).
- Insertar en la barra de soporte, los anillos elásticos y las juntas.
- Colocar la barra.
- Fijar en el suelo el soporte barra exactamente en el centro, dejando
el oportuno espesor en el caso que el suelo no sea llano (Fig. 4a).
- Verificar que los carros estén a la misma altura (diferencia máxima
3 mm). De lo contrario girar con una llave de 17 mm la punta del
tornillo de trasmisión (fig. 6). Un giro del tornillo de trasmisión de-
splaza el carro de 5 mm.
- Lubrificar las juntas con Molikote.
- Insertar las juntas en los árboles de las cajas angulares e inserir
los anillos elásticos en las expresas ranuras (Fig. 4b).
- Bajar los carros y apretar los tornillos de fijación de las cajas an-
gulares (Fig. 5).
- Montar el carter cubrebarra, fijándolo a tierra mediante 4 tacos.
- Enfiler le support, les anneaux ressorts et les joints sur la barre.
- Positionner la barre.
- Fixer le support barre au sol, exactement au centre et caler oppor-
tunément si le sol n’est pas plat (Fig. 4a).
- Contrôler que les chariots soient à la même hauteur (différence
maximum 3 mm). Sans quoi, tourner avec une clé de 17 mm la tête
de la vis de transmission (Fig. 6). Un tour de la vis de transmission
déplace le chariot de 5 mm.
- Lubrifier les joints avec du lubrifiant Molikote.
- Enfiler les joints dans les arbres des boîtes angulaires et introduire
les anneaux ressorts dans les encoches (Fig. 4b).
- Faire descendre les chariots et serrer les vis de fixation des boîtes
angulaires (Fig. 5).
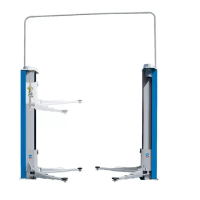
- Monter le carter de protection de la barre en le fixant au sol au
moyen de 4 vis tamponnées.
- Auf die Welle die Halterung, die Ringe und die Verbindungen
einsetzen.
- Die Welle positionieren.
- Die Wellenhalterung genau in der Mitte am Fussboden verankern.
Sollte der Fussboden nicht eben sein, ordnungsgemäss mit Unter-
legscheiben ausgleichen (Abb. 4a).
- Überprüfen, ob sich die Hubwagen auf gleicher Höhe befinden
(zugelassener Unterschied max. 3 mm). Ist dies nicht der Fall, ist
die Mutter oberhalb der Spindeln mit einem 17 mm Schlüssel zu
regulieren (Abb. 6). Eine Spindelumdrehung verschiebt den Hubwagen
um 5 mm.
- Die Kupplungen mit Molykote schmieren.
- Die Verbindungen in die Wellen der Winkelgetriebe stecken und die
Ringe in die dafür vorgesehenen Aussparungen einsetzen (Abb.
4b).
- Die Hubwagen herunterfahren und die Arretierschrauben der Winkel-
getriebe fest anziehen (Abb. 5).
- Die Wellenabdeckung montieren und mit 4 Dübeln am Boden
verankern.
- Fit the support, the internal rings and the couplings onto the bar.
- Place the bar in position.
- Fasten the bar support to the floor, exactly in the centre, adding
shims if the floor is not perfectly flat (Fig. 4a).
- Check that the carriages are at the same height (max. difference 3
mm). If not, turn the top of the drive screw using a 17 mm spanner
(Fig. 6). One turn of the drive screw shifts the carriage by 5 mm.
- Lubricate the joints with Molikote
- Thread the couplings into the shafts of the angular boxes and fit
the internal rings into the respective slots (Fig. 4b).
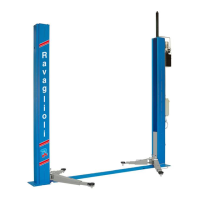
- Portare i carrelli in basso e serrare le viti di fissaggio delle scatole
angolari (Fig. 5).
- Montare il carter copribarra, fissandolo a terra mediante 4
tasselli.
- Lower the carriages and tighten the fastening screws of the angular
boxes (Fig. 5).
- Fit the bar cover casing, fastening it to the ground with 4 plugs.
 Loading...