35
0472-M002-3KPX 336-337 W-WK-WR
6
6.8 Completamento e controllo
- Portare i carrelli ad una altezza di 70-80 cm.
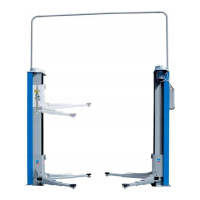
- Montare i bracci lunghi (Fig. 11).
- Montare i bracci corti (Fig. 11).
- Azionando il comando di discesa, agire manualmente sul fi necorsa
inferiore: la discesa deve arrestarsi.
- Azionare il comando di salita fi no al completo innalzamento dei
carrelli controllando che l’arresto avvenga per intervento del fi necor-
sa superiore.
- Riempire le vaschette delle colonne con l’olio ESSO GEAR OIL GX
85W - 140 fi no al livello indicato (vedi paragrafo 9).
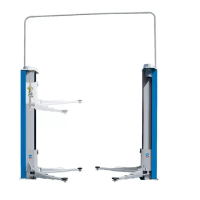
- Montare i carter colonna come illustrato in Fig. 13.
6.9 Arresto braccio
- Applicare su ogni braccio un arresto (Fig. 12); a ponte abbassato
il braccio deve comunque risultare libero.
6.10 Salvapiedi
- Montare i salvapiedi come indicato in Fig. 14.
6.11 Smontaggio
- Eventuali operazioni di disinstallazione per spostamento, accanto-
namento, o rottamazione vanno eseguite seguendo in ordine inver-
so le fasi di montaggio.
6.8 Completion and check
- Move the carriages to a height of 70-80 cm
- Fit the long arms (Fig. 11)
- Fit the short arms (Fig. 11)
- Operate the down run control, manually setting the lower limit switch.
Downward movement should stop.
- Operate the up run control until the carriages are fully raised and
make sure the upper limit switch engages to stop these.
- Fill the post tanks with ESSO GEAR OIL GX 85W – 140 up to in-
dicated level (see para. 9)
- Fit post cover guards as shown in Fig. 13
6.9 Arm stop
- Fit a stop to each arm (Fig. 12). The arm should be free when the
lift is lowered.
6.10 Foot guards
- Fit the foot guards as shown in Fig. 14
6.11 Dismantling
- Any dismantling operations performed in order to move, store or
scrap the machine must be done in the reverse sequence to that
followed for installation.
6.8 Komplettierung und Kontrolle
- Die Hubwagen auf eine Höhe von 70-80 cm fahren.
- Die langen Arme montieren (Abb. 11).
- Die kurzen Arme montieren (Abb. 11).
- Herunterfahren und von Hand den unteren Endschalter betätigen.
Die Abwärtsbewegung muss sich unterbrechen.
- Hochfahren, bis die Hubwagen ihren kompletten Hublauf ausgeführt
haben und sicherstellen, dass der Stopp durch den Einsatz des obe-
ren Endschalters erfolgt.
- Die Säulentöpfe bis zum angegebenen Ölstand mit Öl ESSO GEAR
OIL GX 85W - 140 füllen (Siehe Abschnitt 9).
- Die Säulenabdeckungen gemäss Abb. 13 montieren.
6.9 Armfeststellvorrichtung
- Auf jeden Arm eine Feststellvorrichtung (Abb. 12) montieren. Bei
bodenenbener Hebebühne muss sich der Arm frei bewegen kön-
nen.
6.10 Fussabweiser
- Die Fussabweiser gemäss Abb. 14 montieren.
6.11 Demontage
- Soll die Bühne wegen Ortsverschiebung, Einlagerung oder Ver-
schrottung demontiert werden, ist wie bei der Aufstellung aber in
umgekehrter Reihenfolge vorzugehen.
6.8 Complètement de l’installation et contrôle
- Soulever les chariots à une hauteur de 70-80 cm.
- Monter les bras longs (fi g. 11).
- Monter les bras courts (fi g. 11).
- Actionner la commande de descente et agir manuellement sur la
butée de fi n de course inférieure: la manoeuvre de descente doit
s’arrêter.
- Actionner la commande de montée pour porter les chariots à leur
hauteur maximale et contrôler que l’arrêt est provoqué par l’interven-
tion de la butée de fi n de course supérieure.
- Remplir les bacs des colonnes avec de l'huile ESSO GEAR OIL
GX 85W -140 jusqu’au niveau indiqué (voir paragraphe 9).
- Monter les carters des colonnes comme indiqué à la fi g. 13.
6.9 Blocage du bras
- Monter un arrêt sur chaque bras (fi g.12); lorsque le pont est abais-
sé, le bras doit résulter libre.
6.10 Garde-pieds
- Monter les garde-pieds comme indiqué à la fi g. 14.
6.11 Démontage
- Les opérations éventuelles de démontage en cas de déplacement,
stockage ou mise à la ferraille doivent être réalisées en appliquant
les phases du montage dans le sens inverse.
6.8 Terminación de la instalación y control
- Levar los carros a una altura de 70-80 cm.
- Montar los brazos largos (Fig. 11).
- Montar los brazos cortos (Fig. 11).
- Accionando el mando de bajada, actuar manualmente en el fi n de
carrera inferior: la bajada debe detenerse.
- Accionar el mando de subida hasta la elevación completa de los
carros controlando que la parada se efectúe por intervención del fi n
de carrera superior.
- Llenar los tanques de las columnas con aceite ESSO GEAR OIL
GX 85W-140 hasta el nivel indicado (ver párrafo 9).
- Montar los cárteres columna como está ilustrado en la Fig.13.
6.9 Bloqueo brazo
- Montar en cada brazo un bloqueo (Fig.12). Con el elevador total-
mente bajado, el brazo debe quedar suelto.
6.10 Salvapiés
- Montar los salvapiés según la Fig.14.
6.11 Desmontaje
- Eventuales operaciones de instalación por: desplazamiento, alma-
cenamiento, o auto desguace se realizan siguiendo el orden contra-
rio de las fases de montaje.
 Loading...