Do you have a question about the RC Mowers 52XP and is the answer not in the manual?
Register your mower with the serial number to ensure satisfaction and receive updates.
Read and understand all provided manuals, safety instructions, and unit controls.
Practice safe working precautions and follow applicable local rules and laws.
Details on emission controls and components, and regulations for tampering.
Read manuals, decals, and safety video; understand controls and safe use.
Ensure unit is in safe working condition, check parking brake, and inspect for damage.
Use recommended attachments appropriate for your machine and application.
Do not jump start the mower; check battery condition and charge properly.
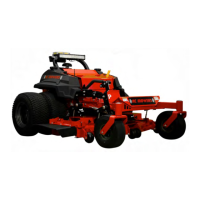
A radio frequency control system for wirelessly operating the equipment.
Controls power to the mower; engine will not start with switch in down position.
Controls power to the engine; cannot be removed when in the On position.
Controls fuel flow from left or right tank, or stops all fuel flow.
Includes warning lights, deck lift, height-of-cut, transport lock, and brake controls.
System consists of radio transmitter, receiver, actuators, and inclinometer.
Adjust the deck lift handle and adjustment pin for desired cutting height.
Turn the valve to the left or right tank, or to the off position.
Steps to stop the mower in an emergency, including pushing E-Stop and engaging brake.
Procedure to start the engine, including disengaging brake and turning on remote.
Move joystick slowly, engage PTO, and adjust speed; keep throttle at fast position.
Ensure PTO is disengaged, reduce throttle, turn off remote, and wait for engine stop.
Bypass transaxles to move the unit with the engine off.
Engage transport lock, move to vehicle, secure frame, and turn off fuel.
Pull deck lift handle forward and lift release lever to disengage lock.
Mow on a 45-degree angle for best embankment control and turning.
Mow side-to-side across an area, moving back and forth.
Mow straight up and down the slope, turning at top or bottom.
Park on a flat surface, stop engine, engage brake, and prepare for service.
Measures engine runtime, displays service alerts, and recommended intervals.
Contact RC Mowers to purchase common service parts for your unit.
Check oil level in expansion tanks; it should reach the cold fill indicator mark.
Fill expansion tanks with 15W-50 synthetic oil until oil reaches the cold fill indicator mark.
Warm oil, stop engine, drain oil, replace filter, and refill with new oil.
Disconnect spark plug wires, remove hardware, and then remove blades.
File or grind metal from each cutting edge; check blade balance after sharpening.
Disconnect cables, remove hold-down bracket, and then remove the battery.
Clean terminals and battery cable ends with a wire brush and coat with grease.
Install battery, secure bracket, reconnect cables, and place boot over terminal.
Check battery voltage; charge if less than 11.5V using an automatic charger.
Apply oil to pivot points and pump grease into grease fittings.
Replace fuses with correct amperage rating; determine cause of failure.
Replace defective fuse with one of the same amperage rating.
Engage brake, stop engine, remove key, and remove PTO belt.
Release spring tension and remove the mower drive belt.
Install belt around pulleys and reinstall idler spring hook for tension.
Install PTO belt around clutch sheave and pulleys, then align with idlers.
Adjust anti-scalp wheels for different cutting heights; set all to same height.
Disconnect PTO belt, engage transport lock, support deck, and lower.
Position deck under unit, connect arms and lift links, secure with hardware.
Measure blade distance to ground to check deck level and pitch.
Loosen jam nuts and turn adjustment bolts to level the deck sides.
Adjust bolts to set front of blades lower than rear for optimal cut quality.
Remove hardware, reverse brake plates, and secure to clutch bracket.
Device complies with FCC, Industry Canada, and European Union regulations.
Complies with license-exempt RSS standards; operation subject to two conditions.
OEM integrator responsible for testing end product for compliance requirements.
Warranty duration for commercial use, rented, or leased products.
Details warranty term exclusions and limitations for components and wear.
| Brand | RC Mowers |
|---|---|
| Model | 52XP |
| Category | Lawn Mower |
| Language | English |