EasyManua.ls Logo

RCA RP-3751

RCA RP-3751
3 pages
To Next Page IconTo Next Page
Loading...
Listening to compact disc
If the disc compartment is empty, or the disc cannot be
played, the LED message “nd” flashes.
Do not store CDs in damp areas. Do not expose CDs to
high temperatures.
You should avoid leaving the CD door open. Dust is liable
to impair performance of the laser optical unit.
THE DIGITAL CD CLOCK RADIO
1
Select CD
1
Lift to open the door
2
OPEN/CLOSE
Insert a disc and close the door
3
Press
4
PLAY/
PAUSE
Adjust to
your desired listening level
5
VOLUME
MIN MAX
You may listen through a headphone by inserting
one into on the left side of the unit.
Note that while the alarm is on, the speaker will
sound as well although a headphone is inserted.
PHONES
CD
AM
FM
Press to repeat the entire disc playback and
the LED indicator will light
Press to play music randomly and the LED
indicator will light
Press to pause playback
Press to stop playback
Press or to select track
REPEAT
SHUFFLE
PLAY/
PAUSE
STOP
Listening to radio
Sleep to CD/radio
THE DIGITAL CD CLOCK RADIO
You can drift off to sleep to CD/radio knowing that the unit will turn
itself off automatically. If alarm is set, the unit will turn on again as
programmed.
• If you decide to turn off the unit sooner, press
or and this will shut off the sleep cycle.
• When sleep mode is active, subsequent presses on
will show the remaining time before the unit
goes off.
SNOOZE
POWER
SLEEP
Press and hold and the
LED indicator will light
SLEEP
ON
Adjust to
your desired listening level
VOLUME
MIN MAX
Turn to your desired station
TUNING
2
Select AM/FM
CD
AM
FM
3
Press or to select time
from 1 minute to 1 hour and 59
minutes (When 0 is reached, the
unit goes off)
1
Press to turn on the radio
POWER
4
2
3
• To improve reception, you may try and:
1. move or rotate the unit
2. slide on the left side of the unit to MO
• To turn off the radio, press again
ST
MO
POWER
Listen to CD/radio (AM/FM)
1
Question and Answer IconNeed help?

Do you have a question about the RCA RP-3751 and is the answer not in the manual?

RCA RP-3751 Specifications

General IconGeneral
BrandRCA
ModelRP-3751
CategoryClock Radio
LanguageEnglish

Summary

CD Playback Operations

Select and Play CD

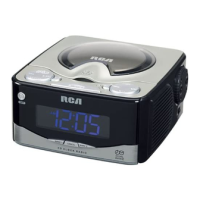
Steps to select a CD, open the door, insert a disc, and close the door for playback.

CD Playback Controls

Controls for repeating, shuffling, pausing, stopping, and selecting tracks on a CD.

Volume Adjustment

How to adjust the listening volume level for CD playback.

CD Usage Precautions

Important notes regarding disc compartment status, storage, and laser unit care.

Radio Operations

Select and Tune Radio

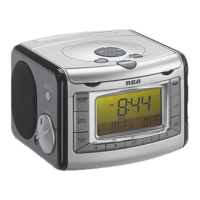
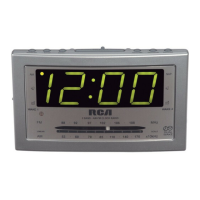
Steps to select AM/FM bands and tune to a desired radio station.

Radio Volume and Reception

Adjusting volume and tips to improve radio reception quality.

Turning Off Radio

Procedure to turn off the radio unit.

Sleep Function

Setting Sleep Timer

How to set the unit to automatically turn off after a selected time while playing CD or radio.

Managing Sleep Mode

Options to end the sleep cycle early or check remaining sleep time.

Alarm Setup

Setting Alarm Tone

Procedure to set the alarm to sound with a tone, including GRADUWAKE feature.

Setting Alarm Music

Steps to set the alarm to play music from CD or radio, specifying track or station.

Alarm Precautions

Notes on alarm behavior with empty CD compartment, ALARM 2, and dual music alarms.

Alarm Management

Stopping Alarms

Methods to silence an alarm momentarily, stop it for the day, or cancel it completely.

Snooze Functionality

How to activate and adjust the snooze duration for extra sleep time.

Power and Safety Information

Mains Connection

Details on the power supply voltage and how to connect the unit to the mains.

Polarized Plug Safety

Safety instructions regarding the polarized AC power plug and outlet compatibility.

Warranty Information

Canadian Warranty Details

Information on warranty coverage, exclusions, and procedure for claims.

Out of Warranty Service

Contact information for obtaining service for products outside the warranty period.

Related product manuals