10
Setting Up the VCR
Startup
7.Use TV•VCR button.
Skip this step if you used one of the advanced hookups.
When using one of the basic hookups, the TV•VCR button lets
you switch between the picture coming from the VCR or
television channels. This button lets you record a program on
the VCR while watching another channel on the TV. Details
are on page 20.
A. Press TV•VCR to see the picture from the VCR.
The VCR indicator lights in the display panel.
B. Press CHANNEL up or down to change channels on
the VCR. The channel number changes on the TV screen.
C. Press TV•VCR to see the TV channels.
The VCR indicator does not light in the display panel.
Change channels using the TV’s remote.
D. Return the TV to the VCR viewing channel —
CH3 or CH4.
E. Press TV•VCR to switch back to the picture from
the VCR.
8.Set AUTO TV/VCR feature.
Skip this step if you used one of the basic hookups.
If you connected your VCR using the TV’s video input, you
can prevent the VCR indicator from turning on automatically.
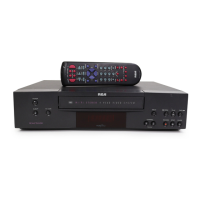
A. Press MENU on remote to display the VCR MAIN MENU.
B. Press 4 to display SETUP OPTIONS.
C. Press 3 to select AUTO TV/VCR: ON or OFF.
• Select ON if you used one of the basic hookups and
watch your VCR on channel 3 or 4 of your TV. Then,
you press the TV•VCR button to turn the VCR indicator
on or off to switch between the picture coming from the
VCR or television channels.
• Select OFF if you used one of the advance hookups and
watch your VCR on the video input channel of your
TV. The VCR indicator does not turn on automatically.
Pressing TV•VCR on the remote still turns the VCR
indicator on or off.
VCR MAIN MENU
1 TIMER PROGRAMMING
2 REVIEW PROGRAMS
3 CHANNEL SETUP
4 VCR SETUP OPTIONS
SETUP OPTIONS
1 REMOTE CONTROL: VCR1
2 AUTO PLAY: ON
3 AUTO TV/VCR: ON
4 AUDIO SETUP
0 EXIT TO MAIN MENU