5
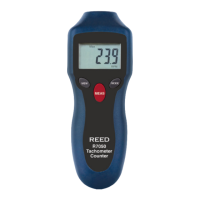
Instrument Description
1. PhotoTachometerLaserSensor
2. Power Adapter Input
3. ModeButton
4. MemoryButton
5. MeasurementButton
Operating Instructions
Applying Reflective Marking Tape
1. Cutandpeelthereectivetapeprovidedintoapproximately
0.5"(12mm)squares.
2. Applyonesquaretothesurfaceoftheobjectbeingmeasured.
3.
Thenon-reectiveareamustalwaysbegreaterthanthereectivearea.
4. Iftheshaftorrotatingobjectisnormallyreective,itmustbecovered
withblacktapeorblackpaintbeforeattachingreectivetape.
5. Thesurfaceoftheobjectbeingmeasuredmustbecleanandsmooth
beforeapplyingthereectivetape.
RPM Measurement Mode
1. Applyasmallpieceofreectivetapetotheobjectbeingmeasured
(seeApplying Reflective Marking Tape sectionfordetails).
2. ToselectRPMmeasurementmode,pressandreleasetheMEAS
button to power the meter on and press the MODEbuttonuntilRPM
appears on the display.
3. Point the meter towards the target under test at a distance of
2to20"(50to500mm).
4. Press the MEAS button and align the laser light beam to the applied
reectivetape.
5. VerifythatthemeasurementindicatorappearsontheLCDwhenthe
reectivetapepassesthroughthelightbeamasindicatedby .
6. When the measurement button is released the last reading will
display for 5 to 10 seconds before the meter automatically turns off.
continued...
R7050
Tachometer
Counter
5
4
3
2
1
RPMREV
MEM
MEAS
MODE
REED Instruments
1-877-849-2127 | info@reedinstruments.com | www.reedinstruments.com