5
Operating Instructions
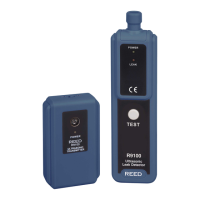
Leak Detector
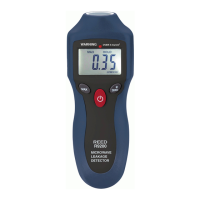
1. Plugtheheadphonesintotheheadphonejack.
2. Press and hold the TEST button. At this point, you can hear a
"tickingtone"throughtheheadphonesconrmingthatthedetector
is activated.
3. Startbyadjustingthevolumeoftheheadphonestoasuitablelevel,
thenadjustthedetectorsensitivitytoadesiredlevel.
Note: Rotate the sensitivity wheel upwards to decrease sensitivity. Rotate
downwards to increase sensitivity.
4. Continue to press and hold the TEST button while moving the probe
around the seals of the suspected area. Once the detector picks
uptheultrasonicsoundgeneratedbyaleak,the"tickingtone"
willincreaseinfrequencyandthe"LEAK"LEDlightwillturnON.
The closer the probe moves towards the leak, the frequency of the
"tickingtone"increases.
5. Once the leak is located and repaired, retest with the detector to
conrm there is no longer a leak.
Notes:
• Therearemanyfactorsinvolvedintheultrasonicleakdetection,such
as the pressure within the vessel under test, shape & size of the hole,
temperature, etc. In some cases, the ultrasonic sound emitted is very
weak. Always start by setting the detector's sensitivity to the highest
level at the beginning of the test.
• Ifthedetectedultrasonicsoundistoointensemakingitdifcultto
pinpointtheleakbecausethe"tickingtone"istoohigh,
decrease the sensitivity.
• Asultrasonicsoundattenuatesrapidlywhenittravelsovera
distance, move the detector as close as possible to the suspected leak.
Remember to always decrease the sensitivity if necessary. During
testing, move the probe slowly.
Transmitter
Thetransmittercansupplyultrasonicsignalswheregas/airleaksdonot
have sufcient pressure to create an ultrasonic sound.
continued...
REED Instruments
1-877-849-2127 | info@reedinstruments.com | www.reedinstruments.com