ENGLISH
4
FUNCTIONS
1. The Output Status LED -1- and Input Status LED -2- will show the Output and Input signal levels:
1.1 Output Signal
- OFF: when less than -24 dBV (LINE).
- FULLY LIT: when more than +2 dBV (LINE).
- FLASHING: when more than +14 dBV (LINE) - indicating clipping.
1.2 Input Signal
- OFF: when less than -28 dBV (LINE) / -60 dBV (PHONO).
- FULLY LIT: when more than -2 dBV (LINE) / -34 dBV (PHONO).
- FLASHING: when more than +10 dBV (LINE) / -22 dBV (PHONO) - indicating clipping.
2. If the Thru Buttons -3- are enabled, the audio signal will be sent straight from the input to the output. This function is
used in setups where no software is used (e.g. vinyl) and the signal does not need to be sent to a computer. The Thru
Button Status LED -4- will light up if Thru-mode is active.
3. USB Hub Status LED -5-:
- OFF: when the FLUX is connected in the USB-C to PC port via USB-C to USB-A cable - USB Hub is in passive mode.
- DIMMED: when a USB-A external power supply is connected to the USB-C DC IN port - USB Hub is in active mode
(less than 0.8 A per port).
- FULLY LIT: when a power source is supplied via either a USB-C computer or a USB-C external power supply (min 15
W) - USB Hub is in active mode (0.8 A per port).
4. The PD Status LED -6- lights up when a connected USB-C PD power supply is detected.
5. USB/DC Status LED -7-:
- FLASHING BRIEFLY ON POWER-UP: warning. Power may be insufcient (below or equal to 500 mA) for high power-
consumption USB Hub connections.
- DIMMED: FLUX is powered by a USB-A computer port or a USB-A external power supply (USB Hub may not be able
to deliver full output power).
- FULLY LIT: 15 W or more available either from a USB-C computer port or a USB-C power supply (USB Hub delivers
maximum output power).
6. The Outputs -8- and Inputs -12- will be connected to your mixer and playback device (turntable/CD player).
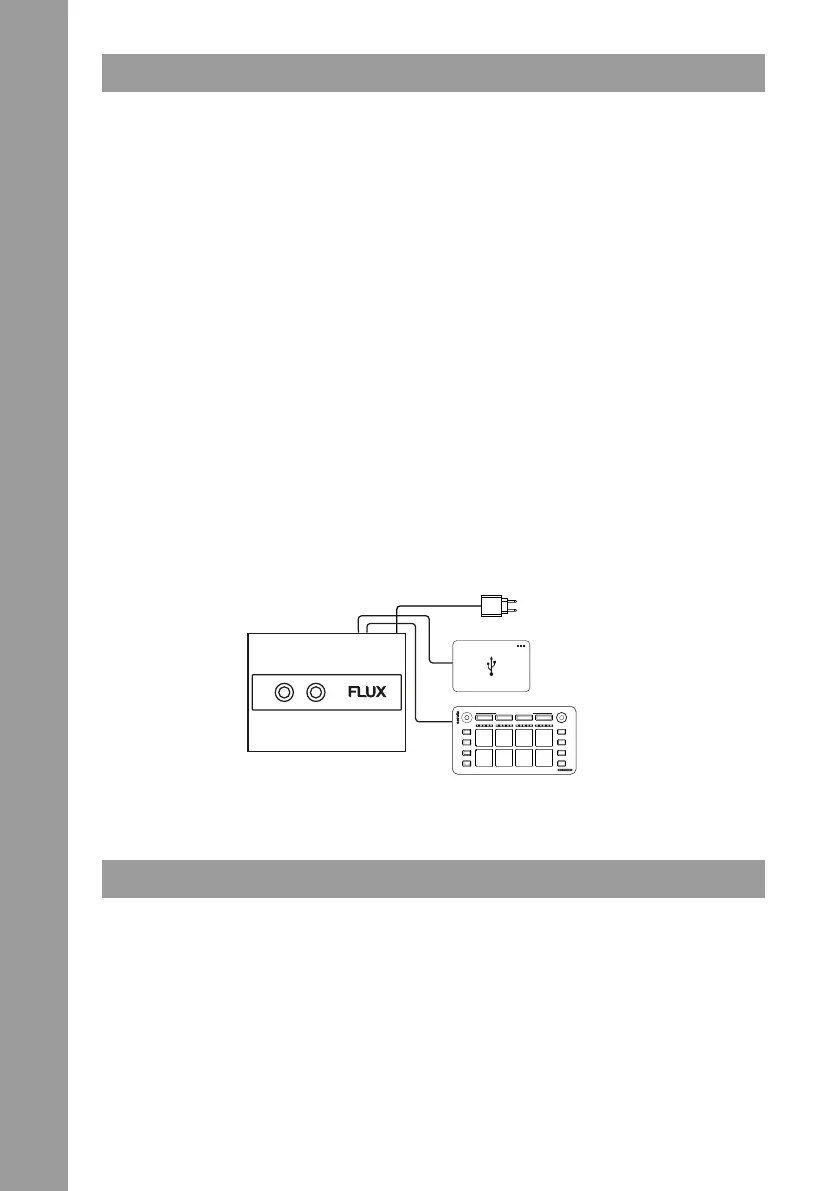
7. Two active USB Hubs -9- for connecting accessories such as MIDI devices, etc.
8. The USB-C PD-Port -10- connects the FLUX to your computer.
9. The USB-C DC In -11- connects the FLUX to an external power supply.
10. Switch the source between Phono/Line signal with the Phono/Line Source Switches -14-.
CONNECTIONS
To integrate the FLUX into a typical DJ setup, connect it to your turntables (or CD players) and mixer as follows (¬ Page 7):
1. INPUTS
Connect your turntables or CD players to the Deck Inputs -12- on the FLUX. If you are using turntables, connect their
earth wires to the earth terminal -13- on either the FLUX or your mixer.
2. INPUT LEVEL SELECTION
Set each input to the correct input level using the Phono/Line switches -14-. Set the switches to UP for Phono (turntables)
or DOWN for Line (CD players).
3. OUTPUTS
Connect the Outputs -8- on the FLUX to the Line Inputs on your mixer.
4. CONNECT THE FLUX TO YOUR COMPUTER
Using the provided USB cable, connect the USB-C PD port -10- on the FLUX to an available USB-C or USB-A port on
your computer. Make sure you connect it directly to your computer, not through a hub or splitter.
button
enabled
USB-C
USB-A
USB-C PD
INPUTS
OUTPUTS
Accessories
USB-A
HUB
USB-C
USB-A
USB-C
DC IN
USB-C
USB-C
USB-C PD
USB-C
DC IN
Power