5
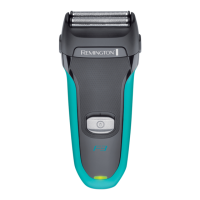
PARTS
1. On/o switch
2. Pivoting head and cutter assembly
3. Flexing heads
4. Hairpocket
5. Detail trimmer
6. Trimmer release button
7. Charging indicator light
8. Power connector
Not shown
9. Adaptor
10. Cleaning brush
11. Stubble head guard
GETTING STARTED
CHARGING
• It is recommended to fully charge your appliance before using it for the rst time.
• Ensure the product is switched o.
• The adaptor automatically adjusts to a main voltage between 100V and 240V.
• Connect the shaver to the adaptor and then to the mains.
CHARGING INDICATOR LIGHT
Charge Level Light
Charging The light will light up red
• Run time from fully charged is up to 40 mins.
• Charge time from empty is 16 hours.
• Note: To preserve the life of your batteries, let them run out every 6 months then
fully charge.
INSTRUCTIONS FOR USE
SHAVING
1. Slide the power switch to turn on.
2. Stretch the skin with your free hand so the hairs stand upright.
3. Only apply light pressure on the shaving head while shaving (pressing too hard can
damage the heads and make them vulnerable to breakage).
4. Use short, circular strokes.
TRIMMING
1. Push the trimmer button to release the detail trimmer.
2. Hold the trimmer at a right angle to your skin.
3. Place the trimmer at desired trim line for a quick, easy professional trim.
4. To retract the trimmer, push down until it locks into position.

 Loading...